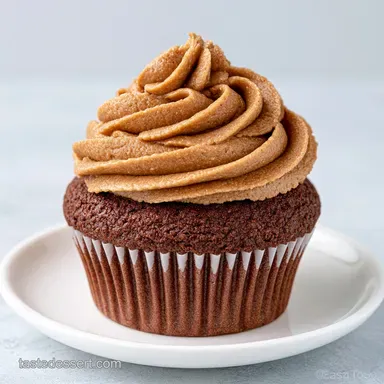
Chocolate Espresso Cupcakes: Rich and Velvety

- Time:15 minutes active + 20 minutes baking = Total 35 minutes
- Flavor/Texture Hook: Intense dark chocolate with a silky, espresso infused buttercream
- Perfect for: Afternoon pick me-ups, dinner party desserts, or a rainy Sunday treat
That first scent of hot espresso hitting cocoa powder is honestly one of my favorite things in the kitchen. It's not just a smell, it's like a heavy, aromatic cloud that fills the room and tells you that something decadent is happening.
I remember the first time I tried adding actual brewed coffee to a batter, I was terrified it would taste like a latte instead of a cake. I'd spent years using just a pinch of instant powder, but the results were always a bit flat, lacking that "oomph" you get from a high end cafe treat.
Then I had a morning where my espresso machine acted up, and I ended up with a small cup of lukewarm brew that I didn't want to waste. I poured it right into my chocolate batter on a whim. The way the batter transformed from a thick paste into a glossy, flowing ribbon was instant.
When they came out of the oven, the Chocolate Espresso Cupcakes didn't just taste like chocolate, they tasted like the most concentrated, rich version of chocolate I'd ever experienced.
It's the kind of treat that makes you want to close your eyes and just savor the bitterness of the coffee cutting through the sweetness of the frosting.
You can expect these to be incredibly moist, almost fudgy in the center, with a crumb that holds together but melts the second it hits your tongue. We're going with a bold contrast here: the dark, slightly bitter notes of the cake against a velvety, sweet espresso buttercream.
If you love a treat that feels sophisticated but takes almost no effort to pull off, these Chocolate Espresso Cupcakes are your new best friend. Let's get into the bits and pieces that make this actually work.
Chocolate Espresso Cupcakes
The heart of this recipe is the espresso. While some people use it just for the caffeine kick, the real hero is how the liquid interacts with the cocoa. Most home cooks just mix their dry ingredients and add room temp liquids, but by adding hot brewed espresso at the end, we're essentially "blooming" the cocoa powder. According to the experts at King Arthur Baking, treating cocoa with hot liquid releases the trapped flavor compounds, making the chocolate taste more intense.
But it's not just about the coffee. The use of buttermilk adds a subtle tang that balances the sugar and reacts with the baking soda to give these a beautiful, rounded lift. This prevents the cakes from feeling too heavy or dense, keeping them light enough that you can actually eat more than one without feeling like you need a nap immediately.
We're aiming for a specific contrast: a rich, dark base and a light, airy frosting.
If you're in the mood for something equally indulgent but with a different vibe, you might like my Butterscotch Fudge recipe, which has that same "melt in-your mouth" quality. But for those who need a caffeine infused sugar rush, these cupcakes are the gold standard. Trust me, once you start blooming your cocoa, you'll never go back to the old way.
The Secret To Deep Flavor
Instead of a long lecture, let's just look at why these Chocolate Espresso Cupcakes actually turn out so well. It comes down to a few simple reactions in the oven and the bowl.
- Cocoa Blooming: Hot espresso dissolves cocoa lumps and wakes up the flavor. This makes the chocolate taste darker and more "expensive."
- Buttermilk Lift: The acid in buttermilk breaks down gluten. This ensures the crumb is velvety rather than chewy.
- Fat Balance: Using oil instead of butter in the cake keeps them moist for days. Oil stays liquid at room temperature, so the cake never feels dry.
- Frosting Stability: Heavy cream and butter create a stable emulsion. This allows the frosting to hold those stiff, beautiful peaks.
Before we jump into the ingredients, it's helpful to see how the method compares to other ways of making cupcakes. Most of us stick to the oven, but some people swear by other methods.
| Method | Bake Time | Texture | Best For |
|---|---|---|---|
| Standard Oven | 20 minutes | Traditional, airy dome | Classic parties, large batches |
| Slow Cooker | 2 hours | Very fudgy, almost like lava cake | Small crowds, "set and forget" |
| Microwave | 2 minutes | Spongy, very moist | Single servings, instant cravings |
You'll notice the oven is the way to go here because it gives us that specific "cupcake" structure. A slow cooker version would be too dense for the espresso buttercream we're planning.
The Essential Ingredient List
Let's break down what's actually doing the work in these Chocolate Espresso Cupcakes. I've found that being picky about the cocoa powder makes a world of difference.
| Ingredient | Science Role | Pro Secret |
|---|---|---|
| Unsweetened Cocoa | Flavor base | Use Dutch processed for a darker color and smoother taste |
| Buttermilk | Tenderizer | If you're out, add a tsp of lemon juice to regular milk |
| Hot Espresso | Flavor catalyst | Ensure it's hot to the touch to properly bloom the cocoa |
| Powdered Sugar | Structure | Sift it first to avoid those annoying tiny white lumps |
When you're gathering your stuff, don't worry about having a professional espresso machine. A strong brew from a Keurig or even a very concentrated instant coffee mix works perfectly. The goal is a bold, dark liquid that doesn't dilute the chocolate flavor.
For the Cake Batter
- 1.5 cups all purpose flour Why this? Standard protein level for a sturdy but soft crumb
- 0.5 cup unsweetened cocoa powder Why this? Provides the deep, dark chocolate foundation
- 1 cup granulated sugar Why this? Dissolves easily for a smooth texture
- 1 tsp baking soda Why this? Reacts with buttermilk for a great rise
- 0.5 tsp baking powder Why this? Provides extra insurance for the lift
- 0.5 tsp salt Why this? Cuts the sweetness and enhances the coffee notes
- 2 large eggs Why this? Binds everything and adds structure
- 0.75 cup buttermilk Why this? Keeps the cake moist and tender
- 0.33 cup vegetable oil Why this? Ensures a velvety crumb that doesn't dry out
- 1 tsp vanilla extract Why this? Rounds out the sharp edges of the cocoa
- 0.5 cup hot brewed espresso Why this? The secret weapon for blooming the cocoa
For the Espresso Frosting
- 1 cup unsalted butter, softened Why this? The base for a creamy, stable frosting
- 3 cups powdered sugar Why this? Provides sweetness and holds the shape
- 1 tbsp instant espresso powder Why this? Adds a concentrated coffee punch without adding liquid
- 2 tbsp heavy cream Why this? Adds silkiness and adjustability to the consistency
- 1 tsp vanilla extract Why this? Balances the intensity of the espresso powder
If you don't have some of these on hand, don't panic. Most of these can be swapped without ruining the batch.
| Original Ingredient | Substitute | Why It Works |
|---|---|---|
| Buttermilk (0.75 cup) | Milk + 1 tsp Vinegar | Similar acidity. Note: Let it sit 5 mins first |
| Vegetable Oil (0.33 cup) | Melted Coconut Oil | Similar fat content. Note: Adds a slight coconut hint |
| Espresso Powder | Very finely ground coffee | Same flavor profile. Note: May feel slightly grainy |
| Heavy Cream (2 tbsp) | Whole Milk | Provides moisture. Note: Frosting will be slightly softer |
I've found that using coconut oil actually makes these feel a bit more like a gourmet treat, though the vegetable oil is the safest bet for a neutral flavor. Just a heads up, avoid using "low-fat" butter for the frosting. You need that fat for the structure, otherwise, your swirls will just slump over.
The step-by-step Process
Right then, let's get these in the oven. I like to get all my dry ingredients together first so I'm not scrambling while the espresso is getting cold.
- Preheat your oven to 350°F (175°C). Line a 12 cup cupcake pan with paper liners. Note: Liners prevent sticking and keep the cakes moist.
- Sift the flour, cocoa powder, baking soda, baking powder, and salt into a large bowl. Whisk in the granulated sugar. Note: Sifting is non negotiable for cocoa powder as it loves to clump.
- Add the eggs, buttermilk, vegetable oil, and vanilla extract to the dry mix. Stir until the batter is smooth and glossy. Note: Don't overmix here, just stir until the flour streaks vanish.
- Carefully stir in the hot brewed espresso. The batter will thin out significantly, which is exactly what we want. Note: The heat is what activates the cocoa.
- Fill each cupcake liner approximately 2/3 full. Note: Leaving space allows them to rise without spilling over the edges.
- Bake for 18-22 minutes until a toothpick inserted into the center comes out with just a few moist crumbs. Note: Do not overbake, or you'll lose that fudgy center.
- Let the cupcakes cool completely on a wire rack. Note: Frosting a warm cake is a recipe for a melted mess.
- Beat the softened butter with a hand mixer or stand mixer such as KitchenAid until it looks pale and fluffy. Slowly mix in the powdered sugar and instant espresso powder. Note: Start slow so the sugar doesn't fly everywhere.
- Blend in the heavy cream and vanilla extract. Whip on high until the frosting is airy and holds a stiff peak. Note: If it's too soft, add another tablespoon of powdered sugar.
- Pipe the frosting in swirls onto the cooled cupcakes. Note: Using a large round tip gives that professional bakery look.
Precision Checkpoints for Success
- - Batter Consistency
- After adding the espresso, the batter should be pourable and glossy, not a thick paste.
- - Bake Temp
- Ensure your oven is exactly 350°F; too hot and they'll peak and crack, too low and they won't rise.
- - Frosting Peak
- When you lift the beater, the frosting should stand straight up without drooping.
Pro Tips and Pitfalls

One mistake I once made was using coffee that was too weak. I thought any "coffee" would do, but the result was a cake that just tasted like standard chocolate. You want that brew to be strong, almost like a syrup. If you're using a drip machine, use double the coffee grounds for the same amount of water.
Another thing to watch out for is the temperature of your butter for the frosting. If it's too cold, you'll get lumps. If it's melted, the frosting will never stiffen. It should be "room temperature," meaning you can press your finger into it and it leaves an indent, but the butter still holds its shape.
Chef's Note: For a real pro move, try freezing your butter for 10 minutes before you start whipping it for the frosting. This gives it a slightly firmer base that allows you to whip in more air, resulting in a cloud like texture that doesn't feel overly greasy.
If you're looking for other ways to use chocolate in your baking, you might be interested in my German Chocolate Cake recipe, which uses a totally different frosting profile but is just as decadent.
Common Baking Issues
But what about the sogginess or the sinking? We've all been there. Usually, it's a simple fix.
Troubleshooting Common Issues
| Issue | Solution |
|---|---|
| Why Your Cupcakes Sank | If the tops of your cupcakes collapsed after coming out of the oven, you likely opened the oven door too early. The sudden rush of cool air can cause the delicate structure to collapse before it's set |
| Frosting Is Runny | Runny frosting usually happens because the butter was too warm or you added too much cream. You can fix this by chilling the whole bowl in the fridge for 15 minutes and then whipping it again on high. |
| Can You Use A Mixer | While you can stir the batter by hand, I highly recommend a mixer for the frosting. Getting that "airy" texture requires incorporating a lot of oxygen, which is hard to do with a whisk. |
Mistakes Checklist:
- ✓ Did you sift the cocoa powder? (Prevents bitter lumps)
- ✓ Is the espresso actually hot? (Ensures the cocoa blooms)
- ✓ Did you wait for cupcakes to be cold? (Prevents frosting melt)
- ✓ Is the butter properly softened? (Ensures a smooth swirl)
- ✓ Did you stop mixing once the flour disappeared? (Prevents toughness)
Simple Ways To Scale
Sometimes you only want a few treats, or you're feeding a whole office. Adjusting Chocolate Espresso Cupcakes is pretty straightforward, but there are a few rules to follow.
Scaling Down (For 6 Cupcakes): Use half of everything. The trickiest part is the egg. Crack one egg into a small bowl, beat it well, and then use exactly half of that mixture (about 2 tablespoons).
Reduce the bake time by about 2-3 minutes, as smaller batches sometimes cook faster depending on your pan.
Scaling Up (For 24-36 Cupcakes): When doubling or tripling, don't just multiply the salt and baking soda linearly. Increase salt and leavening agents to only 1.5x the original amount to avoid a metallic aftertaste. Work in batches if your mixer can't handle the volume.
If you're baking multiple trays at once, lower the oven temp to 325°F (160°C) and extend the time by 5 minutes to ensure even heat distribution.
If you're making a massive batch, I suggest preparing the batter and frosting in two separate stages. This keeps the batter from sitting too long and losing its lift while the first tray is in the oven.
| Batch Size | Flour Amount | Eggs | Bake Time Adjustment |
|---|---|---|---|
| 6 Cupcakes | 0.75 cup | 1 (half beat) | - 3 minutes |
| 12 Cupcakes | 1.5 cups | 2 | Standard (20 min) |
| 24 Cupcakes | 3 cups | 4 | + 5 minutes (if 2 trays) |
Debunking Cake Myths
There are a lot of "rules" floating around the internet about baking that just aren't true. Let's clear a few things up.
Myth: Espresso makes the cake taste like coffee. Truth: In a chocolate cake, espresso actually acts as a flavor enhancer. It doesn't make the cake taste like a cup of Joe; instead, it makes the chocolate taste "more chocolatey" by deepening the earthy notes of the cocoa.
Myth: You must use a stand mixer for cake batter. Truth: For a simple batter like this, a whisk and a bowl are perfectly fine. The only place where a mixer is mandatory is the buttercream frosting, where you need to aerate the butter to get that velvety feel.
Myth: Sifting flour is just for show. Truth: While you can get away with not sifting flour, you cannot skip sifting cocoa powder. Cocoa is naturally hydrophobic and clumps easily, which leads to bitter pockets of raw powder in your finished cupcakes.
Storage Guidelines
To keep your Chocolate Espresso Cupcakes tasting fresh, you have a few options. Because of the oil in the batter, these stay moist much longer than butter based cakes.
Fridge Storage: Store them in an airtight container in the fridge for up to 5 days. The frosting will firm up, so let them sit at room temperature for about 20 minutes before eating to get that silky texture back.
Freezing Tips: You can freeze these for up to 3 months. I recommend freezing them without frosting. Once frozen, place them in a freezer safe bag. Thaw them on the counter for an hour and then frost them fresh.
If you've already frosted them, freeze them in a single layer with parchment paper between them so the swirls don't get squashed.
Zero Waste Ideas: If you have a bit of batter left over, don't throw it away. Put it in a small ramekin and microwave it for 60-90 seconds for a quick "mug cake" treat. If you have leftover frosting, freeze it in small dollops on a tray, then move them to a bag.
They make great toppings for warm brownies or slices of pound cake.
Serving and Enjoying
The best way to serve these is at a cool room temperature. If they're too cold, the butter in the frosting masks the espresso flavor. If they're too warm, the frosting loses its structure.
Perfect Pairings
- - Cold Milk
- The classic choice. The creaminess balances the coffee bitterness.
- - Fresh Raspberries
- Place a single raspberry on top of the frosting for a tart, bright contrast.
- - Black Tea
- A strong Earl Grey tea complements the espresso notes without competing with the chocolate.
Plating Ideas
For a dinner party, I like to put each cupcake on a small white ceramic plate. Dust a tiny bit of cocoa powder over the top of the frosting and add a single coffee bean for a professional touch. If you're serving them casually, a tiered cake stand works wonders to make them look like they came from a boutique bakery.
If you're craving something different but still want that cheesecake vibe, try my Strawberry Cheesecake Cookies as a lighter alternative to follow these rich cupcakes.
Right then, you're all set. These Chocolate Espresso Cupcakes are a total crowd pleaser because they hit all the right notes: sweet, bitter, moist, and airy. Just remember to bloom that cocoa and don't overbake them, and you'll have a dessert that tastes like it took hours when it really only took 35 minutes.
Happy baking!
Recipe FAQs
Can I replace the buttermilk with regular milk?
No, stick with buttermilk. The acidity in buttermilk reacts with the baking soda to provide the necessary lift and moisture for a tender crumb.
How long do these cupcakes stay fresh in the fridge?
Up to 5 days. Keep them in an airtight container and let them sit at room temperature for 20 minutes before serving to restore the frosting's silky texture.
Can I use a stand mixer for the batter?
Yes, you can. While stirring by hand works, a mixer is faster; just be careful not to overmix the batter once the flour is added.
Is it true that opening the oven door early doesn't cause cupcakes to sink?
No, this is a common misconception. A sudden rush of cool air can cause the delicate structure of the cupcake to collapse before it has fully set.
How to fix runny espresso frosting?
Chill the bowl in the fridge for 15 minutes. After chilling, whip the frosting again on high until it is airy and holds a stiff peak.
How to freeze these cupcakes for later?
Freeze them without frosting in a freezer safe bag. This method preserves the cake's quality for up to 3 months.
What is the best accompaniment for these cupcakes?
Pair them with a cold cream dessert. These cupcakes taste incredible alongside a scoop of vanilla bean ice cream to balance the bold espresso notes.
Chocolate Espresso Cupcakes