Classic New York Cheesecake Recipe
- Time: Active 30 minutes, Passive 8 hours 15 mins, Total 8 hours 45 mins
- Flavor/Texture Hook: Silky smooth filling with a buttery, shatter crisp crust
- Perfect for: Holiday centerpieces, milestone birthdays, or showing off your baking skills
- Master the Ultimate Classic New York Cheesecake Recipe
- My Secret to Perfect Results
- Component Analysis for Superior Texture
- Essential Ingredients and Swaps
- Tools for the Best Bake
- Step-by-Step Baking Guide
- Solving Common Baking Pitfalls
- Adapting the Recipe Size
- Debunking Cheesecake Myths
- Storing and Keeping it Fresh
- Best Toppings and Pairings
- Recipe FAQs
- 📝 Recipe Card
Master the Ultimate Classic New York Cheesecake Recipe
The kitchen is quiet, but the air is heavy with the scent of toasted butter and vanilla. I still remember the first time I pulled a cheesecake out of the oven only to watch a canyon sized crack open right across the middle as it cooled.
It was heartbreaking, but it taught me that this cake isn't just about mixing ingredients it's about managing temperature. This Classic New York Cheesecake Recipe is my way of sharing everything I learned from those early mistakes so you can skip the heartbreak and go straight to the glory.
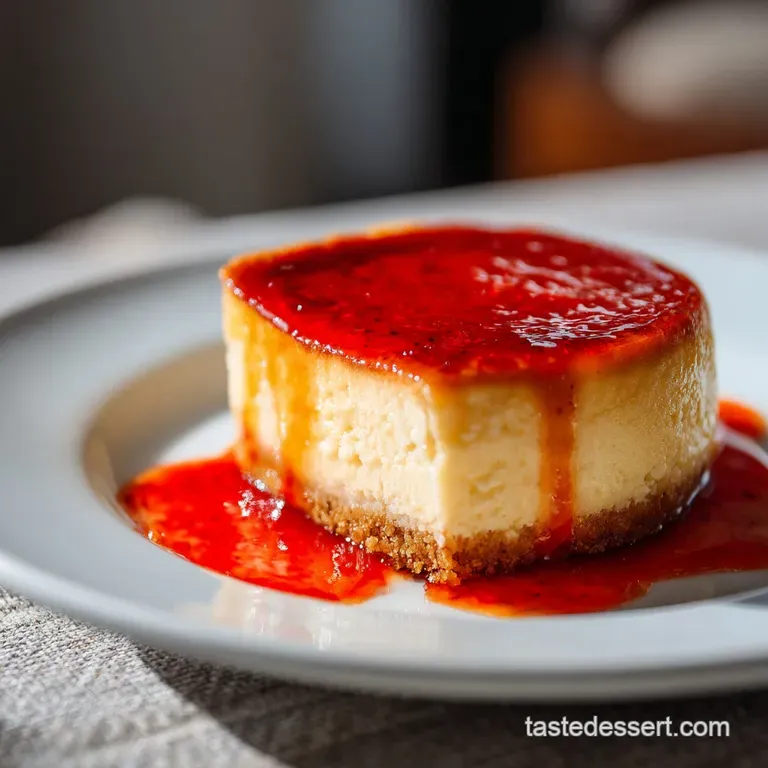
We are looking for that specific contrast: a crust that offers a satisfying shatter when your fork hits it, leading into a filling so rich it practically melts. Most people settle for "good enough" cheesecakes that are either too airy or too dry. We aren't doing that here.
We're going for the timeless, cherished texture that defined the old school diners of Manhattan.
You can expect a slice that stands tall on the plate. It isn’t light or fluffy like a mousse; it’s substantial, tangy, and deeply satisfying. This is the kind of dessert that stops the conversation at the dinner table.
It takes a bit of patience, but I promise the look on your friends' faces when they see that smooth, unblemished surface is worth every second of waiting.
My Secret to Perfect Results
Achieving that signature dense yet silky mouthfeel requires a bit of kitchen physics. Here is exactly why this method works so well compared to other versions you might have tried.
- Protein Stabilization: Using full fat brick cream cheese provides the necessary structural fat content to prevent the cake from collapsing as it cools.
- Emulsification Control: Adding eggs one at a time at room temperature ensures they bond perfectly with the fats, preventing a grainy or separated texture.
- Thermal Buffering: The water bath (bain marie) acts as a heat shield, keeping the internal temperature of the cake from exceeding 160°F (71°C), which is the point where eggs turn rubbery.
- Starch Integration: A small amount of all purpose flour binds to the moisture in the sour cream, acting as a safety net against "weeping" or moisture loss.
| Method | Time | Texture | Best For |
|---|---|---|---|
| Traditional Water Bath | 1 hours 15 mins | Velvety, dense, even | Authentic NYC texture |
| No Bake Style | 20 minutes | Light, mousse like | Quick summer treats |
| over High heat Blast | 50 minutes | Browned top, soft | Basque style lovers |
Choosing the traditional water bath method is what defines the "York" style. While it takes longer, the humidity in the oven keeps the surface supple, allowing the cake to expand and contract without snapping. If you are looking for a smaller version of this flavor profile, you might enjoy my New York Style recipe for mini versions.
Component Analysis for Superior Texture
Every ingredient in this recipe has a specific job to do. When we choose our elements carefully, the result is a timeless dessert that tastes like a professional bakery creation.
| Ingredient | Science Role | Pro Secret |
|---|---|---|
| Cream Cheese | Provides structure and fat | Use bricks only; tub varieties have too much air and water. |
| Sour Cream | Adds acidity and creaminess | Softens the "heavy" fat of the cheese for a brighter finish. |
| Granulated Sugar | Sweetens and tenderizes | Whisk slowly to avoid aerating the batter too much. |
| Large Eggs | Acts as the primary binder | Never over beat once these are in, or the cake will puff and crack. |
The balance of fats here is critical. We want enough fat to feel luxurious but enough acidity from the lemon and sour cream to keep it from feeling cloying. This delicate balance is similar to how we manage rich flavors in a Classic New York recipe.
Essential Ingredients and Swaps
To get that authentic result, stick to these exact measurements. I've included a few tested swaps just in case you find yourself missing a pantry staple.
- 200g graham cracker crumbs: These provide the toasted, honey like base.
- 350g granulated sugar: Divided between the crust (about 50g) and the filling (300g).
- 115g unsalted butter, melted: Why this? It binds the crumbs into a sturdy, non crumbly floor.
- 2g fine sea salt: Just a pinch to make the crust flavor pop.
- 900g full fat brick cream cheese: Must be at room temperature to avoid lumps.
- 240g full fat sour cream: Why this? Adds that signature NYC tang and smoothness.
- 15ml pure vanilla extract: For deep, aromatic warmth.
- 10ml fresh lemon juice: Provides the necessary acid to set the proteins.
- 4 large eggs + 1 egg yolk: The extra yolk adds a boost of golden color and richness.
- 20g all purpose flour: Prevents the batter from cracking by stabilizing the proteins.
Chef's Tip: Grate a tiny bit of fresh lemon zest into the crust before baking. It creates a bright aromatic bridge between the crunchy base and the creamy filling.
Tools for the Best Bake
You don't need a professional kitchen, but a few specific tools will make your life much easier. The most important is a 23cm (9 inch) springform pan with high sides.
- Springform Pan: Essential for removing the cake without flipping it.
- Stand Mixer: Using the paddle attachment keeps air incorporation to a minimum.
- Large Roasting Pan: Must be wide enough to hold the springform pan with space for water.
- Heavy Duty Aluminum Foil: I recommend the extra wide rolls to ensure a watertight seal.
- Silicone Spatula: For scraping the very bottom of the bowl to ensure no cream cheese streaks remain.
step-by-step Baking Guide

Follow these steps closely. The order of operations is just as important as the ingredients themselves when you're aiming for that perfect finish.
1. Prepping the Watertight Seal
Preheat your oven to 160°C. Wrap the exterior of your springform pan in three layers of heavy duty foil, bringing it all the way up to the rim. Note: This prevents water from seeping into your crust during the bake.
2. Achieving the Perfect Crust
Mix 200g graham crumbs, 50g sugar, 115g melted butter, and salt in a bowl. Press the mixture firmly into the bottom and 2cm up the sides of the pan. Bake for 10 minutes until it smells toasted and golden, then let it cool completely.
3. Mixing the Creamy Filling
Beat the 900g cream cheese and 300g sugar on medium low speed until no lumps remain. Use a slow speed to keep air out. Add the sour cream, vanilla, lemon juice, and flour, mixing just until combined.
4. Integrating the Eggs
Add the eggs and the extra yolk one at a time. Mix on the lowest speed after each addition until the yellow streaks just disappear. Over mixing at this stage is the leading cause of surface cracks.
5. Baking to a Gentle Jiggle
Pour the batter over the cooled crust and place the pan inside the roasting pan. Fill the roasting pan with hot water halfway up the sides of the cheesecake. Bake for 1 hours 15 mins until the edges are set but the center still wobbles like Jell O.
6. Cooling for Structural Integrity
Turn off the oven and crack the door open about 10cm. Let the cheesecake sit in the oven for 1 hour. Note: This gradual cooling prevents the cake from shrinking too fast and cracking.
7. The Final Chill
Remove from the water bath, take off the foil, and run a thin knife around the edge. Chill in the fridge for at least 6 hours, or preferably overnight. The texture isn't set until it is completely cold.
Solving Common Baking Pitfalls
Even the best bakers run into trouble sometimes. Most cheesecake issues are visible on the surface, but they are usually caused by what happened inside the oven.
Fixing a Cracked Surface
Cracks are almost always caused by two things: too much air in the batter or cooling the cake too quickly. If your cake puffs up like a soufflé during baking, it’s a sign you whipped too much air into the eggs. When that air collapses as the cake cools, it pulls the surface apart.
Dealing with Lumpy Batter
If you see small white dots in your finished cake, the cream cheese was likely too cold when you started. It's impossible to get a smooth batter if the cheese is firm. If you find yourself with lumps mid mix, stop and let the bowl sit in a warm spot for 15 minutes before continuing.
| Problem | Root Cause | Solution |
|---|---|---|
| Soggy Crust | Water leaked through foil | Use extra wide foil or a silicone pan protector. |
| Grainy Texture | Eggs overcooked | Use a thermometer; pull the cake at 65°C internal. |
| Shrunken Edges | Cake stuck to the pan | Run a knife around the rim immediately after baking. |
Common Mistakes Checklist
- ✓ Leave dairy on the counter for 2 hours before mixing.
- ✓ Always use hot water for the water bath to maintain steady heat.
- ✓ Resist the urge to open the oven door during the first 60 minutes.
- ✓ Wipe your knife with a hot, damp cloth between every single slice.
- ✓ Tap the filled pan on the counter 5 times to pop surface bubbles.
Adapting the Recipe Size
If you need to change the yield, keep these ratios in mind. Cheesecake is essentially a custard, so physics matters when you change the volume.
Scaling Down (1/2 Batch) Use a 15cm (6 inch) pan. Reduce the baking time by about 20 minutes. Since the recipe calls for 4 eggs and 1 yolk, use 2 whole eggs and 1 tablespoon of whisked egg for the half batch.
Scaling Up (2x Batch) I don't recommend baking one giant cheesecake as the center will struggle to set before the edges overcook. Instead, bake two separate 23cm cakes. If you are baking them on the same rack, ensure there is at least 5cm of space between the roasting pans for airflow.
- 1. Crust
- 115g of butter is the exact amount to hold 200g of crumbs without it becoming greasy.
- 2. Temperature
- Pull the cake when the center reaches 65°C (150°F) for the creamiest result.
- 3. Resting
- 1 hour of cooling in the turned off oven is non negotiable for a smooth top.
Debunking Cheesecake Myths
Myth: You must use a springform pan or the cake will be ruined. Truth: You can use a regular deep cake pan if you line it with parchment "slings" that hang over the sides.
However, getting it out cleanly is much harder, and you risk marring the sides of your beautiful York Cheesecake Recipe.
Myth: Adding flour makes the cake "cakey" and dry. Truth: In a New York style recipe, 20g of flour acts as a stabilizer. It prevents the egg proteins from over bonding, which actually makes the cake creamier and less likely to weep liquid after it's sliced.
Storing and Keeping it Fresh
Storage: Keep your cheesecake in the fridge, tightly covered with plastic wrap or in an airtight container, for up to 5 days. The flavor actually improves after the first 24 hours as the vanilla and lemon mellow out.
Freezing: This cake freezes beautifully. Wrap individual slices in plastic wrap and then foil. They will stay fresh for up to 3 months. To serve, thaw in the fridge overnight. Do not thaw at room temperature or the crust may become soggy from condensation.
Zero Waste: If you have leftover crust crumbs, save them! They make an incredible topping for vanilla ice cream or can be stirred into pancake batter for a "cheesecake pancake" breakfast the next morning.
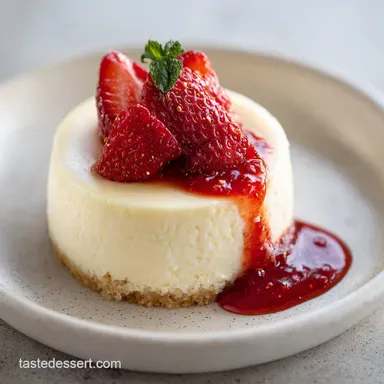
Best Toppings and Pairings
While this cake is a star on its own, a few additions can take it to the next level. I love a simple raspberry coulis the tartness of the berries cuts through the heavy fat of the cream cheese perfectly.
If you want something more indulgent, a drizzle of salted caramel and a sprinkle of toasted pecans is classic.
For a completely different vibe, you could even try serving it alongside a slice of Red Velvet Marble recipe for a dramatic dessert platter. The bright red cocoa notes of the cake look stunning next to the pale, creamy cheesecake.
- Base
- Salty, toasted, crunchy
- Heart
- Rich, dense, creamy
- Top
- Tangy, bright, smooth
Whatever you choose, remember that the best part of baking a Classic New York Cheesecake Recipe is the process. It forces you to slow down, pay attention to the details, and ultimately, share something truly special with the people you love. Happy baking!

Recipe FAQs
What is the secret to New York cheesecake?
It is controlling the temperature and fat content. The dense, velvety texture comes from using full fat brick cream cheese and incorporating eggs slowly at room temperature. This ensures a stable emulsion that resists cracking when baked gently in a water bath.
What makes a NY style cheesecake different from a standard cheesecake?
NY style is defined by its density and richness. Classic New York versions incorporate substantial sour cream and often a small amount of flour for stability, resulting in a tall, heavy, and extremely smooth cake, unlike lighter, fluffier versions often found elsewhere.
What is the secret to making good cheesecake?
The most critical secret is gradual cooling. After baking, turn the oven off and leave the cheesecake inside with the door cracked for at least one hour. This slow temperature descent prevents thermal shock, which is the primary cause of surface cracks.
Why is my cheesecake batter lumpy even though the cream cheese was softened?
The mixing order was likely incorrect, or the ingredients weren't fully incorporated. Add sugar to the cream cheese first and mix until perfectly smooth before introducing liquids and eggs.
If you enjoyed mastering the process of slow emulsification here, see how that same principle applies when stabilizing flavors in our Carrot Cake Recipe.
Should I skip the water bath to save time?
No, do not skip the water bath (bain marie). The steam created by the water keeps the oven environment humid, preventing the top and edges of the cheesecake from setting too quickly and drying out before the center is done.
How do I prevent the graham cracker crust from getting soggy?
Bake the crust separately for ten minutes first. Pre-baking sets the butter and crumbs, making them firm enough to resist absorbing moisture from the wet filling. This same technique of pre-setting a base helps prevent a soggy bottom in our Southern Pecan Pie Recipe.
Is it better to use a mix or make everything from scratch for authentic flavor?
Make everything from scratch for authentic flavor. Pre-made crusts lack the necessary buttery depth, and mixes rarely use the full fat brick cream cheese essential for the required dense texture.
Classic Ny Cheesecake Recipe
Ingredients:
Instructions:
Nutrition Facts:
| Calories | 499 kcal |
|---|---|
| Protein | 7.4 g |
| Fat | 35.2 g |
| Carbs | 40.3 g |
| Fiber | 0.5 g |
| Sugar | 29.4 g |
| Sodium | 312 mg |
