Coffee Crisp Dream Bars
Okay, buckle up, buttercups! let's talk coffee crisp dream bars , eh? ever get that hankering for something sweet, something nostalgic, but just a little bit fancy? i know, right? me too! that's where these bars come in.
Coffee Crisp Dream Bars: Homemade Goodness
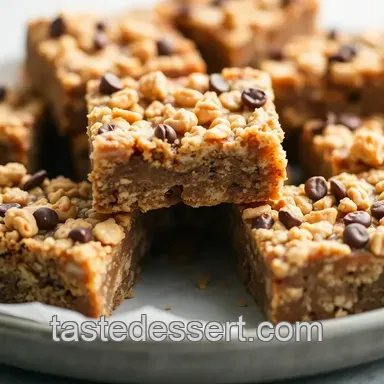
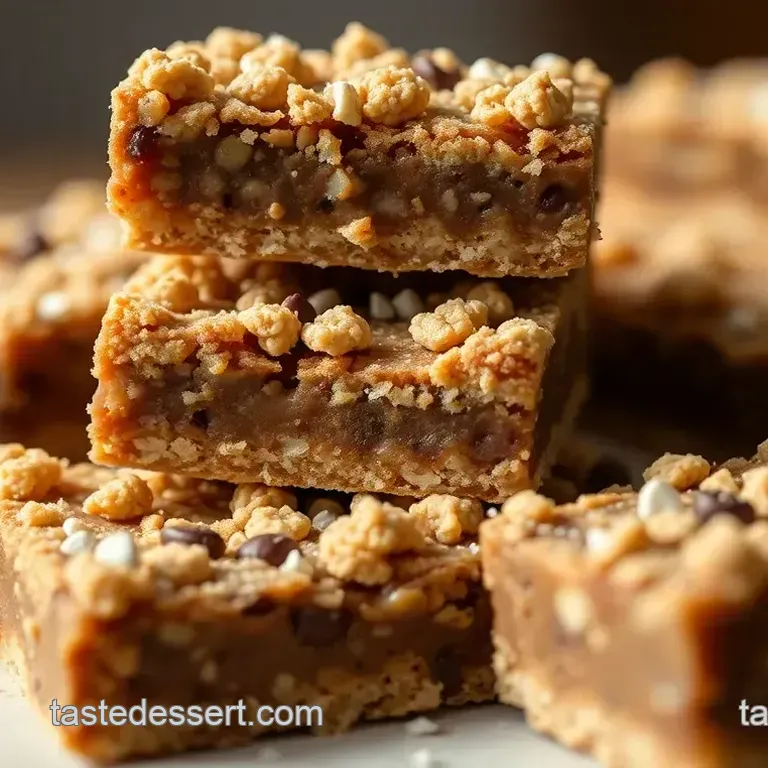
These aren't your average corner shop coffee crisp . honestly, these are next level. we're talking a grown-up, made from-scratch version that'll make you say "oh my gosh!".
Think layers of crispy, wafer like cookies slathered in a rich, dark chocolate coffee ganache. can you even? the flavor is intensely yummy.
I've baked these several times and i've learned to store the extras in the freezer!
A Little Bit of Nostalgia, A Whole Lot of Flavor
The original coffee crisp bar is a canadian classic, isn't it? it's got that je ne sais quoi that brings back memories of childhood and simpler times.
This recipe builds on that, adding sophistication and depth of flavor. it's a bit of a project, but the reward is so, so worth it.
Plan for about 2 hours of active time plus chilling. you'll get about 12-16 bars. perfect for sharing.
Coffee Obsession meets Chocolate Indulgence
Let's be real, the coffee flavor is where it's at. that little caffeine kick is enough to brighten you up.
Plus, dark chocolate is packed with antioxidants, so we can almost call it healthy, right? okay, maybe not, but it's good for the soul! these bars are ideal for an afternoon treat.
Especially after a long week. they're also a showstopper at any gathering, and i can tell you that a croissant and coffee for coffee breakfast is perfect.
I love the morning coffee aesthetic , and if you are on your coffee day don't forget to drinking coffee .
Time to dive into the ingredients. Trust me, you're gonna love this.
Alright, mate! So, we're tackling these Coffee Crisp Dream Bars, yeah? Here's the lowdown on what you'll need. Don't worry; it's easier than understanding cricket! We want that Croissant Aesthetic with a Coffee and Croissants twist, right?
Ingredients & Equipment
Let's get stuck in!
Main Ingredients
Right, for these bad boys, here’s what you’ll need. I remember one time I tried to eyeball it. Disaster! Measurements are your best friends, trust me.
For the "Wafer" Layers:
- 1 cup (120g) all-purpose flour, plus extra for dusting. (Us customary).
- ¼ tsp (1g) baking powder
- ¼ tsp (1g) salt
- ½ cup (1 stick or 113g) unsalted butter, super cold, cubed.
- 3-4 tbsp (45-60ml) ice water. Cold is key!
For the Coffee Ganache:
- 12 oz (340g) good quality dark chocolate (60-70% cacao), chopped up small. Honestly, the quality makes all the difference here.
- 1 cup (240ml) heavy cream (36% milk fat minimum).
- 2 tbsp (30g) unsalted butter, softened.
- 2 tbsp (30ml) strong brewed coffee, cooled. Gotta get that Coffee Obsession vibe.
- 1 tsp (5ml) vanilla extract.
- A pinch of salt.
For the chocolate, if it is high quality, you're on to a winner! think of a coffee date aesthetic. and, hey, if you are ever in doubt, make more rather than less.
It's always a winner.
Seasoning Notes
Spice wise, we're keeping it simple. The coffee does most of the heavy lifting. We need those Indian Snack Recipes in mind, but with a Coffee Crisp twist.
- Essential spice combinations: Just a pinch of salt in the ganache. That's all.
- Flavor enhancers: That strong brewed coffee is everything.
- Quick substitution options: If you're caffeine sensitive, use decaf. No biggie! Or you can just go to that Iced Coffee Shop Aesthetic.
Equipment Needed
Okay, nothing too fancy here, promise.
- Food processor. Makes the wafer dough way easier, but you can mix it by hand if needed.
- Rolling pin.
- Baking sheets.
- Parchment paper. Stops things from sticking, a life saver.
- 9x13 inch baking pan.
- Double boiler or heatproof bowl and saucepan. Don't burn that chocolate!
- Offset spatula or knife. For spreading that lush ganache! And, hey, we all Making Coffee, so you've probably got that sorted, right?
Honestly, you probably have most of this stuff already. a saucepan will do instead of the double boiler if you don't have one.
Just watch it like a hawk! now, get ready to create your own version of coffee day! you know you wanna enjoy that coffee drink!
Alright, let's dive into making some incredible coffee crisp dream bars! honestly, these are like the grown-up, gourmet version of those candy bars we all secretly love.
Time to channel your inner croissant aesthetic and get baking! they are perfect with coffee and croissants.
Prep Steps: Setting the Stage

First things first: mise en place! this basically means getting all your ingredients prepped and ready to go. like a surgeon, we want everything at our fingertips.
Chop your chocolate, cube that cold butter, and measure out everything else. it's the foundation for success.
Time Saving Tip : Measure out all your dry ingredients into one bowl and wet into another. It cuts down on the chaos. Oh my gosh, this is a big help!
Remember, cold butter is crucial for those flaky wafers. So, keep it chilled until the very last second. Safety First: Always be careful when using sharp knives!
Step-by-step: Making the Magic Happen
Here's the lowdown on creating these beauties:
- Make the "Wafer" Dough : Combine 1 cup (120g) flour, 1/4 tsp (1g) baking powder, and 1/4 tsp (1g) salt. Pulse in 1/2 cup (113g) cold, cubed butter until crumbly. Add 3-4 tbsp (45-60ml) ice water until the dough forms.
- Chill Out : Flatten the dough into a disc, wrap it up, and chill for at least 30 minutes. This helps the gluten relax and prevents tough wafers. You know? It's like a spa day for your dough!
- Bake the "Wafers" : Preheat your oven to 375° F ( 190° C) . Roll out the dough super thinly, cut into rectangles, and bake for 20 minutes , or until golden brown.
- Coffee Ganache Time : Melt 12 ounces (340g) chopped dark chocolate with 1 cup (240ml) hot heavy cream. Stir in 2 tbsp (30g) softened butter, 2 tbsp (30ml) cooled strong coffee, 1 tsp (5ml) vanilla extract, and a pinch of salt. I love the smell of coffee .
- Assemble and Chill : Layer ganache and wafers in a 9x13 inch pan, ending with ganache. Chill for at least 1 hour until firm.
Pro Tips: Level Up Your Bars
- Thin is In : The thinner the wafers, the better the Coffee Crisp crunch! So, roll that dough like your life depends on it.
- Chocolate Matters : Use good quality dark chocolate for the ganache. It's a game changer!
- Chill, Baby, Chill : Don't rush the chilling time! It's what makes these bars sliceable and gorgeous. Serve with iced coffee shop aesthetic. It creates that morning coffee aesthetic.
Honestly, these are the bomb!
Right, let's dive into those all-important Recipe Notes for our Coffee Crisp Dream Bars! Honestly, these are the bits that can make or break a recipe. It's all about the details, innit?
Recipe Notes: Nailing the Coffee Crisp Experience
These notes are essential to make it as smooth as possible for you.
Serving Suggestions: Time to Shine!
Okay, so you've made these amazing bars, what's next? Presentation is key! Think Crossiant Aesthetic but for coffee crisp .
- Plating and Presentation Ideas : Cut the bars into neat squares or rectangles. A dusting of cocoa powder adds a touch of elegance. Maybe a swirl of whipped cream. Imagine that Iced Coffee Shop Aesthetic !
- Complementary Sides or Beverages : Honestly, these bars are amazing with Morning Coffee Aesthetic . A Coffee And Croissants vibe, but make it Coffee Crisp! If you're not a coffee obsession type, try a glass of cold milk. It brings back childhood memories! Or why not offer it with a Coffee Drink , like a flat white?
Storage Tips: Keep That Goodness Fresh
No one wants a stale Coffee Crisp Dream Bar, right?
- Refrigeration Guidelines : Store the bars in an airtight container in the fridge. They'll last for up to 5 days.
- Freezing Options (if applicable) : You can freeze them. Wrap them individually in cling film, then place them in a freezer bag. They'll keep for up to 2 months.
- Reheating Instructions : Let them thaw in the fridge before serving. No need to reheat unless you fancy a slightly softer texture.
Variations: Putting Your Stamp On It
Fancy a twist? Why not? It's your kitchen, after all!
- Dietary Adaptations : For a gluten-free version, use a gluten-free flour blend for the wafers. For a vegan version, use a coconut cream instead of heavy cream for the ganache.
- Seasonal Ingredient Swaps : In autumn, add a pinch of cinnamon to the ganache. For summer, a hint of orange zest brightens things up. You know?
Nutrition Basics: The Good Stuff
Okay, let's face it, these are a treat. But it's good to know what you're getting.
- Simplified Nutrition Information : Roughly 450-550 calories per bar.
- Key Health Benefits : Okay, not health food. But dark chocolate has antioxidants, and coffee...well, it wakes you up! A Coffee Day treat, I suppose!
Right, there you have it! everything you need to know to make these coffee crisp dream bars a resounding success.
Don't be afraid to experiment and have fun. now, go make some magic in the kitchen! you got this! maybe even inspire a coffee date aesthetic , eh?
Frequently Asked Questions
My coffee crisp bars are too soft. What did I do wrong?
A common culprit is not chilling the bars long enough. The ganache needs sufficient time to firm up in the refrigerator, at least an hour, or even longer. Also, ensure your ganache is made with the correct ratio of chocolate to cream. Too much cream will result in a softer set.
Can I use milk chocolate instead of dark chocolate for my coffee crisp?
Absolutely, but be aware that it will significantly change the flavor profile, making it much sweeter. The original recipe calls for dark chocolate to balance the sweetness and complement the coffee flavor.
If you use milk chocolate, you might want to reduce the amount of sugar in the wafer layers slightly to compensate, otherwise, it might give you a proper sugar rush!
How do I store these homemade coffee crisp dream bars to keep them fresh?
Store your coffee crisp bars in an airtight container in the refrigerator. They'll keep well for up to a week. The fridge helps to maintain the texture of the ganache and prevent the wafers from becoming soggy.
You can also freeze them for longer storage (up to a month), but be aware that the texture of the ganache may change slightly upon thawing.
Is there a gluten-free version of this coffee crisp recipe?
Yes, you can make these coffee crisp bars gluten-free! Simply substitute the all-purpose flour in the "wafer" layers with a gluten-free all-purpose flour blend. Make sure the blend contains xanthan gum or another binding agent to help hold the wafers together.
Check all your other ingredients too to ensure they are gluten-free!
The wafers are too crumbly. How can I make them easier to roll out?
The key to less crumbly wafers is ensuring the butter is very cold and not overworking the dough. Use ice water and chill the dough thoroughly before rolling. If the dough still feels too dry, add a teaspoon of ice water at a time until it comes together.
Rolling between two sheets of parchment paper can also help prevent sticking and tearing.
Can I adjust the coffee flavor in the coffee crisp ganache?
Definitely! The recipe uses 2 tablespoons of strong brewed coffee. You can increase this to 3 tablespoons for a more intense coffee flavour, or decrease it to 1 tablespoon if you prefer a subtler taste.
You can also experiment with different types of coffee, like espresso or instant coffee, to achieve your desired flavour profile. Just remember that too much liquid can affect the ganache's consistency.
Coffee Crisp Dream Bars