Easy Cherry Cobbler Recipe: Buttery Topping

- Time:15 minutes active + 50 minutes baking = Total 65 minutes
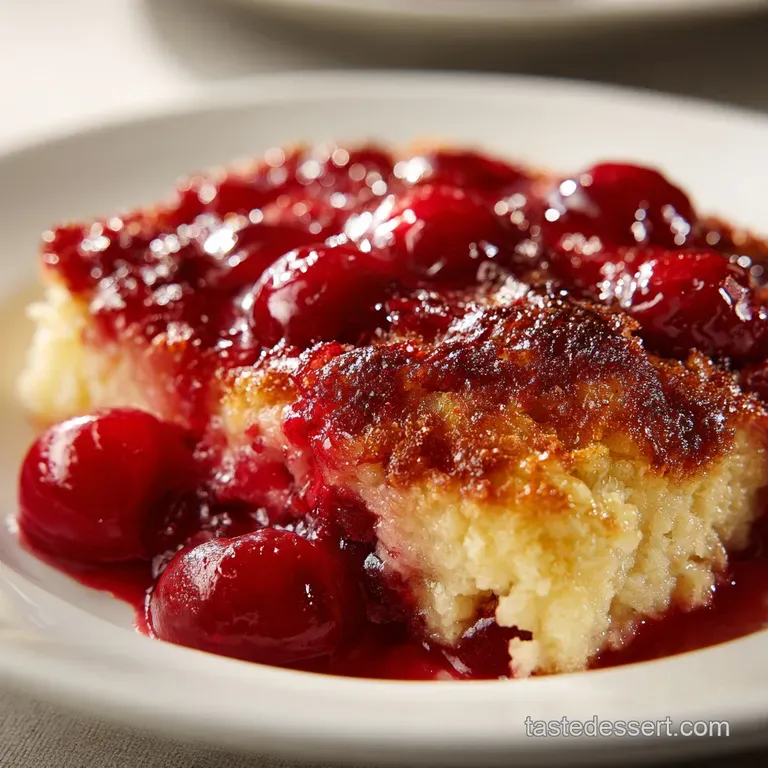
- Flavor/Texture Hook: Tart cherries under a mahogany colored, velvety crust
- Perfect for: Family Sunday dinners or a quick potluck win
- The Secret to an easy cherry cobbler recipe
- Why This Texture Works
- Component Analysis
- Essential Ingredients and Swaps
- Necessary Kitchen Gear
- Step by Step Instructions
- Fixing Common Mistakes
- Scaling Your Batch
- Creative Recipe Variations
- Storage and Zero Waste
- Plating and Presentation
- Recipe FAQs
- 📝 Recipe Card
The Secret to an easy cherry cobbler recipe
The smell of bubbling cherries and melted butter always takes me back to my grandmother's kitchen. I remember the sound of her old oven door creaking open and that sudden, warm cloud of sweet, tart aroma that filled the whole house.
She didn't use fancy tools, just a worn out whisk and a heavy baking dish, but the result was always the same: a dessert that felt like a hug on a plate.
For a long time, I thought those cherished flavors required hours of pitting fresh fruit and kneading dough. I spent years trying to mimic that specific, nostalgic texture, often overworking the batter or ending up with a fruit layer that was too runny.
But the real trick wasn't in the complexity, it was in the simplicity of the components.
This easy cherry cobbler recipe is my way of bringing those memories back to the table without the stress. It’s designed for those moments when you want something that tastes like it took all day, but only requires a few minutes of actual work.
You get that velvety crumb and those glossy cherries every single time.
Why This Texture Works
The magic here isn't about fancy techniques, but about how a few basic ingredients interact under heat. It's less of a biscuit and more of a soft, sweetened cake that pillows over the fruit.
- The Almond Effect
- Almond extract mimics the natural pits of cherries, which makes the canned filling taste more like fresh, wild fruit.
- Butter Integration
- Using melted butter instead of cold chunks creates a more uniform, silky crumb that blends into the fruit.
- Leavening Lift
- The baking powder reacts quickly in the oven, pushing the batter upward to create those classic "cobbled" peaks.
- Fruit Density
- The thick consistency of the filling prevents the batter from sinking, keeping the layers distinct.
| Method | Time | Texture | Best For |
|---|---|---|---|
| Canned Filling | 65 min | Uniform and Glossy | Quick weeknight treats |
| Fresh Cherries | 90 min | Rustic and Tart | Summer peak season |
| Cake Mix Shortcut | 60 min | Spongy and Sweet | Ultra fast parties |
Component Analysis
Understanding what each part does helps you avoid those annoying mistakes, like a topping that doesn't brown or a filling that tastes too metallic.
| Ingredient | Science Role | Pro Secret |
|---|---|---|
| Baking Powder | Lift and Air | Use a fresh tin for a higher rise |
| Lemon Juice | Acid Balance | Cuts through the sugar of the filling |
| All Purpose Flour | Structure | Sift if you see any clumps |
| Whole Milk | Hydration | Room temperature milk blends faster |
Essential Ingredients and Swaps
I've found that while the classic version is timeless, a few small tweaks can change the whole vibe of the dish. Just be careful not to over swap, or you'll lose the identity of the dessert.
- 2 cans (800g) cherry pie filling Why this? Consistent thickness and sweetness
- 1 tbsp (15ml) lemon juice Why this? Brightens the heavy sugar notes
- ½ tsp (2.5ml) almond extract Why this? Deepens the cherry profile
- 1 cup (125g) all purpose flour Why this? Provides a stable, soft structure
- 1 cup (200g) granulated sugar Why this? Creates the mahogany crust
- 1 tbsp (12g) baking powder Why this? Essential for the "cobble" lift
- ½ tsp (3g) salt Why this? Balances the sweetness
- ¾ cup (180ml) whole milk Why this? Adds richness to the batter
- ½ cup (113g) unsalted butter, melted Why this? Gives that velvety mouthfeel
| Original Ingredient | Substitute | Why It Works |
|---|---|---|
| Whole Milk (180ml) | Buttermilk (180ml) | More tang and a slightly tighter crumb |
| Granulated Sugar | Light Brown Sugar | Adds a caramel note. Note: Darker crust |
| All Purpose Flour | gluten-free Blend | 1:1 blend works. Note: Slightly grainier |
| Canned Filling | Fresh Cherries + Cornstarch | Pure fruit flavor. Note: Requires more sugar |
Right then, let's talk about the gear. You don't need a professional kitchen for this, but a few specific items make the process much smoother.
Necessary Kitchen Gear
I've learned the hard way that using the wrong pan can lead to uneven cooking. If your dish is too large, the batter spreads too thin and you lose those beautiful peaks.
First, you'll need a 9x9 inch baking dish. Glass or ceramic works best because they hold heat steadily. If you use a metal pan, keep an eye on the bottom, as it can brown faster. A large mixing bowl is a must for the batter, and a whisk is your best friend here to ensure there are no flour pockets.
Finally, a silicone spatula is great for spreading the batter. It allows you to push the dough right to the edges without disturbing the cherry layer underneath. Honestly, don't even bother with a spoon; it's too clunky for the layering process.
Step by step Instructions
Let's crack on. This process is straightforward, but the order of operations is what ensures that velvety top doesn't mix with the fruit.
- Preheat the oven to 350°F (175°C). Pour the cherry pie filling into a 9x9 inch baking dish.
- Stir the lemon juice and almond extract into the cherry filling and spread evenly to cover the corners of the pan. Note: This ensures every bite has that bright, nutty flavor.
- In a large mixing bowl, whisk together the flour, sugar, baking powder, and salt.
- Slowly pour in the milk and melted butter, whisking until the batter is smooth. Note: Don't over whisk; a few tiny lumps are fine.
- Carefully pour the batter over the cherries, spreading it to the edges with a spatula without stirring it into the fruit.
- Bake for 45-50 minutes until the top is mahogany colored and juices are bubbling around the edges.
Chef's Note: If you want a bit of extra crunch, sprinkle a tablespoon of coarse sugar over the batter right before it goes into the oven. It creates a shatter like crust that contrasts the soft interior.
Fixing Common Mistakes
Even with an easy cherry cobbler recipe, things can go sideways. Usually, it's a matter of temperature or mixing.
Why Your Crust Is Pale
If the top isn't getting that deep brown color, your oven might be running cool, or you've placed the rack too low. The top needs direct heat to caramelize the sugars. According to Serious Eats, heat distribution is key for crust development. Move your rack to the upper third of the oven.
Why The Batter Sank
Sinking usually happens when the baking powder is expired or the batter was over mixed. Over mixing develops too much gluten, making the cake heavy and unable to support its own weight.
| Problem | Root Cause | Solution |
|---|---|---|
| Soggy Middle | Too much filling | Use exactly 800g of filling |
| Rubbery Top | Over mixing batter | Whisk only until smooth |
| Burnt Edges | Oven too hot | Lower temp by 10°C/20°F |
Preventive Checklist:
- ✓ Check the expiration date on your baking powder
- ✓ Ensure butter is fully melted but not boiling
- ✓ Use a 9x9 inch pan to maintain depth
- ✓ Avoid stirring the batter into the fruit layer
- ✓ Let the cobbler rest for 10 minutes before serving
Scaling Your Batch
If you're feeding a crowd or just making a treat for yourself, you'll need to adjust. But remember, baking is a bit like a puzzle; you can't just double everything without thinking about the pan.
For a half batch, use an 8x8 inch pan and reduce the bake time by about 20%. Since you can't easily halve an egg (though this recipe doesn't use one), the proportions remain simple. Just be careful with the baking powder keep it precise to ensure the lift remains consistent.
When doubling the recipe for a 9x13 inch pan, don't just double the spices and salt. I usually increase salt and almond extract to only 1.5x the original amount to avoid an overwhelming taste.
You'll likely need to extend the bake time by 10-15 minutes because the larger mass takes longer to heat through.
Creative Recipe Variations
Once you've nailed the classic, you can start playing with the flavors. I love this dish because it's such a versatile canvas. If you're in the mood for something different, you could try a homemade blueberry pie for a similar fruit heavy vibe.
For a more "Old Fashioned" feel, you can swap the canned filling for fresh cherries. Just toss the pitted cherries with a bit of cornstarch, lemon juice, and sugar first. This creates a more rustic, chunky texture that feels very traditional.
If you want to go totally decadent, serve a slice of this alongside a dollop of cherry cream cheese delight. The tang of the cream cheese cuts through the sweetness of the cobbler perfectly. You could also add a pinch of cinnamon to the dry ingredients for a warmer, spiced aroma.
Storage and Zero Waste
Don't let any of this go to waste. Cobbler actually tastes fantastic the next day once the flavors have had time to settle.
Store leftovers in an airtight container in the fridge for up to 4 days. To reheat, I recommend the oven at 175°C for about 10 minutes. This brings back the crispness of the top, which a microwave usually destroys.
You can also freeze individual slices for up to 2 months; just wrap them tightly in foil and parchment paper.
As for zero waste, if you have leftover cherry filling in the can, don't toss it. Stir in a bit of Greek yogurt and use it as a topping for oatmeal or pancakes the next morning. Even the leftover batter (if you made a double batch) can be baked into small muffins for a quick snack.
Plating and Presentation
The way you serve a dessert can change the whole experience. Depending on who is coming over, you can switch up the presentation.
For a simple family night, just scoop it straight from the dish into bowls. It's rustic and cozy. For something more polished, cut it into clean squares and top with a single fresh cherry and a sprig of mint.
If you're aiming for a restaurant feel, use a circular cutter to create a neat cylinder, then surround it with a drizzle of raspberry coulis and a quenelle of vanilla bean ice cream.
| Plating Level | Technique | Garnish | Vibe |
|---|---|---|---|
| Simple | Large scoop in bowl | Dusting of powdered sugar | Homey |
| Polished | Square cut slice | Fresh mint leaf | Dinner Party |
| Restaurant | Circular mold | Vanilla quenelle + coulis | Gourmet |
Trust me on this: regardless of how it looks, the combination of that mahogany crust and the tart cherries is what people will remember. It's a timeless treat that brings everyone together.
Recipe FAQs
What kind of cherries do you use for cherry cobbler?
Canned cherry pie filling. This ensures a consistent texture and sweetness. Stirring in lemon juice and almond extract helps the canned fruit taste fresh and bright.
What's the secret to a good cobbler crust?
Not stirring the batter into the fruit. Pour the batter carefully and spread it with a spatula to maintain distinct layers. If you enjoyed mastering this layering technique here, see how the same principle works in our peach pie.
What is the difference between a cherry cobbler and a crisp?
The type of topping. A cobbler features a cake like batter or biscuit dough, whereas a crisp uses a crumbly topping typically made with oats and butter.
What are common cobbler mistakes?
Overmixing the batter or stirring the fruit. Overworking the flour makes the crust tough, and mixing the batter into the filling creates a muddy texture instead of a clean layer.
How to store and reheat leftover cobbler?
Keep in an airtight container in the fridge for up to 4 days. Reheat in the oven at 175°C for about 10 minutes to restore the crispness of the top.
Is it true that you must use fresh cherries for a professional result?
No, this is a common misconception. Canned pie filling is highly effective for this recipe and provides a reliable consistency for home cooks.
How to know when the cobbler is fully baked?
Bake for 45 50 minutes until the top is mahogany colored. You will also see the fruit juices bubbling around the edges of the 9x9 inch baking dish.
Easy Cherry Cobbler Recipe

