Hershey Kiss Cookies: Chewy Peanut Butter Blossoms

- Introducing the Cheesy Grin Cookie: A Nostalgic Baking Tradition
- Gathering Your Supplies: Essential Ingredients and Smart Swaps
- Baking Success: Step-by-Step Guide to Making Flawless Blossoms
- The Science of Softness: Mastering the Perfect Texture
- Pro Techniques and Troubleshooting: Avoiding Common Blossom Pitfalls
- Extending Freshness: Storing Your Peanut Butter Blossoms
- Perfect Pairings: How to Serve and Enjoy Your Cheesy Grin Cookies
- Recipe FAQs
- 📝 Recipe Card
Introducing the Cheesy Grin Cookie: A Nostalgic Baking Tradition
That initial aroma of warm peanut butter, browned sugar, and melting chocolate? It’s pure bliss, the very definition of comfort food. I swear, the instant the first sheet of Hershey Kiss Cookies comes out of the oven, my kitchen suddenly feels like a holiday magazine.
This recipe is the cornerstone of my seasonal baking, but honestly, these Peanut Butter Blossoms deserve to be baked year round.
And guess what? This isn't one of those fussy, delicate baking recipes that requires four hours and a spirit level. These Hershey Kiss Cookies are cheap, fast, and unbelievably reliable, making them the perfect solution when you need a big batch of joy without the drama.
They require ingredients you already have, and the shaping process is almost meditative.
We’re going to dive deep into mastering the perfect Peanut Butter Blossom, which means tackling the chewy texture and the critical chocolate press. The secret to phenomenal Hershey Kiss Cookies hinges on simple timing and smart ingredient choices.
Trust me, we’re going to elevate this classic!
What Makes Peanut Butter Blossoms a Classic?
It comes down to contrast, doesn't it? You get the salty, rich, slightly coarse texture of the peanut butter base, which is immediately followed by the smooth, creamy, melt-in-your mouth milk chocolate center. It’s the perfect marriage of salty and sweet.
That chewy center, thanks to the brown sugar, paired with the slight crunch from the sugar coating makes these Kiss Cookies infinitely addicting. They are simple, yet completely satisfying.
A Brief History of the Hershey Kiss Cookie
You might call them Peanut Butter Blossoms, but they're still the original Hershey Kiss Cookies . These iconic little treats actually have a documented history, which I love. The recipe was invented by a woman named Freda Smith in Ohio, back in 1957.
She entered them into the 9th Pillsbury Bake Off Contest, and while she didn’t win the grand prize, her creation was so beloved it immediately became a national classic. That’s real cookie power!
Why 'Cheesy Grin'? Naming the Perfect Cookie
Every recipe needs a good nickname, right? I call these my "Cheesy Grin Cookies" because when you press that chilled Kiss into the soft, hot cookie base, the edges crack and push up slightly around the chocolate. It genuinely looks like the cookie dough is giving you a huge, happy, slightly goofy smile.
That joyful crack is exactly what you want! If you’re making Hershey Kiss Cookies and they don't develop that tell tale blossom crack, you might be overbaking them.
Gathering Your Supplies: Essential Ingredients and Smart Swaps
The magic of this Hershey Kiss Cookies recipe is that the ingredients list is incredibly short. Every item plays a critical role, so choose wisely. We are aiming for a chewy, soft interior not a dry, crumbly one.
| Ingredient | Role in the Cookie | Smart Swap |
|---|---|---|
| All-Purpose Flour | Structure and binding. | Use a 50/50 mix of all-purpose and cake flour for extra softness. |
| Unsalted Butter | Flavor and texture. | Use half shortening and half butter for a higher rise and firmer cookie structure. |
| Smooth Peanut Butter | Flavor and density. | Cashew butter or sunflower seed butter (Sunbutter) works perfectly for allergies. |
| Brown Sugar | Moisture and chew. | Replace up to half with maple syrup or honey, but reduce liquid ingredients slightly. |
| Hershey Kisses | The crown and the chocolate finish. | Try mini Reese's peanut butter cups or caramel filled Kisses for variations. |
Selecting the Right Peanut Butter (Creamy vs. Natural)
This is a hill I will die on: DO NOT USE NATURAL PEANUT BUTTER for traditional Hershey Kiss Cookies . Natural peanut butter (the kind that separates and requires stirring) has a higher oil content that isn't fully emulsified.
That excess oil will cause your cookies to spread too much and feel greasy. Use a stabilized brand like Jif or Skippy for the best, most consistent Peanut Butter Blossom Cookies.
Flour Power: Measuring Techniques for Consistent Results
In baking, flour measurement is everything. If you scoop the flour directly from the bag, you compact it, adding up to 25% too much structure. This guarantees a dry, tough cookie. Instead, lightly spoon the flour into your measuring cup, then level off the top with a knife.
This ensures you get the exact texture needed for these soft Hershey Kiss Cookies .
Sweeteners and Salt: Adjusting the Flavor Profile
We use a 50/50 mix of granulated sugar (for spread and crisp edges) and brown sugar (for moisture and chewiness). That combination is essential for achieving a chewy peanut butter cookie recipe. Also, don’t skimp on the salt!
That little pinch is vital for balancing the intense sweetness of the peanut butter and the milk chocolate Hershey Kiss Cookies . Without it, the flavor falls flat.
Alternative Kisses: Changing up the Chocolate Topping
While the classic milk chocolate Kiss is iconic, you absolutely can mix it up! I sometimes use peppermint Kisses during the winter months, which pairs surprisingly well with the peanut butter base.
You could also try unwrapped mini Rolos for a caramel interior, or even dark chocolate Kisses if you prefer less sweetness. This versatility makes the Hershey Kiss Cookies fun to customize for any occasion.
Baking Success: step-by-step Guide to Making Flawless Blossoms
I promise, this process is straightforward, but pay close attention to the timing in the oven and the temperature of your ingredients.
Prepping the Dough: Creaming and Combining Wet Ingredients
First, make sure your butter, egg, and peanut butter are at room temperature. This is non-negotiable! Cream the butter, peanut butter, and both sugars together until they are light and fluffy this should take a solid three to four minutes in your stand mixer. The mixture will lighten in color and volume.
This aeration step creates the airy pockets that lead to a soft texture in the final Hershey Kiss Cookies . Then, beat in the egg and vanilla just until combined. Stop the mixer the second the yolk streaks disappear.
Rolling and Coating: Creating the Sugar Shell
Once the dry ingredients are gently mixed in, the dough will be wonderfully soft almost too soft. Use a small cookie scoop (about 1.5 tablespoons) to ensure uniformity. Roll the dough tightly into balls between your palms, then drop them into the bowl of coating sugar. Roll until fully coated.
This sugar coating isn’t just decorative; it helps caramelize the exterior, creating a slightly crunchy shell that contrasts beautifully with the soft center of the Hershey Kiss Cookies .
The Critical First Bake: Achieving Golden Edges
Bake these at 375°F (190°C) for 10 to 12 minutes. The biggest mistake people make is baking until the center looks completely set. Do not overbake!
The edges should be just starting to look golden and set, but the center should still look pale and perhaps even a touch puffy or raw. When you pull the tray out, the cookies will continue cooking on the hot sheet.
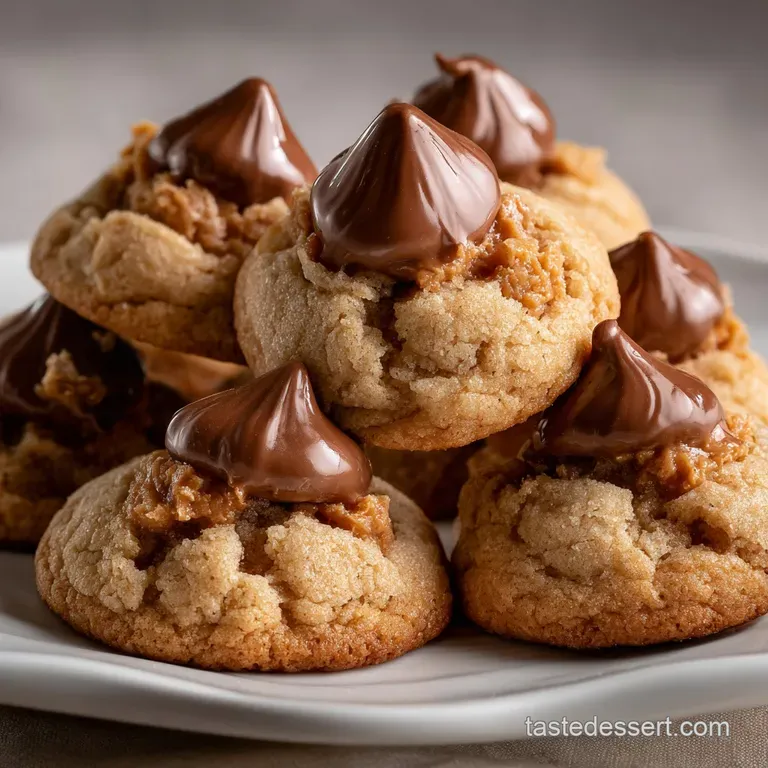
The Immediate Press: Inserting the Chocolate Kiss
This is the most crucial step for beautiful Hershey Kiss Cookies . As soon as the baking sheet comes out of the oven, grab your chilled Kisses (they must be chilled!) and press one gently but firmly into the center of each cookie.
Press just enough so the base splits slightly and the chocolate is anchored. The heat from the cookie base will immediately start to melt the chocolate just enough to seal it in place, but because the Kiss was chilled, it retains its iconic peak shape.
Chef's Note: If you wait even 60 seconds, the surface of the cookies begins to set, and the Kiss won't stick properly. Be ready to move fast!
The Science of Softness: Mastering the Perfect Texture
Why does this specific ratio create such perfectly chewy Hershey Kiss Cookies with Peanut Butter ? It’s all about the moisture control. The combination of stabilized peanut butter, brown sugar, and the room temperature fats allows the dough to retain internal moisture while achieving a pleasant spread in the oven.
The gentle melting of the chocolate top adds a final layer of creamy richness that seals the deal.
Pro Techniques and Troubleshooting: Avoiding Common Blossom Pitfalls
I’ve had my share of cookie disasters from rock hard disks to greasy puddles. Learning how to manage the dough temperature and timing is how you conquer the Peanut Butter Kiss Cookies Recipe .
Achieving the Ideal Chew: Balancing Fat and Sugar
If your cookies are too cakey, you likely added too much flour or didn't use enough brown sugar. If they spread too much and are greasy, you probably used natural peanut butter or your butter was too warm when you started creaming. Always ensure your butter is soft, but still cool to the touch.
This guarantees a strong emulsion that traps air beautifully, leading to a chewy, thick result.
The Role of Baking Powder in Cookie Spread
We use baking soda here, which reacts with the acidity in the peanut butter and brown sugar. If you accidentally use baking powder, your cookies will puff up too much and then fall flat, resulting in thin edges instead of that lovely plump blossom shape. If you’re ever curious about deep diving into chocolate recipes, check out my tips for Crinkle Cookies: The Best Fudgy Chocolate Recipe , which uses a different leavening strategy entirely.
The Essential Timing of the Hershey Kiss Press
As mentioned, timing is everything for flawless Hershey Kiss Cookies . If you press the Kiss too early (before baking), it will melt during the 10 minute oven time.
If you press it too late (after the cookie has cooled for more than a minute), the surface sets, and the chocolate won’t stick, or worse, the cookie will crack awkwardly. You must press them the moment they emerge, still bubbling.
Solving the 'Dough Too Sticky' Problem
If your dough is too warm or humid, it will be impossible to roll neatly in the sugar. Don’t panic! Simply wrap the dough tightly in plastic wrap and chill it in the fridge for 30 minutes.
This firms up the fat, making the dough much easier to handle and roll, guaranteeing perfectly shaped Hershey Kiss Cookies .
Preventing the Kiss from Melting Too Fast
This goes back to temperature control. You must chill the Kisses before baking. If you press a room temperature Kiss into a 375°F cookie, it will immediately melt into a sad, flat puddle.
Chilling provides crucial thermal resistance, allowing the Kiss to soften just enough to adhere, but retaining its sharp, recognizable peak.
Why You Must Chill the Dough (And When to Skip It)
While I listed a 30 minute chill as optional in the recipe, I highly recommend it unless your kitchen is naturally very cold. Chilling the dough slows the spread of the cookie during baking, ensuring your Hershey Kiss Cookies stay nice and plump instead of becoming thin and crispy.
This is especially vital if you live in a warm climate.
Extending Freshness: Storing Your Peanut Butter Blossoms
These Peanut Butter Blossoms store beautifully, which is why they are perfect for holiday trays or large gatherings. Store them in an airtight container at room temperature. They will retain their peak texture and freshness for about 5 to 7 days.
I like to separate the layers with wax paper to protect the delicate chocolate points.
But does it freeze well? You bet. To freeze, place the completely cooled Kiss Cookies (where the chocolate is fully set) in a single layer on a sheet tray until firm. Then, transfer them to a heavy duty zip-top freezer bag or container. They can be frozen for up to 3 months.
Thaw them overnight at room temperature. Do not attempt to reheat them in the microwave, or the Kisses will melt entirely!
Perfect Pairings: How to Serve and Enjoy Your Cheesy Grin Cookies
The absolute best way to enjoy these Hershey Kiss Cookies ? Freshly cooled with an ice-cold glass of whole milk. The cold, creamy milk is the perfect counterpoint to the warm, salty sweet peanut butter and rich chocolate.
For a grown-up treat, serve these delightful cookies alongside a strong, slightly bitter Americano or a robust dark roast coffee. The bitterness cuts through the sweetness beautifully. If you're building a holiday platter, serve these next to something acidic or zesty, like a lemon bar, or something nutty but less sweet, such as my recipe for Healthy Oatmeal Cookies: Chewy, Low Sugar Recipe with Maple Syrup . This makes the perfect presentation and palate contrast.
Seriously, this reliable Hershey Kiss Cookies Recipe is a keeper. Once you master the timing, you’ll never buy a store-bought cookie again. Happy baking!

Recipe FAQs
When exactly should I press the Hershey Kisses into the cookies?
The Kisses must be pressed in immediately after the cookies exit the oven, while they are still piping hot. Waiting even 60 seconds risks the cookie surface hardening, causing the chocolate to crack or fall off once cooled. Gently twist the Kiss as you press it down slightly into the center of the warm cookie.
Why did my cookies spread too much during baking?
Excessive spreading is often caused by using butter that is too warm or not measuring the flour correctly. Ensure your butter is truly softened, not melted, and always measure flour using the spoon and-level technique to prevent adding too little dry ingredient.
Chilling the dough for 30 minutes before baking can also help mitigate spreading.
My baked cookies turned out crumbly or dry. What went wrong?
Dryness usually results from over baking or accidentally incorporating too much flour. Pull the cookies immediately when the edges are set and lightly golden, even if the center looks slightly soft. Residual heat on the baking sheet finishes the baking process perfectly, ensuring a soft, chewy center.
Can I substitute the peanut butter with another nut butter?
Yes, you can substitute the peanut butter with other creamy nut or seed butters, such as almond butter or sunflower seed butter, maintaining the same measurements. Be aware that the texture might be slightly denser or drier depending on the oil content of the substitute.
If the dough seems too stiff, incorporate an extra teaspoon of milk or water.
What is the best way to store these cookies, especially the chocolate Kisses?
Store baked Hershey Kiss cookies in an airtight container at room temperature for up to one week. To prevent the chocolate from melting or becoming too soft, ensure they are kept away from direct sunlight or heat sources.
For longer storage or during summer months, refrigeration is recommended to maintain the Kiss shape.
Can I freeze the dough, and how should I bake it from frozen?
The dough freezes excellently. Form the dough into balls, roll them in the sugar coating, and freeze them in a freezer safe bag for up to 3 months. When ready to bake, place the frozen dough balls directly on the baking sheet and add 2 4 minutes to the typical bake time; press the Kisses into the cookies immediately upon removal.
Are there other chocolate varieties I can use instead of the classic milk chocolate Kiss?
Absolutely! This recipe works beautifully with many variations of Hershey Kisses, allowing for flavor customization. Dark chocolate Kisses, Hugs (milk and white chocolate swirled), or even seasonal flavors like caramel filled or candy cane Kisses work wonderfully.
Use the standard timing protocol for placement, regardless of the variety chosen.
Easy Hershey Kiss Cookies

Ingredients:
Instructions:
Nutrition Facts:
| Calories | 801 kcal |
|---|---|
| Protein | 9.1 g |
| Fat | 37.9 g |
| Carbs | 69.8 g |
