The Sundrenched Peach Galette Easy Rustic Tart with Cinnamon Vanilla
- Ditching the Pie Dish: Why This Free-Form Bake Reigns Supreme
- The Heart of Summer: Capturing Perfect Peach Flavour
- Assembling the Components for Your Rustic Fruit Tart
- Essential Toolkit for Galette Construction
- Crafting the Perfect All-Butter Dough Foundation
- Layering the Filling and Folding the Edges
- Baking to a Golden Zenith
- Elevating Your Final Presentation and Serving Suggestions
- Recipe FAQs
- 📝 Recipe Card
Ditching the Pie Dish: Why This Free Form Bake Reigns Supreme
There is a certain magic that happens when you embrace simplicity in baking. While a traditional double crust pie requires precision, crimping, and the strict confinement of a metal tin, the Peach Galette frees us from those constraints.
This is the epitome of French country cooking: beautiful results achieved with minimal fuss. We are ditching the pie dish entirely, opting instead for a free form, rustic presentation that looks effortlessly charming on any dessert platter.
It’s the ultimate Summer Peach Dessert because its relaxed nature perfectly mirrors the ease of the season. If you are looking for a Simple Galette Recipe that delivers maximum impact with minimum stress, you have found your champion.
The Heart of Summer: Capturing Perfect Peach Flavour
The success of any fruit tart hinges entirely on the quality of the star ingredient. For this Peach Galette Recipe , we are celebrating peak summer sweetness. The goal is tender, caramelized fruit, not mushy, watery filling.
We achieve this balance by using firm yet yielding peaches and employing a clever thickening agent cornstarch to manage the natural juices released during the high heat of baking.
A Charming Alternative to Traditional Pastry
Many home bakers approach pastry with trepidation, convinced they need industrial equipment or years of practice. This is where the beauty of the Rustic Peach Galette shines.
We are using a reliable, all-butter crust that yields incredible flavour, but because it is free form, you are simply rolling it out into a rough circle and folding the edges over.
The slight imperfections the uneven pleats, the slightly thicker edges are precisely what give this tart its signature, heartwarming appeal. Whether you choose to make the dough from scratch, as detailed below, or opt for a high-quality store-bought option (perhaps even a Peach Galette with Puff Pastry for an extra airy lift), the rustic outcome remains wonderfully achievable.
What Makes This Peach Galette Recipe So Effortless?
The effortlessness of this particular Peach Galette Recipe lies in its component preparation. We use a food processor to cut the butter into the flour swiftly, minimizing the warming of the fat the enemy of flaky pastry.
On top of that,, the filling requires only a brief toss of ingredients in a single bowl. This streamlined process ensures that even if you are working quickly, the dough remains cold and manageable, setting you up for success when it comes time to roll out and assemble your Easy Peach Galette .
Flavour Profile: Vanilla Pod Infusion vs. Extract
While time can be limited, flavour should never be compromised. For this bake, we are enhancing the natural sweetness of the peaches with classic pairings. A good measure of cinnamon provides warmth, while the vanilla provides depth.
If you happen to have a vanilla pod, splitting it and scraping the seeds directly into the sugar for the filling offers a superior, complex aroma. However, for speed and ease, one teaspoon of high-quality pure vanilla extract stirred directly into the sliced fruit performs admirably, ensuring every bite sings of summer.
Assembling the Components for Your Rustic Fruit Tart
To create a truly fantastic Peach Galette , we must prepare our two main players the crust and the filling before uniting them. The dough needs time to rest and firm up, which allows the gluten to relax, ensuring a tender final product.
Simultaneously, allowing the peaches to macerate briefly with the sugars and thickeners ensures the flavour penetrates the fruit thoroughly before it hits the heat. We are aiming for approximately 1 ½ cups of flour for the pastry, paired with four to five substantial, ripe peaches.
The filling is deliberately simple, relying on the quality of the fruit, a ¼ cup of granulated sugar for structure, two tablespoons of brown sugar for caramel notes, and importantly, two tablespoons of cornstarch to bind those glorious juices.
Essential Toolkit for Galette Construction

While you don't need a specific pie dish, having the right tools makes the process smooth. Beyond the mixing implements, a good, heavy rolling pin is crucial for getting the dough evenly thin, and a large, rimmed baking sheet lined with parchment paper is non-negotiable it catches any inevitable drips and ensures easy transfer out of the oven.
The Best Butter Temperature for Flaky Crust Achievement
The temperature of the butter is perhaps the single most critical variable in achieving a truly flaky Peach Galette with Pie Crust . The butter must be intensely cold straight from the coldest part of the refrigerator, cut into small, half inch cubes.
When pulsed in the food processor with the flour, these cold butter pieces create steam pockets during baking, which physically separate the layers of dough, resulting in that coveted, shatteringly crisp texture.
If the butter starts to feel soft to the touch during mixing, stop immediately and return it to the freezer for ten minutes.
Selecting Peak Season Peaches for Maximum Sweetness
For the best results in this Rustic Peach Galette , look for peaches that yield slightly when pressed gently near the stem, but are not mushy. They should smell intensely fragrant.
Yellow peaches tend to hold their shape better during baking than white varieties, offering that ideal textural contrast against the soft crust. If you are utilizing Frozen Peach Galette Recipe methods during the off-season, ensure the fruit is only partially thawed before mixing with the starch and sugar; this prevents the filling from becoming a soup during baking.
Specific Flour and Sugar Ratios Explained
The foundation requires 1 ½ cups of all-purpose flour balanced against ½ cup plus one tablespoon of cold butter. This ratio is purposefully high in fat to guarantee richness. In the filling, we use a mix of white and brown sugar.
The granulated sugar helps dissolve the cornstarch and ensures a clean sweetness, while the brown sugar adds moisture and a deeper molasses undertone that complements the cinnamon beautifully.
Related Recipes Worth Trying
- Easy Fresh Peach Cake Recipe with Buttery Crumb Topping — Bake the ultimate summer Fresh Peach Cake from scratch This moist buttermilk recipe features juicy peaches and a perfect brown sugar crumble Easy to master
- Cream Cheese Peach Cobbler Southern Comfort in Every Bite — This Cream Cheese Peach Cobbler recipe takes Southern comfort food to the next level Juicy peaches nestled under a tangy cream cheese biscuit topping Easy...
- Rustic Mixed Berry Pie in 2025 My Easiest Galette — Want Mixed Berry Pie in 2025 without the fuss This easy rustic galette is bursting with flavor Frozen berries welcome Try my flaky crust tips inside
Crafting the Perfect All-Butter Dough Foundation
If you are mixing by hand rather than using a machine, combine your 1 ½ cups of flour, 1 tablespoon of sugar, and ½ teaspoon of salt in a large, chilled bowl. Then, using a pastry blender or your fingertips, quickly work the ½ cup plus 1 tablespoon of cold, cubed butter into the flour until the mixture resembles coarse crumbs with some discernible pea-sized chunks of butter remaining.
Gradually drizzle in 4 to 6 tablespoons of ice water just enough until the dough barely holds together when pinched. Immediately press this into a thick disc, wrap it tightly, and chill it for a mandatory minimum of 60 minutes.
This resting period allows the dough to hydrate evenly and chill completely before the next crucial step.
Layering the Filling and Folding the Edges
Once the dough has chilled, place it on a lightly floured surface. Roll it out gently into a large, rough circle, approximately 13 to 14 inches in diameter. Remember, perfection is the enemy here; if you have to patch a small tear with a bit more dough, embrace it!
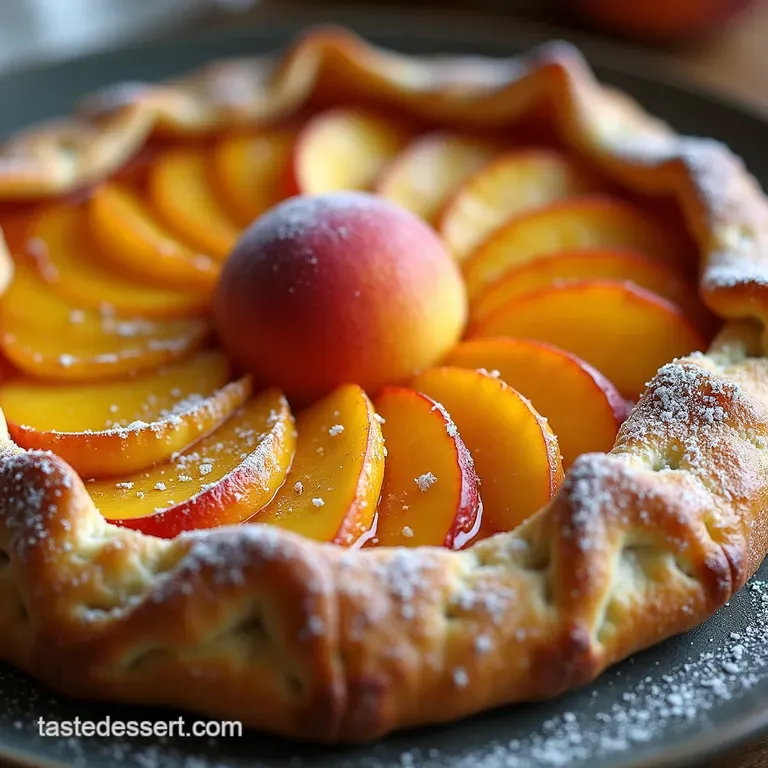
Carefully transfer this large circle onto a baking sheet lined with parchment paper. Now, arrange the tossed peach filling right in the centre, leaving a generous 2 inch border all the way around. This border is critical, as it will become your crust.
Start folding the dough edge up and over the fruit, overlapping your folds as you circle the entire galette. The fruit will remain exposed in the middle, but the folded edges create a sturdy, beautiful frame for your Peach Galette .
Baking to a Golden Zenith
The final phase requires sharp temperature control to achieve that signature contrast: a deeply browned, flaky crust surrounding tender, bubbling fruit.
Techniques for Chilling and Rolling Out Dough Without Tears
If your dough becomes sticky or tears during the rolling process, it’s usually a sign that the butter is softening too much. The trick is swiftness and utilizing a cool environment.
If your kitchen is warm, place the rolled out dough back onto the baking sheet and chill for 15 minutes before adding the filling. When rolling, turn the dough frequently to prevent sticking to the counter.
For those seeking convenience, remember that this method works splendidly even if you started with a Peach Galette with Puff Pastry base just ensure it's thoroughly chilled before filling.
Arranging the Sliced Fruit for Optimal Caramelisation
When placing the peaches on the dough, try to create a slight mound in the centre. This vertical stack helps prevent the fruit from collapsing entirely into a flat puddle during baking.
Since the centre of the galette is more exposed than a traditional pie, arranging the slices slightly overlapping allows the heat to circulate, ensuring that the sugars and cornstarch create a beautifully thick, almost jam-like caramelisation around the edges of the fruit where it meets the crust.
Achieving Deep Brown Edges on Your Finished Galette
The crust needs to be protected and promoted simultaneously. Before baking, brush the exposed dough edges thoroughly with an egg wash (one egg whisked with a splash of water). This promotes browning. Immediately after the wash, generously sprinkle coarse Turbinado or Demerara sugar over the washed edges.
This not only adds a delightful crunch but also helps the crust achieve that deep, sun-kissed mahogany colour essential for a truly rustic finish. Bake at 400° F ( 200° C) for 40 to 45 minutes.
If you notice the edges darkening too rapidly while the centre is still pale, loosely tent the perimeter with a piece of foil to shield it from the direct heat source.
Elevating Your Final Presentation and Serving Suggestions
Once pulled from the oven, the aroma alone will announce your success. Resist the urge to cut immediately; the filling needs about 20 minutes on the baking sheet to allow the cornstarch to fully set. This cooling time is vital for ensuring clean slices.
A warm slice of this fruit tart is heavenly on its own, but it truly sings when paired with something cool and creamy.
Creamy Companions: Best Toppings for a Warm Peach Galette
The ultimate pairing for a warm Peach Galette is the sharp, cold contrast of premium vanilla bean ice cream its slow melt mixing beautifully with the warm juices.
Alternatively, for a truly indulgent experience, serve it with a large dollop of unsweetened whipped cream or, for a richer touch, a spoonful of thick clotted cream. The buttery crust and sweet, spiced fruit are perfectly complemented by dairy.
Storage Guidelines for Leftover Rustic Tarts
Any leftovers of this Rustic Peach Galette are best enjoyed within 24 hours, stored loosely covered at room temperature. Do not refrigerate unless humidity is extremely high, as cold temperatures can prematurely stiffen and dull the beautiful texture of the all-butter crust.
If you must refrigerate, allow the slice to sit out at room temperature for at least 30 minutes before eating to revitalize the pastry texture.
Solving the Mystery of a Soggy Bottom Crust
The primary culprit for a soggy base in any free form tart, including one made with a Frozen Peach Galette Recipe , is insufficient heat or inadequate thickening.
Ensure your oven is fully preheated to 400° F ( 200° C) before the galette goes in. Next,, never skip the cornstarch; it is your barrier against excess moisture.
Baking the galette directly on a preheated baking stone or steel, rather than just parchment, can also provide a crucial burst of bottom heat, ensuring the underside bakes crisp alongside the filling.
Creative Variations: Nut Additions and Spice Swaps
While the basic structure is perfected, feel free to experiment. A fantastic addition is texture; try sprinkling 2 tablespoons of finely chopped pecans or slivered almonds directly onto the dough before placing the peaches down this creates a lovely, slightly crunchy layer that further protects the base from moisture.
For spice swaps, try replacing the cinnamon with a pinch of ground cardamom, or adding a grating of fresh nutmeg for a slightly more sophisticated profile in your next Peach Galette .

Recipe FAQs
My dough keeps tearing when I try to roll out the Peach Galette crust what’s gone wrong?
That’s usually down to one of two things: either your dough was too cold straight out of the fridge, or you’ve over handled it. If it’s rock hard, let it sit on the counter for 10 minutes before rolling.
If it tears, don’t fret just use a tiny scrap of dough and a dab of water to patch it up; the rustic look is part of its charm!
Can I make this Peach Galette ahead of time, or does it have to be baked fresh?
You can certainly prep ahead! The pastry dough can be made up to two days in advance, provided it stays tightly wrapped in the fridge. For assembly, it's best to bake the galette the day you plan to eat it, as the crust loses its crispness if stored assembled overnight.
My filling looks watery after baking how do I avoid a soggy bottom?
The cornstarch (or tapioca starch) is your absolute best friend here, so don't skimp on that measurement! Also, make sure you let the sliced peaches sit for a few minutes and only put the fruit in the centre, leaving behind any large pools of liquid that might have accumulated at the bottom of the bowl before folding the edges.
What’s the best way to store leftovers of this rustic tart?
Once completely cool, cover the leftovers loosely with foil or plastic wrap and store them at room temperature for up to 24 hours this maintains the best crust texture. If you need longer storage, the fridge is fine, but be sure to reheat it in a moderate oven (about 325°F/160°C) for about 10 minutes to crisp the pastry back up before serving.
Can I substitute the peaches with a different fruit, or do I need to change the recipe much?
Absolutely, this rustic format is brilliant for almost any stone fruit or firm berry! If you swap for plums or nectarines, the recipe works nearly identically. If you use very juicy berries, you might want to add an extra half teaspoon of cornstarch to handle the extra moisture.
I’m not a huge fan of cinnamon; what can I use instead in the filling?
No problem at all! If cinnamon isn't your cup of tea, try substituting it with an equal amount of ground cardamom for a lovely, slightly floral warmth, or perhaps a pinch of freshly grated nutmeg. You could even use a tiny sprinkle of ground ginger for a little zing!
Easy Rustic Peach Galette

Ingredients:
Instructions:
Nutrition Facts:
| Calories | 791 kcal |
|---|---|
| Protein | 7.5 g |
| Fat | 4.6 g |
| Carbs | 124.6 g |
| Fiber | 9.7 g |
| Sodium | 6720 mg |
