Flourless Chocolate Chewy Cookies Recipe
- Time: Active 45 minutes, Passive 10 minutes, Total 55 minutes
- Flavor/Texture Hook: Shatteringly crisp exterior with a fudgy, molten chocolate core
- Perfect for: gluten-free gifting, holiday cookie swaps, or midnight cravings
- Baking the Best Flourless Chocolate Chewy Cookies
- Essential Specs and Time Estimates
- The Science of the Crinkle
- Detailed Ingredient Component Analysis
- Selecting Your Fudgy Base Ingredients
- Minimal Tools for Maximum Results
- Step-By-Step Baking Method
- Solving Your Common Baking Hurdles
- Creative Flavors and Easy Swaps
- Storage and Waste Prevention Guide
- Serving Ideas for Chocolate Lovers
- Cooking Myths Debunked
- Recipe FAQs
- 📝 Recipe Card
Baking the Best Flourless Chocolate Chewy Cookies
I remember the first time I pulled a tray of these out of the oven on a rainy Tuesday afternoon. I was actually in the middle of a frantic pantry search because I had promised a neighbor a treat, only to realize I was completely out of all purpose flour.
I felt a bit desperate, but then I remembered this technique that treats cookies more like a dense meringue than a standard dough.
When the timer dinged, the kitchen didn't smell like the usual buttery warmth of a chocolate chip cookie. Instead, it was filled with the sharp, sophisticated, and almost fruity aroma of high-quality Dutch processed cocoa. I watched through the oven glass as the tops began to crinkle and shine like polished obsidian.
It was a total accident that turned into my most requested recipe.
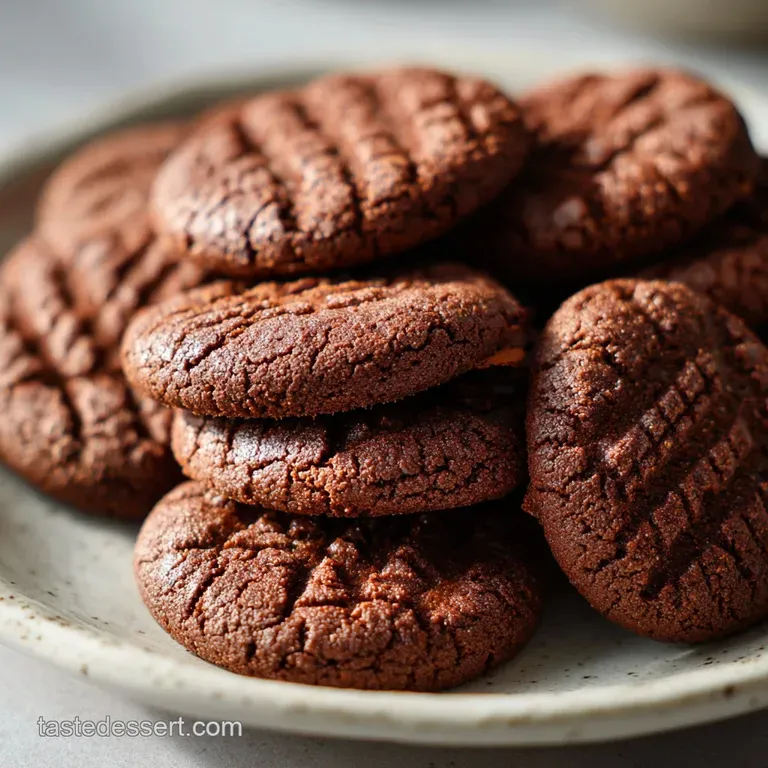
Trust me, you don't miss the flour for a second here. The texture is so decadent and rich that it feels like you're eating the very heart of a truffle that somehow learned how to be a cookie. We are going for that specific contrast between a paper thin, crisp shell and a center that is almost impossibly gooey.
Let's get into how we make that magic happen with just a few pantry staples.
Essential Specs and Time Estimates
Before we start whisking, we need to talk about the physical state of your ingredients. This isn't a "throw it all in a bowl" kind of situation. Precision with temperatures and resting periods is what separates a flat, greasy puddle from a towering, chewy masterpiece.
You'll want your egg whites at exactly room temperature (around 21°C) to ensure they incorporate smoothly into the heavy sugar base without clumping.
While the baking time is incredibly short - just 10 minutes - the preparation requires patience. Sifting is non negotiable here. Powdered sugar and cocoa powder love to form tiny, stubborn pebbles that refuse to dissolve, leading to white spots or bitter cocoa pockets in your finished bake.
Take the time to pass them through a fine mesh sieve; your effort will be rewarded with a silky, professional grade batter.
1. The Power of "Starchless" Structure
Without flour, we rely entirely on the protein in the egg whites and the crystallization of the powdered sugar to provide body. This creates a structure that is far denser than a cake but more flexible than a cracker. It is essentially a heavy duty meringue.
2. Meringue Leavening Hybrid Technique
We aren't whipping the whites to stiff peaks like a traditional meringue. Instead, we whisk them just enough to aerate the cocoa sugar mixture. This creates tiny air pockets that expand in the oven, giving us that distinctive rise and subsequent "fudgy collapse" as they cool.
3. The 30 Minute Batter Rest
Allowing the batter to sit before scooping is the "pro secret" for the best flourless chocolate chewy cookies. This rest period allows the sugar to fully hydrate, which is what produces that sought after shiny, crackled surface.
| Method | Time | Texture | Best For |
|---|---|---|---|
| Hand Whisked | 55 mins | Ultra fudgy and dense | Maximum chewiness |
| Electric Mixer | 45 mins | Slightly lighter, aerated | Larger batches |
| Stand Mixer | 45 mins | Most consistent rise | Professional appearance |
Using an electric mixer might save you some arm fatigue, but honestly, I prefer the hand whisked approach for these. It gives you a better "feel" for the batter's viscosity. If you over beat the whites with a machine, the cookies can become too puffy and lose that characteristic fudgy sink hole in the middle.
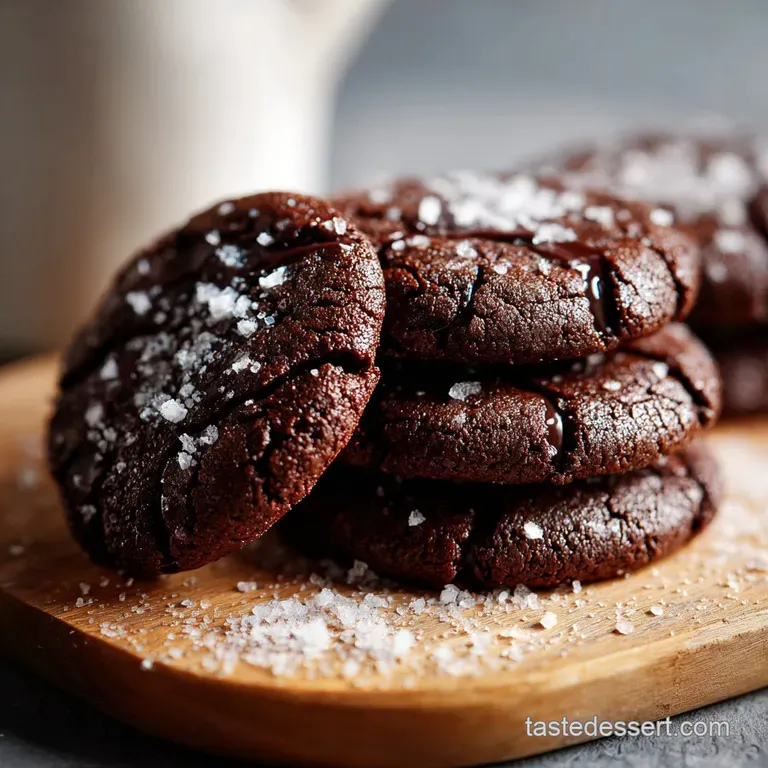
The Science of the Crinkle
The secret to the glossy, shattered top lies in the sugar saturation. When the high concentration of powdered sugar dissolves into the egg whites, it creates a thin film on the surface of the cookie that dries out faster than the interior.
As the cookie expands from the steam inside, this dried "skin" cracks, creating those beautiful, tectonic like plates on top.
Detailed Ingredient Component Analysis
| Ingredient | Science Role | Pro Secret |
|---|---|---|
| Powdered Sugar | Provides structure and "crinkle" | Sift it twice to ensure a velvety crumb |
| Dutch Processed Cocoa | Adds deep flavor and low acidity | Sift with sugar to prevent bitter lumps |
| Egg Whites | Acts as the primary binder | Use room temp whites for better emulsification |
| Espresso Powder | Enhances cocoa's flavor profile | Dissolve in vanilla first for even distribution |
Choosing the right cocoa is a game changer. Dutch processed cocoa has been treated with an alkalizing agent, which makes it darker and less acidic than natural cocoa powder. In this specific recipe, that lower acidity helps the egg whites stay stable, resulting in a richer color and a more mellow, chocolatey punch.
If you are looking for more ways to use up your pantry staples, you might enjoy experimenting with different textures in my Sourdough Discard Dessert Recipes. Both recipes rely on understanding how different binders affect the final chew of the cookie.
Selecting Your Fudgy Base Ingredients
When gathering your supplies, quality really matters since there are so few components. I always reach for a high-quality vanilla extract rather than imitation. Because there is no butter to provide flavor, the vanilla and the espresso powder do the heavy lifting in rounding out the sweetness of the sugar.
- 3 cups (360g) powdered sugar: Do not substitute with granulated sugar; the cornstarch in powdered sugar helps the structure.
- Substitute: Organic powdered sugar. Why this? It often has a more complex flavor than standard beet sugar.
- ¾ cup (65g) Dutch processed cocoa powder: This provides the deep mahogany color.
- Substitute: Natural cocoa powder. Why this? It will be lighter in color and slightly more tart.
- ½ tsp fine sea salt: Crucial for balancing the intense sweetness.
- Substitute: Kosher salt. Why this? Use slightly more if the flakes are large.
- 3 large egg whites: These must be at room temperature to incorporate properly.
- Substitute: Carton egg whites (approx. 90ml). Why this? Convenient, but fresh whites often provide a better lift.
- 2 tsp pure vanilla extract: Adds warmth and depth.
- Substitute: Vanilla bean paste. Why this? Adds beautiful flecks and a more intense aroma.
- 1 tsp instant espresso powder: The secret weapon for making chocolate taste more like "chocolate."
- Substitute: Strong brewed coffee (1 tsp). Why this? Use very carefully to avoid thinning the batter too much.
- 1 ½ cups (255g) semi sweet chocolate chips: Use a brand you love eating plain.
- Substitute: Dark chocolate chunks. Why this? Provides larger, molten pools of chocolate in every bite.
- ½ cup (60g) chopped walnuts: Adds a necessary earthy crunch.
- Substitute: Pecans or hazelnuts. Why this? Hazelnuts offer a classic "Nutella like" flavor profile.
Chef's Note: If you really want to deepen the chocolate notes, toss your walnuts in a dry pan for 3 minutes until they smell toasted before adding them to the batter. It makes a world of difference.
Minimal Tools for Maximum Results
One of the reasons I love this recipe is that it doesn't require a mountain of equipment. You don't even need to lug out the heavy stand mixer if you don't want to. A large mixing bowl, a sturdy whisk, and a silicone spatula are your primary weapons.
I highly recommend using silicone baking mats (like a Silpat) rather than just greasing the pan. These cookies are extremely high in sugar, which means they love to stick to everything.
A silicone mat provides the most reliable release, ensuring your cookies come off in one piece rather than leaving their fudgy bottoms behind.
1. Preparing the Dry Base
Start by sifting your sugar and cocoa into a large bowl. I know, I've mentioned sifting three times now, but it's the difference between a grainy cookie and a silky one. Add your salt and espresso powder here too.
2. The Liquid Binding Elements
In a separate small bowl, lightly whisk your egg whites with the vanilla just until they are foamy. You aren't looking for peaks here, just breaking up the proteins so they mix easily into the dry ingredients.
3. Essential Chewy Add Ins
Once the base is mixed, you'll fold in the chocolate chips and walnuts. This is where the batter transforms from a liquid y paste into a thick, scoopable dough. The chips actually help provide internal structure as the cookie bakes.
step-by-step Baking Method
- Preheat your oven to 175°C (350°F). Note: A calibrated oven is key for the 10 minute window.
- Sift the powdered sugar and cocoa powder together. Note: This removes all lumps and aerates the dry base.
- Whisk in the fine sea salt and espresso powder.
- Combine the egg whites and vanilla in a separate bowl until just frothy and bubbly.
- Pour the egg mixture into the dry ingredients.
- Stir slowly with a spatula until a thick, glossy batter forms.
- Fold in the semi sweet chocolate chips and chopped walnuts.
- Rest the batter for 30 minutes at room temperature. Note: This is crucial for the shiny top developement.
- Scoop rounded tablespoons onto a silicone lined tray, leaving 5cm of space.
- Bake for 10 minutes until the tops are crackled and the edges are set.
When you take them out, they will look slightly underbaked. Don't be tempted to leave them in longer! They will firm up as they cool on the tray. If you overbake them, they turn into hard discs rather than the chewy treats we're after. For another classic that uses a similar "set and cool" technique, check out this Hershey Kiss Thumbprint Cookies recipe.
Solving Your Common Baking Hurdles
Sometimes things go sideways in the kitchen, but usually, there is a very simple fix. The most common issue with flourless cookies is the spread. Because there is no flour to hold things together, the temperature of your ingredients and your oven is everything.
Why Cookies Spread Thin
If your cookies come out looking like thin lace pancakes, your egg whites were likely too large or your oven wasn't hot enough. When the oven is too cool, the sugar melts and spreads before the egg whites have a chance to set the structure. Always use a standalone oven thermometer to verify the heat.
Fixing Gritty Cookie Texture
Grittiness usually comes from the powdered sugar not being fully incorporated or the cocoa powder being low quality. Sifting is the first line of defense, but the 30 minute rest is the second. That rest allows the sugar crystals to fully dissolve into the moisture of the egg whites.
| Problem | Root Cause | Solution |
|---|---|---|
| Flat cookies | Too much moisture/egg white | Add 2 tbsp extra cocoa powder next time |
| Dull surface | Batter didn't rest enough | Ensure 30 minute rest at room temp |
| Stuck to pan | No parchment or silicone used | Always use a silicone mat for high sugar bakes |
Common Mistakes Checklist
- ✓ Using cold egg whites (prevents the sugar from dissolving properly).
- ✓ Skipping the sifting step (leads to white sugar spots).
- ✓ Over mixing once the chips are added (deflates the air you worked in).
- ✓ Removing from the tray too early (the cookies need to set for 5-10 minutes).
- ✓ Not preheating the oven fully (causes excessive spreading).
Creative Flavors and Easy Swaps
Once you've mastered the base recipe, the variations are endless. Since these are naturally gluten-free, they are a fantastic canvas for bold flavors. You can easily pivot from a classic chocolate walnut to something more exotic with just a few small changes.
Mexican Hot Chocolate Twist
Add 1 teaspoon of ground cinnamon and a tiny pinch of cayenne pepper to the dry ingredients. The heat from the cayenne perfectly complements the dark chocolate and provides a surprising finish that warms the back of your throat.
Salted Caramel Flavor Swap
Replace the walnuts with sea salt caramel chips. After scooping the dough onto the tray, sprinkle a tiny pinch of flaky Maldon sea salt on top of each one. The salt cuts through the sugar and makes the caramel notes sing.
Vegan Friendly Modification Tips
You can substitute the 3 egg whites with 9 tablespoons of aquafaba (the liquid from a can of chickpeas). Whisk the aquafaba until it's very foamy before adding it to the sugar. The texture will be slightly thinner, but it still produces a lovely, chewy result.
Nut Free Variation Options
If you have a nut allergy, simply swap the walnuts for toasted sunflower seeds or even crushed pretzels. The pretzels add a fantastic salty sweet crunch that mimics the texture of the nuts without the allergen risk.
| Serving Size | Ingredient Adjustments | Pan Size | Cook Time |
|---|---|---|---|
| 10 people | Half the recipe; use 1.5 egg whites | Standard sheet | 10 minutes |
| 20 people | Follow Schema quantities | Two sheets | 10 minutes |
| 40 people | Double recipe; 6 egg whites | Four sheets | 12 minutes (rotate) |
Storage and Waste Prevention Guide
These cookies are best enjoyed within the first 48 hours when the contrast between the crisp shell and fudgy center is at its peak. However, if you find yourself with leftovers, you can store them in an airtight container at room temperature for up to 4 days.
I actually find that the chocolate flavor deepens on day two.
For zero waste, don't throw away those egg yolks! You can use them to make a rich lemon curd, a homemade Caesar dressing, or even a decadent custard. If you have broken cookie bits at the bottom of the container, save them.
They make an incredible topping for vanilla bean ice cream or can be folded into a chocolate mousse for extra texture.
You can also freeze these cookies easily. Place them in a single layer on a baking sheet to freeze solid, then transfer them to a freezer safe bag. They will stay fresh for up to 3 months. When the craving hits, just let them thaw at room temperature for about 20 minutes - no reheating required!
Serving Ideas for Chocolate Lovers
While these are spectacular on their own, you can easily turn them into a plated dessert. The richness of the chocolate pairs beautifully with tart fruits like raspberries or blackberries. A simple dusting of extra powdered sugar right before serving makes them look like they came straight from a French patisserie.
The Classic Milk Pair
There is nothing quite like a cold glass of whole milk or a creamy oat milk to wash down a dense chocolate cookie. The milk cleanses the palate from the heavy sugar, making every bite feel like the first one.
Artisan Ice Cream Sandwiches
Because these cookies are so chewy, they don't shatter and fall apart when you bite into them, making them the ultimate vessel for ice cream. Sandwich a scoop of mint chip or salted caramel ice cream between two cookies and press down gently.
The fudgy texture of the cookie stays soft even when cold, which is exactly what you want in an ice cream sandwich.
If you are looking for another rich dessert to serve at your next gathering, you might want to try The Fudge Brownie recipe as a companion to these cookies. Having both on a dessert platter offers a wonderful variety of chocolate textures for your guests to enjoy.
Cooking Myths Debunked
Many people believe that you need flour or some kind of starch to make a "real" cookie, but that simply isn't true. Structure can be achieved through the coagulation of egg proteins and the crystallization of sugar alone.
These cookies aren't a "compromise" for people with allergies; they are a deliberate culinary choice for maximum flavor.
Another myth is that you can use low-fat cocoa powder for the same results. In reality, the small amount of natural cocoa butter in high-quality Dutch processed cocoa is essential for the mouthfeel. If you use a "lite" or highly processed cocoa, the cookies can end up feeling dry or chalky rather than velvety.
Stick to the good stuff your taste buds will thank you!

Recipe FAQs
Can I substitute all-purpose flour for the cocoa powder in this recipe?
No, this recipe cannot handle the substitution. Flour provides gluten structure, which this recipe deliberately omits; removing it means relying solely on sugar and egg proteins for texture.
How to achieve the signature shiny, crackled top on these cookies?
Allow the batter to rest for 30 minutes at room temperature before scooping. This rest period allows the high concentration of powdered sugar to fully hydrate, creating the thin, delicate skin that shatters beautifully when baked.
Is it true that using room temperature egg whites results in a better cookie structure?
Yes, room temperature eggs are essential for proper emulsification. They mix smoothly into the heavy sugar base, preventing clumps and ensuring you incorporate enough air to achieve the right internal chewiness.
How do I keep these cookies fudgy and prevent them from becoming dry disks?
Bake them for exactly 10 minutes at 350°F (175°C) and do not overbake. The key is pulling them when the edges are just set, as they will continue to firm up while cooling on the baking sheet.
Why is sifting the dry ingredients so important in a flourless recipe?
Sifting is non-negotiable because it eliminates bitterness and ensures silkiness. Cocoa powder readily forms lumps that will not dissolve, leading to gritty spots or pockets of intense, unsweetened chocolate flavor.
What is the best way to use leftover egg yolks after separating them for this recipe?
Use the yolks immediately to practice making rich custards or sauces. Mastering emulsification is a key skill, and you can see how well you controlled the protein structure in this recipe by applying that same knowledge to something like our German Chocolate Cake recipe, which often benefits from rich fillings.
Can I substitute butter for the oil or use granulated sugar instead of powdered sugar?
No, you must use powdered sugar for the correct texture and shine. Butter introduces too much moisture and fat, causing the cookies to spread too thin and lack the necessary meringue like framework.
Flourless Chewy Chocolate Cookies
Ingredients:
Instructions:
Nutrition Facts:
| Calories | 161 kcal |
|---|---|
| Protein | 2.1 g |
| Fat | 6.1 g |
| Carbs | 28.2 g |
| Fiber | 1.4 g |
| Sugar | 24.8 g |
| Sodium | 64 mg |
