Grandmas Thanksgiving Stuffing: the Ultimate Old-School Herb Butter Classic

- The Unbeatable Power of Simple, Classic Thanksgiving Flavors
- Gathering the Quality Components for Grandmas Thanksgiving Stuffing
- Essential Equipment Checklist Before You Begin
- Mastering the Herb and Butter Infusion
- Baking Grandmas Thanksgiving Stuffing to Golden Perfection
- Advanced Preparation & Troubleshooting Common Stuffing Issues
- Recipe FAQs
- 📝 Recipe Card
The Unbeatable Power of Simple, Classic Thanksgiving Flavors
Listen, if you are looking for a stuffing recipe with sixteen different kinds of mushrooms and fancy artisan cheese, you are in the wrong place. This is Grandmas Thanksgiving Stuffing. This is the stuff that smells like pure nostalgia and tastes like the best parts of your childhood kitchen.
It's unapologetically rich, heavy on the fresh herbs (we are talking sage , loads of it), and relies on one critical, often overlooked element: texture. You want that crispy, browned top layer, but an interior that is so buttery and soft it almost melts. Achieving that balance is tricky.
I spent years making sad, dense, grey stuffing. Don't be me. Follow these steps, and you’ll knock this one out of the park. It’s the absolute business.
Stuffing vs. Dressing: Settling the Regional Debate
Right, let’s get this out of the way. I call this stuffing because that’s what my grandma called it. Technically, if it’s cooked outside the turkey in a casserole dish, it should be called dressing. If it goes inside the bird, it’s stuffing.
This specific recipe is written for a casserole dish (which is safer and yields much better texture, by the way). But honestly? Who cares? Call it what you like. It's the most essential side dish on the table, no matter the name. Just make sure you make enough. Seriously.
Why Proper Bread is the Foundation of Great Stuffing
The bread is non and negotiable. If you use fresh, soft, squishy bread, you are actively asking for gluey stuffing. Fresh bread turns to absolute mush the second it hits the warm broth. You need bread that is dry, rigid, and ready to absorb that gorgeous herb and infused liquid like a sponge.
Think of those cubes as tiny flavor reservoirs. If they are already waterlogged, they can’t hold the good stuff. This is why you must plan ahead. You have to dry the bread out properly. It's the secret to any successful grandma's thanksgiving stuffing recipe.
The Essential Role of Butter and Fresh Sage in This Recipe
You’ll see a massive amount of butter in the ingredient list. We need it. Butter doesn't just add richness (though it does that beautifully). It carries the flavor of the fresh sage and thyme deep into the bread cubes. That herby, earthy, Thanksgiving flavour profile?
It comes straight from two things: the sage, which must be fresh, and the sheer volume of fat carrying the seasoning. Honestly, don't even bother with oil here. It’s just not the same.
Gathering the Quality Components for Grandmas Thanksgiving Stuffing
When I’m making this classic Thanksgiving stuffing, I stick to the absolute basics but insist on quality. This isn't the time for fancy mushrooms or crazy add and ins. This recipe is meant to be a quiet background hum of savory goodness that ties the whole Thanksgiving meal together.
The ingredients should be simple, affordable, and, most importantly, fresh. This is one of those times I pull out all the stops for a high and quality chicken broth, not the stuff you usually keep stashed for soup.
Essential Equipment Checklist Before You Begin
We aren't making anything complicated, but having the right tools makes the assembly way faster. You definitely need a huge mixing bowl. My first year, I tried mixing everything in a medium bowl, and it ended up all over the counter. Learn from my mistakes!
- A massive mixing bowl. It needs to accommodate all the bread and the liquid.
- A good, sharp chef’s knife for those veggies.
- A 9x13 inch casserole dish. Glass or ceramic works best here.
- Heavy and bottomed skillet or Dutch oven (for even heat distribution during the sauté).
- Aluminum foil (crucial for steam control during baking).
Choosing the Ideal Bread Base: Stale is Better Than Dry
The best bread for this classic stuffing is a sturdy white sandwich loaf, a French boule, or even a basic sourdough. You need those structural integrity bread cubes. I strongly recommend cutting the bread 24 hours in advance and just leaving it on a sheet tray on your counter, uncovered.
The air dries it out perfectly. If you forget (it happens!), you can bake it quickly (see the recipe outline), but air and drying gives you a slightly superior texture.
The Aromatic Trio: Celery, Onion, and Herb Measurements
The base of flavor here is what we call mirepoix (onion, celery, and sometimes carrots, but we skip the carrots here). The ratio of celery to onion is 1:1, by volume. Chop it evenly. I know it’s tedious, but even chopping means they soften at the same rate.
As for the herbs, you might look at four tablespoons of fresh sage and think, "Whoa, that’s a lot." It is. And it’s exactly right for this grandma's turkey stuffing recipe. That flavour is what Thanksgiving actually tastes like.
What Type of Broth Delivers the Best Moisture?
Chicken broth, hands down. Vegetable broth works, sure, but chicken adds a deeper savoury complexity. Please use low and sodium. Why? Because you are going to add your own salt with the herbs, and you need that control.
If you use standard broth, especially after reducing it a bit during the sauté process, you can accidentally salt bomb the whole dish. You can gently warm the broth beforehand, too. Warm liquid absorbs faster than cold.
| Broth Type | Flavor Profile | Note |
|---|---|---|
| Low and Sodium Chicken | Savory, classic | Best choice for flavor depth control. |
| Vegetable | Cleaner, lighter | Good for vegetarian swaps, slightly less rich. |
Proper Chopping Techniques for Uniform Flavor Release
I mentioned even chopping, and I’ll mention it again. Your goal is to have the celery and onions disappear into the background, providing moisture and subtle flavor without being crunchy. Small, even dice (about half a centimeter) ensures they soften completely during the ten minutes of slow sautéing.
Big, chunky pieces won't soften fast enough and will throw off the entire final texture.
Prepping the Bread Cubes: Timing is Everything
This is my official warning: If you skip the drying process, I cannot save your stuffing. Cut the bread, spread it out. Walk away. Let physics do the work. If you must rush, use the oven method (250°F is low enough not to toast the bread but high enough to evaporate the water), but just remember the time investment pays off tenfold here.
Dry bread means a moist interior.
Related Recipes Worth Trying
- Thanksgiving Dressing: The Ultimate make-ahead, Crispy Comfort Food — This Proper Ploughmans Thanksgiving Dressing recipe is the ultimate make-ahead holiday comfort food. Achieve the perfect crisp crust and moist, deeply...
- Homemade Stuffing: Classic Sage Thyme Bread Recipe — Homemade Stuffing is the deeply savory side dish your holiday table deserves. Master this Classic Homemade Stuffing recipe with sage, thyme, and a glorious...
- Thanksgiving Side Dishes: The Best Sourdough Dressing (Never Soggy) — Thanksgiving Side Dishes are better with this crispy sourdough dressing recipe. It features fresh sage, apple, and toasted hazelnuts, making it one of the...
Mastering the Herb and Butter Infusion
This step smells so good you will want to skip Thanksgiving and just eat this straight from the pan. The herb and butter infusion is where you transfer the potent flavors of the sage and thyme into the fat.
Melt a stick of butter (yep, 115g) and a little olive oil (to raise the smoke point slightly), and then sweat those onions and celery. Sweating means cooking them low and slow until they release their water and turn completely translucent, but don't take on any color.
Once they are soft, you hit it with the fresh herbs. Cook those herbs for only about 60 seconds. That’s enough time to wake them up and release their essential oils into the butter without burning them.
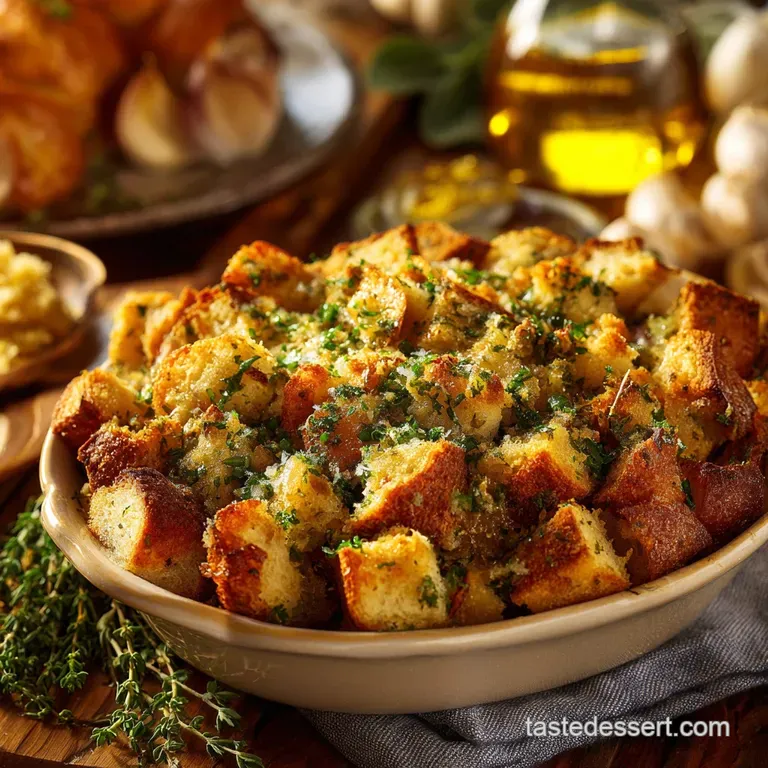
Baking Grandmas Thanksgiving Stuffing to Golden Perfection
Sautéing the Mirepoix Until Perfectly Tender
A good 10 to 12 minutes on medium and low heat is what the aromatics need. Stir often. If you hear sizzle, turn the heat down. We are extracting flavor here, not flash frying. Once the celery has lost its rigidity and the onions are basically clear, you are ready for the next stage.
It should look glossy and tender.
Combining the Herbs, Spices, and Liquid Base
Remove the skillet from the heat, stir in your salt, pepper, sage, and thyme. Give it a proper taste test now. You should think, "Wow, that's almost too salty/herby." Why? Because those dry bread cubes are going to dilute that flavour by half. If it tastes perfect now, it will taste bland later.
Be brave with the seasoning. Then, pour that hot, buttery mixture all over the dry bread.
Folding the Bread: Achieving Even Saturation
I can’t stress this enough: Fold , don’t stir. You need to toss the bread cubes gently with a wide spatula or your hands (if you can handle the heat). You want the vegetables and butter to coat the cubes. Then, drizzle the beaten eggs over.
Finally, add the warm chicken stock in measured stages. Add four cups, fold gently, let it sit for a minute. See how saturated it is. It should look wet, but not so wet that you can tilt the bowl and have broth running out. I usually use about 4.5 cups total.
Optimal Pan Selection and Oven Temperature Settings
I prefer a simple 9x13 glass casserole dish. Glass heats evenly. Set your oven to 375°F (190°C). This temperature is high enough to generate steam and get the interior hot while still allowing the exposed edges to get crispy without burning.
The Secret to a Crispy Top and Moist Interior
This is the big trick for stuffing recipes for thanksgiving.
CRUCIAL NOTE: Always start the baking covered with foil. Bake it covered for 25 minutes first. This is steaming the interior, ensuring every cube softens and heats evenly. Then, you whip that foil off for the last 10 to 15 minutes.
That uncovered stage is what gives you that perfect, crunchy, golden and brown crust. You must have that contrast.
Checking Internal Temperature for Food Safety
If you are following this recipe and baking separately, you are fine once the top is golden. However, if you ignore my advice and decide to stuff the turkey (making it proper grandma's turkey stuffing), the stuffing must reach 165°F (74°C) inside the bird. Get out the thermometer. Seriously.
Raw stuffing is not a fun Thanksgiving surprise.
Advanced Preparation & Troubleshooting Common Stuffing Issues
Can I Assemble This Dish 24 Hours in Advance?
Yes, absolutely. This is one of the best things about making this particular grandma's thanksgiving dressing. Assemble the entire dish (Step 3 complete), press it lightly into the casserole dish, cover it tightly with foil, and stash it in the fridge.
On Thanksgiving Day, pull it out about 30 minutes before baking to take the chill off. You might need to add an extra 5– 10 minutes to the total baking time since it’s starting from cold.
Reviving Dry Stuffing: A Quick Fix for Moisture Loss
Did you panic and not add enough broth? Or did you accidentally leave it uncovered too long? Don’t worry. It happens. The quick fix is simple: Gently heat about a half cup of chicken stock, pierce the stuffing deeply in several spots with a skewer, and drizzle the stock over the top.
Cover it tightly with foil again and pop it back in the warm oven for 5 to 10 minutes. The steam will rehydrate the dry spots. Magic.
Safely Storing and Reheating Leftover Stuffing
Leftovers should be cooled quickly and stored in an airtight container for up to 3 or 4 days. Reheating is best done in a moderate oven (350°F / 175°C) covered with foil until heated through. If you microwave it, it tends to get chewy, which is a proper tragedy.
Swaps for Dietary Needs (Gluten and Free or Dairy and Free Adaptations)
- Gluten and Free: Use a robust gluten and free bread. Make sure you slice and dry it out exactly the same way. The key structural principle remains: dry cubes are required.
- Dairy and Free: Swap the massive amount of butter for a good quality vegan butter substitute. It works shockingly well. Keep the stock ratio the same.
Calculating Nutritional Information Per Serving
Look, it’s Thanksgiving. We are using butter and carbs. This is a rich side dish, full stop. I've given a rough estimate below the recipe card, but honestly, don’t stress about the calories on this specific day. Eat the stuffing. It’s worth it.
Pairing Suggestions for the Ultimate Thanksgiving Plate
This buttery, herb and forward stuffing goes well with anything rich. It’s perfect next to creamy mashed potatoes and cranberry sauce (the proper homemade, chunky kind, not the jiggly can shape). But really, the best pairing for this specific grandma’s stuffing is a huge puddle of homemade turkey gravy.
The gravy sinks into the crispy top and moistens the interior further. That’s the dream right there.

Recipe FAQs
How do I stop my stuffing from becoming a soggy mess?
The secret is the bread it must be properly dried out beforehand, either left overnight or quickly toasted in the oven, or it will simply collapse into mush when the liquid is added. Stop adding chicken stock when the bread is thoroughly moistened but no liquid is pooling at the bottom of the bowl.
Can I prep this Grandmas Thanksgiving Stuffing ahead of time?
Yes, absolutely. You can chop all your vegetables and dry the bread 1 2 days in advance; however, for the best texture, only combine the bread, aromatic mixture, eggs, and stock just before it goes into the oven. Bob's your uncle.
I haven't got fresh sage and thyme; can I use dried for this recipe?
While technically you can substitute, we strongly advise against it for this classic recipe, as the fresh herbs provide the essential aromatic punch that defines proper stuffing. Dried substitutes will taste dusty and won't cut the mustard compared to the vibrant flavour of fresh herbs.
Is it safe to bake this classic stuffing inside the turkey?
It is generally safer and results in a better texture (crispier top) to bake the stuffing separately in a casserole dish as outlined. If you must stuff the bird, ensure the centre of the stuffing reaches an internal temperature of 165°F (74°C) for food safety.
We’ll have loads leftover. How long can I keep the stuffing after the big day?
Store any leftover cooked stuffing in an airtight container in the fridge for up to 3 4 days. When reheating, use the oven or an air fryer until piping hot to ensure the bread crumbs regain their delightful crispiness, as the microwave tends to make it go a bit rubbery.
Grandmas Classic Thanksgiving Stuffing

Ingredients:
Instructions:
Nutrition Facts:
| Calories | 414 kcal |
|---|---|
| Protein | 26.5 g |
| Fat | 29.4 g |
| Carbs | 11.7 g |
