Elegant Layered Berry Mousse
- A Taste of Summer: Layered Berry Mousse with Elegant Touch
- Essential Ingredients Guide for Layered Berry Mousse with Elegant Touch
- Mastering the Art of Layered Berry Mousse with Elegance
- Pro Tips & Secrets
- Perfect Presentation
- Storage & Make-Ahead
- Creative Variations
- Complete Nutrition Guide
- Frequently Asked Questions
- 📝 Recipe Card
A Taste of Summer: Layered Berry Mousse with Elegant Touch
Oh my gosh! have you ever stumbled upon a dessert that just screams summer? i mean, something so vibrant and refreshing that it instantly takes you back to those sunny days of chasing fireflies in the backyard?
That’s exactly what happened to me when i first whipped up this layered berry mousse with elegant touch .
Picture this: rich, creamy mousse delicately layered with fresh seasonal berries, just begging for a spoon. it's like summer in a glass, and trust me, your taste buds will thank you!
The Sweet Story Behind Berry Mousse
You know, the idea of mousse dates back to the early 18th century in france. it was originally made with just eggs and sugar, and while it still had that oh-so-satisfying airiness, it wasn’t quite like the layered mousse we indulge in today.
Fast forward to now, and this berry dessert is not just a nostalgic nod to the past; it's a staple at summer picnics and fancy dinner parties alike.
People adore it for its simplicity and elegance all without needing to turn on the oven!
So, how long does it take to whip up this beauty? all it takes is about 20 minutes of active prep work , followed by a cozy chill session in the fridge for two hours .
It’s a medium difficulty endeavor, but don’t fret! as long as you can layer like a pro and follow a few simple steps, you’ll be a mousse master in no time.
Why You’ll Love It
Let me tell ya, this dessert isn’t just a pretty face. the health benefits are pretty sweet too! chock full of seasonal berries , like strawberries and blueberries, it’s bursting with antioxidants and vitamins.
With flavors that dance around your palate, it’s also a fantastic option for those looking for healthy dessert options . plus, if you're ever in doubt about what to serve at a special gathering, this refreshing mousse is a real crowd pleaser.
Trust me everyone will be asking for seconds!
What really sets this dessert apart from other creamy berry desserts is its lightness. the secret? whipped cream , which gives it that airy feel, making it perfect for hot summer days! you really can’t go wrong by impressing your guests with this sophisticated recipe .
The Lowdown on Ingredients and Costs
The best part? you don’t need to break the bank to make this gourmet masterpiece. most of the ingredients are everyday staples.
A little heavy cream, assorted berries, sugar, and gelatin. easy peasy! and let’s talk yield it serves about six people . that’s six smiles around the table for a total cost of roughly $20 .
And honestly, what could be better than a delicious, show stopping dessert that’s also an absolute breeze to prepare?
Ready for the Layers?
Now that i’ve teased your taste buds and painted the picture of this divine dessert, you must be itching to dive into the ingredients! get ready to layer in that velvety mousse, sprinkle in some bright berries, and make your presentation pop with some expert dessert garnishing tips .
This is where the fun begins!
So, let’s gather our goodies and prepare to create the layered berry mousse with elegant touch . it’s a perfect chance to channel your inner artist in the kitchen and craft a delightful experience for you and your loved ones.
Buckle up, dessert fans we're about to take a wonderful culinary ride!
Essential Ingredients Guide for Layered Berry Mousse with Elegant Touch
So, you’re ready to whip up a layered berry mousse with elegant touch ? awesome choice! this dessert isn’t just a treat it’s a stunning showstopper that’s bound to impress your guests.
Let’s dive into the essential ingredients that make this berry filled delight shine.
Premium Core Components
When it comes to creating that dreamy, creamy texture, you want to make sure each ingredient is top-notch. Here’s what you need to know:
Heavy Cream : Use 1 cup (240 ml) for the mousse. Look for brands that have a high fat content think 36% or more. These are the real MVPs!
Mixed berries : you want about 1 cup (240 g) of mixed berries including strawberries, blueberries, and raspberries. fresh is best! check for vibrant colors and no mushy bits, okay? they should smell sweet and juicy.
Sugar : Don’t skimp on the sugar 3 tablespoons (45 g) will do the trick. It enhances flavor and helps with melding all those fruity vibes.
Vanilla Extract : A teaspoon (5 ml) will elevate your mousse. Go for the real stuff, not the imitation. It’s worth every penny!
Gelatin : For that perfect stability, use 1 tablespoon (15 g). If you prefer vegan, substitute with agar agar in a 2:1 ratio.
Water : You’ll need a couple of tablespoons (30 ml) to dissolve that gelatin goodness.
Storage tips : the mousse can hang out in the fridge for about 3 days. just remember to keep it covered so it doesn’t absorb any fridge flavors.
When choosing fresh produce, always opt for ripe and firm berries. your taste buds will thank you!
Signature Seasoning Blend
Now, let’s spice things up! While this mousse doesn’t need a full blown spice rack, a few well chosen ingredients can take it from good to gourmet.
Herb Pairings : Most dessert recipes don’t scream for herbs, but consider a touch of mint for a refreshing garnish. It’s a game changer!
Flavor Enhancers : A pinch of salt can balance sweetness beautifully. And if you dare, a splash of lemon juice (about 1 tablespoon) in the berry mix will brighten everything up.
Smart Substitutions
You know how life can throw curveballs, right? If you don’t have everything on hand, no worries! Here are some easy swaps:
Fresh Berries : If you’re short on fresh ones, frozen berries can save the day just make sure they’re thawed and drained to avoid excess water in your mousse.
Sugar Alternatives : Feeling healthy? Go for honey or agave syrup instead of sugar. Honestly, this could lighten things up while still being oh-so-delicious.
Emergency Replacements : If you’re totally out of gelatin, you can create a gelatin free mousse with whipped aquafaba. It’s a bit adventurous but dope if you want a vegan mousse!
Kitchen Equipment Essentials
Now, let’s talk tools. A few key gadgets can make this process smoother than the mousse itself.
Mixing Bowls : You’ll need a couple ideally glass or metal. They hold the chill better.
Hand Mixer or Whisk : Get ready to work those wrists! A hand mixer is quicker, but hey, a whisk can be an arm workout.
Measuring Cups and Spoons : Accurate measurements are key in baking and making this light and airy dessert.
Serving Glasses or Cups : Presentation is everything! Use clear glasses so guests can see those gorgeous layers.
Fine Mesh Strainer : If you’re fancy like that, straining the berry puree gives a smooth finish, taking your mousse to sophisticated recipe levels.
Wrapping It Up
So there you have it. by knowing your premium ingredients, signature flavors, and smart substitutions, you’re all set to tackle this layered berry mousse with elegant touch .
Not only will you impress your guests, but you’ll also enjoy a refreshing summer treat that’s both light and luxurious.
Now, let’s jump right into the instructions and get this dessert party started!
Mastering the Art of Layered Berry Mousse with Elegance
Hey, dessert lovers! if there's one recipe that's gonna impress your friends and family this summer, it's got to be this layered berry mousse with elegant touch .
Honestly, if you need a showstopper for a summer gathering or a special occasion, look no further. we’re talking about a dish that’s not just a delight to your taste buds but is also a feast for your eyes.
Trust me on this one!
Essential Preparation Steps
Now, before we dive into the magic of layering, let’s chat about mise en place . this is all about having your ingredients prepped and lined up, so you can rock the kitchen without any chaos.
Get your 1 cup of heavy cream , 1 cup of mixed berries , and all those other goodies ready to roll.
It’ll save you a heap of time and stress!
Speaking of time, let’s get real time management is crucial. set that timer for your 2 hours of chilling time right after you pull your mousse together.
While it’s chilling, why not whip up a little extra whipped cream for garnishing? learn to organize your workspace too; a clean area does wonders for your focus.
Oh, and let’s not forget safety! always keep an eye on that gelatin and, if you're using a knife for the fruit, don’t forget to watch your fingers.
We want this to be a sweet memory, not a bloody one, am i right?
Step-by-step Process
Alright, it’s time for the fun stuff. Here’s your step-by-step guide to creating this beautiful dessert that’ll have everyone reaching for seconds:
Prepare Gelatin: Sprinkle 1 tablespoon of gelatin over 2 tablespoons of water —let it sit for 5 minutes . Gently heat until dissolved; set aside to cool.
Make berry puree: blend 1 cup of fresh mixed berries with 2 tablespoons of sugar and 1 tablespoon of lemon juice until it’s smooth.
Strain it if you want a luxurious texture (totally optional, but fancy).
Whip Cream: In a bowl, whip the 1 cup of heavy cream with 1 teaspoon of vanilla extract until you see soft peaks. This is where the magic happens fluffy goodness!
Combine Gelatin: Stir the cooled gelatin into your berry puree. Make sure it’s well mixed!
Fold Berry Mixture: Gently fold the berry mixture into the whipped cream until perfectly combined. Try not to deflate it— we want it airy and light!
Layer the mousse: spoon some of that beautiful mousse into your serving glasses, top it with some fresh berries, and repeat until you reach the top.
Top it off with another mousse layer.
Chill: Pop those beauties in the fridge and let them chill for at least 2 hours until set .
Serve: Garnish with remaining berries before you dig in.
Expert Techniques
Let’s get into some expert techniques . if there’s one thing i’ve learned, it’s all about timing and temperature control . you want your cream just cold enough to whip nicely, and your gelatin should be at room temperature when it hits the berry puree.
Another tip? Quality checkpoints . Taste as you go! If the berry mixture feels a bit too tart, throw in a pinch more sugar. Always adjust it to your palate.
And don’t sweat if your mousse doesn’t come out perfect on the first try. One time I added too much gelatin and ended up with a rubbery mess yikes! Just remember to ask yourself: was it a disaster? Nope, just a learning experience!
Success Strategies
Now let’s talk about some success strategies . The best piece of advice? Avoiding common mistakes, like over mixing the mousse after you add the puree. You want it light, remember?
For a quick reassurance tip, keep an eye on the chilling time. Those 2 hours don’t have to be exact, but the longer it sits, the firmer and prettier it becomes.
Want a heads-up for next time? Think about make-ahead options! This stunning mousse can be prepared ahead and popped in the fridge until you're ready to impress your guests.
So there you go, friends! This Layered Berry Mousse with Elegant Touch embodies everything we adore in summer desserts fresh, vibrant flavors with a touch of sophistication.
Stick around for some Additional Information where I’ll give you recommendations on plating and perhaps a few gourmet dessert recipes that could take your culinary game up a notch. Happy cooking!
Pro Tips & Secrets

Alright, friends! let’s dive into the layered berry mousse with elegant touch , because honestly, who doesn’t love a fancy dessert? here’s the scoop on a few pro tips that’ll take this delight from good to absolutely wow .
Chef’s personal insights:
i always say, the key to a killer mousse is the whipping . make sure your mixing bowls and beaters are chilled.
If they’re cold, you’ll whip that cream into fluffy perfection faster than you can say “dessert!”
Time saving techniques:
want to cut down on prep time? while the gelatin is doing its thing, you can whip the cream.
It’s like multitasking for the modern kitchen guru. plus, you’re wasting no time just standing there, staring at the walls.
Flavor enhancement tips:
don’t be shy with flavors! a splash of lemon juice in your berry puree really brightens everything up.
And if you’re feeling experimental, tossing in a bit of mint can give your mousse the extra zing it didn’t know it needed!
Presentation advice:
when it comes to the last touch before serving, don’t skip the garnish . a sprig of mint or a dusting of powdered sugar transforms your dessert into a work of art.
Seriously, your guests will think you’re a pro chef!
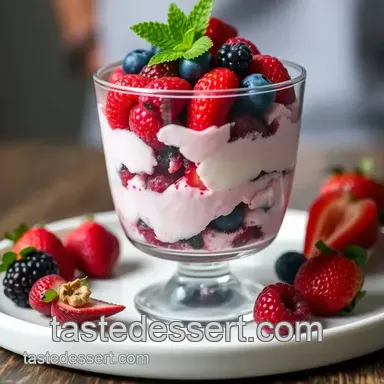
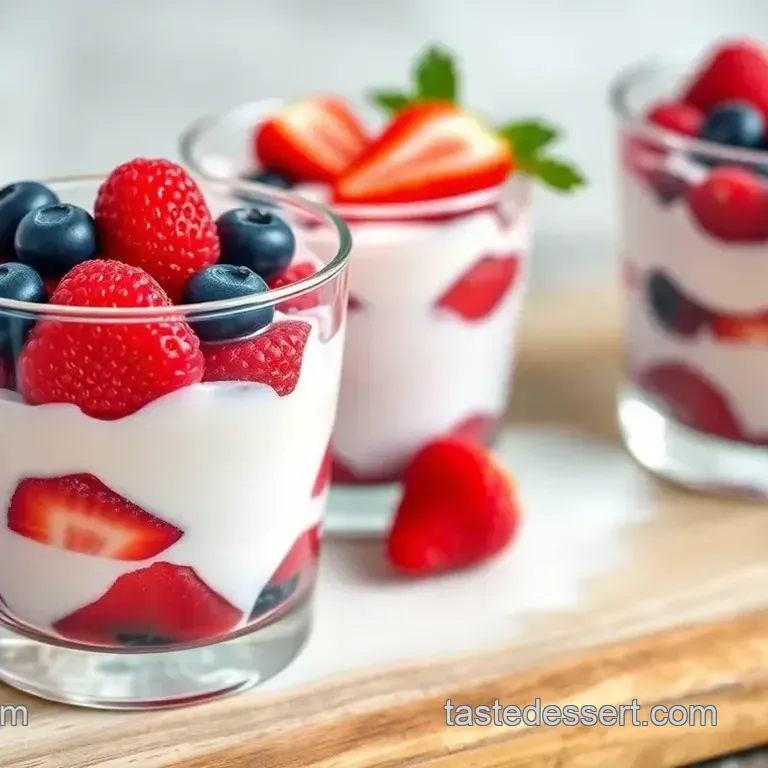
Perfect Presentation
Plating techniques:
let's get fancy! layer the mousse artfully in clear glasses, so everyone can see those vibrant colors.
One layer of pink mousse, one layer of fresh berries it’s like a party for your eyes.
Garnish ideas:
besides mint, how about a zest of lemon or a few crushed pistachios on top? it adds a lovely crunch and a pop of color.
Trust me, every little detail counts!
Color Combinations:
Mixing berries strawberries, blueberries, raspberries isn’t just good for flavor; it looks spectacular! The reds and blues against the creamy white mousse? Absolute perfection.
Visual appeal tips:
think about your mousse cups as mini canvas. adding in layers of colorful fruit not only tastes good, but it adds that wow factor.
Seriously, your guests won’t know what hit them!
Storage & make-ahead
Storage guidelines:
if you’ve got leftovers (which is a major win), keep them covered in the fridge. they should stay fresh for about 2-3 days.
But let’s be real, they probably won’t last long!
Preservation Methods:
Keep those berries fresh by washing and drying them well before adding them to the layers. Trust me, squishy fruit is nobody’s friend in a dessert.
Reheating Instructions:
Well, this mousse is better served chilled, so no reheating here! Just pop it back in the fridge if it gets a bit warm.
Freshness Duration:
The mousse is best enjoyed within a couple of days for that
light and airy
texture. After a while, it might start losing some of its charm.
Creative Variations
Flavor Adaptations:
Feeling wild? Switch out the mixed berries for seasonal fruits like peaches or even mango. It’ll totally change the vibe of your mousse!
Dietary Modifications:
Got some friends who can't eat dairy? No worries! Just swap in coconut cream for a delightful
vegan mousse alternative
. Trust me, they’ll love it!
Seasonal Twists:
In the fall, add in some
spice
with cinnamon or nutmeg for a cozy autumn treats vibe. The flavor adaptations are endless, my friends!
Regional Variations:
Why not get a bit adventurous? If you’ve got some local berries, throw those in! It’s all about celebrating where your ingredients are from, ya know?
Complete Nutrition Guide
Now let’s break down what’s in this creamy berry dessert. each serving has about 250 calories not too shabby for a delicious treat! and it’s packed with flavors and nutrients from the fresh fruit.
Health Benefits:
Those berries? They’re little powerhouses full of antioxidants! Who knew indulging could also be good for ya?
Dietary Considerations:
For those keeping an eye on sugar, you can switch out the regular sugar with a stevia or monk fruit sugar substitute.
Portion Guidance:
Yields are about
6 servings
, so perfect for a small get-together. Just remember, it’s so fabulous, people might go back for seconds!
So there you go! whether you’re prepping for a summer bbq or a fancy dinner party, this layered berry mousse with elegant touch is bound to impress.
Get in the kitchen, whip up that mousse, and remember: cooking is supposed to be fun! don’t sweat the small stuff; just enjoy the delicious journey!
Frequently Asked Questions
What is the easiest way to layer the mousse in the Layered Berry Mousse with Elegant Touch?
The key to a beautiful layered presentation is to use a piping bag or a spoon to carefully layer the mousse and berries in your serving glasses. Start with a layer of mousse, followed by fresh berries, and repeat. This method ensures clear, defined layers that are visually stunning and easy to serve.
Can I make the Layered Berry Mousse with Elegant Touch ahead of time?
Yes, this dessert is perfect for make-ahead! You can prepare the mousse up to a day in advance. Just cover your serving glasses with plastic wrap and keep them in the refrigerator for up to 24 hours. This will also enhance the flavors as they meld together.
What are some variations I can try with the Layered Berry Mousse with Elegant Touch?
There are many fun variations you can explore! Consider substituting different seasonal fruits like peaches or blackberries, or even include a layer of chocolate mousse for a richer dessert. For a vegan option, replace heavy cream with coconut cream and use agar agar instead of gelatin.
How should I store leftovers of the Layered Berry Mousse with Elegant Touch?
Store any leftovers in the refrigerator, covered, for up to 2 days. However, for best results, enjoy them within a day as the fresh berries may soften and lose their texture. Avoid freezing the mousse, as it can affect the smooth consistency once thawed.
What nutritional considerations should I keep in mind with this dessert?
This Layered Berry Mousse provides a delightful treat within a moderate calorie range of about 250 per serving. It contains healthy fats from cream and natural sugars from fresh berries. For a lighter version, consider using a low-fat whipping cream or a sugar substitute for lower calorie intake.
Do I need any special equipment to make the Layered Berry Mousse with Elegant Touch?
While you don't need any specialized equipment, having a hand mixer or whisk for whipping the cream, as well as a fine mesh strainer for the berry puree (if you prefer a smoother texture), will help achieve the best results. A piping bag can also be useful for layering the mousse cleanly into serving glasses.
Layered Berry Mousse With Elegant Touch