Peanut Butter Pie: Failure-Proof
- Time:20 minutes active + 4 hours chilling = Total 4 hours 20 mins
- Flavor/Texture Hook: Silky, salty sweet filling with a cocoa rich shatter crust
- Perfect for: Potlucks, summer parties, or a decadent weekend treat
- The Best No Bake Peanut Butter Pie
- How the Textures Actually Work
- The Full Recipe Specs
- Essential Gear for Success
- Putting It All Together
- Solving Common Texture Issues
- Troubleshooting Common Issues
- Fun Flavor Twists
- Scaling Guidelines
- Storing and Saving Scraps
- Wonderful Pairing Ideas
- Recipe FAQs
- 📝 Recipe Card
I can still smell the dark, cocoa rich scent of crushed Oreos filling my small kitchen from the first time I tried this. It was for my aunt's 60th birthday, and I wanted something that felt fancy but didn't involve me hovering over a hot stove while guests were arriving.
I remember the sound of the food processor humming, turning those cookies into a fine, dark sand that smelled like childhood and sugar.
There is something about the way a peanut butter dessert anchors a table. In the midwestern potlucks I grew up attending, these kinds of creamy, no bake treats were the gold standard. They represent a specific kind of comfort, a bridge between a simple snack and a formal dessert.
When I finally slid that pie out of the fridge, the filling was so smooth it looked like polished marble, and the first bite was just that perfect balance of salt and sugar.
This Peanut Butter Pie is a total crowd pleaser because it doesn't try to be too complicated. We're using a few staple ingredients and letting the fridge do the hard work of setting the structure.
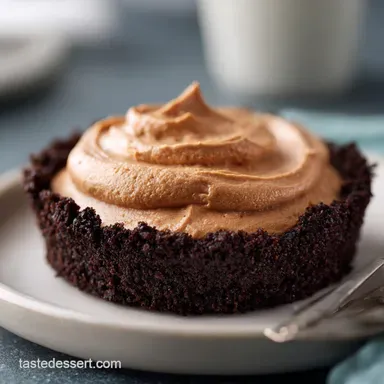
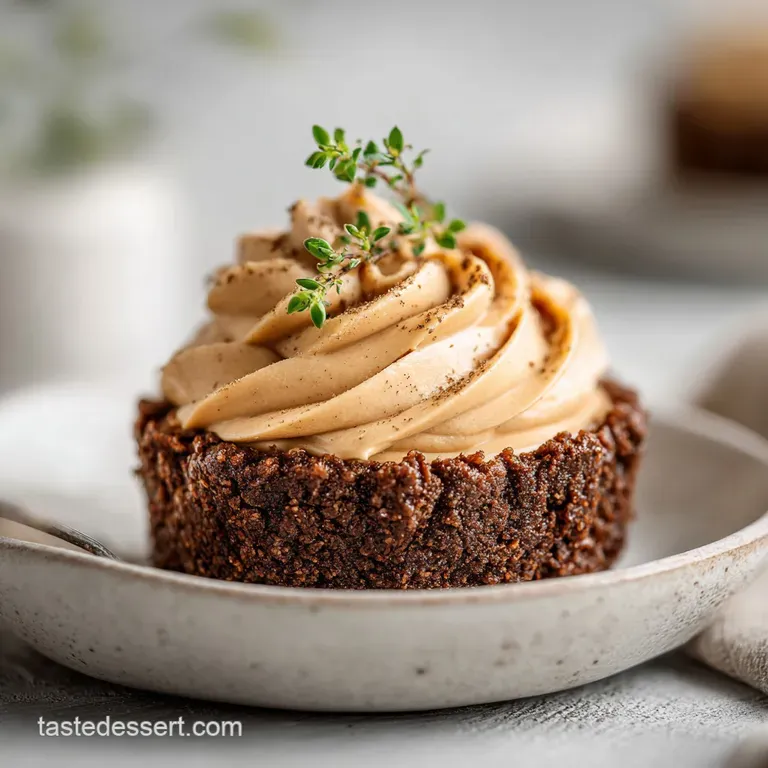
You can expect a rich, dense filling that still feels light on the tongue, all held together by a crust that provides a sharp, chocolatey contrast.
The Best No Bake Peanut Butter Pie
Right then, let's get into why this actually works. When you're making a no bake dessert, you can't rely on eggs or flour to set the structure, so we have to use fat and temperature.
- Fat Solidification
- The combination of cream cheese and peanut butter contains saturated fats that firm up when cold, creating a stable base.
- Air Incorporation
- Folding in whipped topping adds millions of tiny air bubbles, which prevents the pie from feeling like a heavy block of fudge.
- Sugar Stability
- Powdered sugar dissolves instantly into the fats, ensuring a velvety texture without any gritty crystals.
- Crust Compression
- Melted butter binds the cookie crumbs, and a quick blast in the freezer locks them into a solid wall that won't collapse when you slice it.
To help you decide how to approach this, here is a quick look at how the fast version compares to the classic method.
| Feature | Fast Method | Classic Method | Best For |
|---|---|---|---|
| Set Time | 2 hours (Flash freeze) | 4-24 hours (Fridge) | Classic is better for clean slices |
| Texture | Slightly softer, icier | Velvety, cohesive | Classic for a rich mouthfeel |
| Prep Effort | 15 minutes | 20 minutes | Fast for last minute cravings |
But before we start mixing, we need to look at what the ingredients are actually doing in the bowl.
How the Textures Actually Work
Understanding the role of each component helps you avoid those annoying mistakes, like a runny filling or a crumbly crust.
| Ingredient | Science Role | Pro Secret |
|---|---|---|
| Cream Cheese | Structural Anchor | Must be room temp to avoid lumps |
| Peanut Butter | Flavor & Fat Base | Use creamy for the smoothest finish |
| Oreo Cookies | Texture & Contrast | Pulse to a fine sand for a tighter crust |
| Heavy Cream | Final Aeration | Chill the bowl for faster peaks |
I've found that the quality of your peanut butter makes a huge difference here. Honestly, don't even bother with the "natural" oils on-top kind for this specific recipe, as they can separate and make the filling feel grainy. Stick to the creamy, processed stuff for that consistent, silky result.
The Full Recipe Specs
For this homemade peanut butter pie, you'll want to gather everything before you start. Using a kitchen scale is the way to go for consistency, but I've kept the measurements precise.
For the Crust: - 680 g Oreo cookies, filling included Why this? Provides a deep cocoa base that cuts the sweetness - 85 g unsalted butter, melted Why this? Binds the crumbs into a structural shell
For the Filling:
- 225 g cream cheese, softened to room temperatureWhy this? Adds tang and essential stability
- 255 g creamy peanut butterWhy this? The star flavor and primary fat source
- 120 g powdered sugarWhy this? Sweetens without adding liquid or grit
- 225 g whipped topping, thawedWhy this? Provides the light, airy lift
For the Toppings:
- 120 ml heavy whipping cream, chilledWhy this? Creates a rich, velvety crown
- 30 g powdered sugarWhy this? Stabilizes the whipped cream peaks
- 35 g chopped roasted peanutsWhy this? Adds a necessary salty crunch
- 85 g melted semi sweet chocolate (optional)Why this? Adds a decadent drizzle finish
If you're missing something, don't panic. Most of these have easy swaps.
| Original Ingredient | Substitute | Why It Works |
|---|---|---|
| Oreo Cookies | Graham Crackers | Lighter, honey like taste. Note: Less cocoa contrast |
| Cream Cheese | Mascarpone | Higher fat, milder taste. Note: Slightly softer set |
| Heavy Cream | Coconut Cream | Similar fat content. Note: Adds a tropical hint |
| Whipped Topping | Stiffly Beaten Egg Whites | Natural aeration. Note: Lacks the stability of stabilizers |
If you love these kinds of rich treats, you might also enjoy my Butterscotch Fudge Recipe, which hits those same salty sweet notes.
Essential Gear for Success
You don't need a professional kitchen, but a few tools make this a breeze. A food processor is a must for the crust, otherwise, your arms will be exhausted from chopping cookies. I recommend a stand mixer such as KitchenAid for the filling to ensure the cream cheese is totally smooth.
You'll also need a 9 inch pie plate, an offset spatula for smoothing the top, and a hand mixer if you don't have a stand mixer. Trust me on the offset spatula, it's the only way to get that professional, flat surface before you add the cream dollops.
Putting It All Together
Let's crack on with the process. Follow these steps closely, especially the chilling times, or you'll end up with a peanut butter soup.
Phase 1: Constructing the Base
- Pulse Oreo cookies in a food processor until they reach a fine, sand like consistency.
- Pour in melted butter and pulse until the crumbs are evenly moistened and resemble wet sand.
- Firmly press the mixture into the bottom and up the sides of the pie plate. Note: Use the bottom of a measuring cup to pack it tight.
- Place the crust in the freezer for 10 minutes until it feels firm to the touch to lock in the structure. According to King Arthur Baking, compressing the crust properly is key to preventing cracks.
Phase 2: Whipping the Filling
- In a large bowl, beat the softened cream cheese and peanut butter together on medium high speed until the mixture is completely smooth and glossy.
- Gradually add powdered sugar, beating on low until incorporated, then increase to medium until the filling looks fluffy.
- Gently fold in the whipped topping using a 'cut and fold' motion until no white streaks remain. Note: Do not over mix here or you'll deflate the air!
Phase 3: Assembly and Setting
- Spoon the peanut butter mixture into the chilled crust, smoothing the top with an offset spatula.
- Refrigerate for at least 4 hours (ideally overnight) until the filling is firm and holds its shape.
- Whip the heavy cream and powdered sugar until stiff peaks form and dollop onto the pie just before serving. Top with chopped peanuts and chocolate drizzle.
Solving Common Texture Issues

Even the best of us hit a snag. The most common issue with a peanut butter pie recipe is the consistency of the filling.
Troubleshooting Common Issues
| Issue | Solution |
|---|---|
| Filling too runny | This usually happens if the cream cheese wasn't fully incorporated or if the pie didn't chill long enough. If the fat doesn't have time to solidify, it stays a thick cream rather than a sliceable pie. |
| Stop the crust from crumbling | Crumbling happens when there isn't enough butter or the crumbs weren't pressed firmly enough. Make sure you're using the "wet sand" cue and really pushing the crumbs into the edges of the pan. |
| My filling has lumps | Lumps are almost always caused by cold cream cheese. If you see them, you can try to beat the mixture on high for another minute, but it's better to start with room temperature ingredients. |
Common Mistakes Checklist:
- ✓ Did you use room temperature cream cheese?
- ✓ Did you fold the whipped topping instead of beating it?
- ✓ Did you press the crust firmly into the sides?
- ✓ Did you wait at least 4 hours before slicing?
Fun Flavor Twists
Once you've mastered the easy peanut butter pie, you can start playing with the flavors. If you want a no bake chocolate peanut butter pie, simply stir 50g of cocoa powder into the filling or add a layer of chocolate ganache over the peanut butter base before adding the whipped cream.
For those looking for a peanut butter pie with graham cracker crust, just swap the Oreos for honey grahams. It's a lighter, more traditional feel. If you're trying to make a peanut butter pie without cream cheese, you can use a mixture of mascarpone and a bit more peanut butter, though the set will be softer.
Some people prefer a 3 ingredient peanut butter pie no bake style (just PB, powdered sugar, and whipped topping), but adding the cream cheese gives it a professional depth. For another layered masterpiece, you might love my Biscoff Trifle, which uses a similar logic of alternating textures.
Decision Shortcut:
- If you want it richer → Add a layer of melted chocolate to the bottom of the crust.
- If you want it saltier → Use salted peanut butter and add a pinch of flaky sea salt on top.
- If you want it lighter → Increase the whipped topping by 50g and reduce the peanut butter slightly.
Scaling Guidelines
If you're feeding a crowd or just yourself, you can adjust the proportions, but be careful with the chemistry.
Scaling Down (½ Batch): Use a smaller 6 inch springform pan. Reduce the chilling time by about 20%, as the smaller mass cools faster. If the recipe calls for a partial egg (not in this one, but for others), beat one egg and measure by weight.
Scaling Up (2x Batch): Do not double the salt or strong spices; increase them to 1.5x instead to avoid overpowering the dish. Work in batches when whipping the cream to ensure you get those stiff peaks.
For a double layered pie, keep the temperature consistent in your fridge so the middle sets properly.
Since we are dealing with a no bake setup, you don't have to worry about oven temperatures, but the "Total Time" will increase if you're making multiple pies, as your fridge will be more crowded and air circulation will be slower.
Storing and Saving Scraps
This homemade peanut butter pie stays fresh in the fridge for up to 5 days. Keep it covered with plastic wrap or in an airtight container to prevent it from absorbing other fridge smells.
For long term storage, you can freeze it for up to 2 months. I recommend freezing the pie without the whipped cream topping, as the cream can sometimes lose its texture. Just thaw it in the fridge for 4 hours and add fresh cream before serving.
Zero Waste Tip: If you have leftover Oreo crumbs, don't throw them away! Mix them into your morning yogurt or use them as a topping for vanilla ice cream. If you have leftover whipped cream, fold it into some fresh berries for a quick treat.
Wonderful Pairing Ideas
Because this pie is so rich and velvety, you need something to cut through the fat. A tart raspberry coulis or fresh sliced strawberries on top provide a brightness that balances the saltiness of the peanut butter.
In terms of drinks, a strong black coffee or a cold glass of milk is the classic choice. If you're serving this at a party, a crisp sparkling wine like Prosecco works surprisingly well because the bubbles cleanse the palate between bites of the dense filling.
For the ultimate dessert spread, serve this alongside a bowl of fresh citrus fruits. The acidity of oranges or grapefruit creates a wonderful contrast to the decadent nature of the peanut butter. Trust me, the salt sweet acid trio is what makes a dessert feel like it came from a high end bakery.
Recipe FAQs
How to store peanut butter pie?
Keep it covered in the fridge for up to 5 days. Use plastic wrap or an airtight container to prevent the filling from absorbing other fridge odors.
Why is my filling too runny?
The pie likely didn't chill long enough or the cream cheese wasn't fully incorporated. The fats need sufficient time to solidify to create a sliceable texture.
How to stop the Oreo crust from crumbling?
Press the crumbs firmly into the pan until they resemble wet sand. This ensures the structure is locked in before the 10-minute freezer chill.
Why are there lumps in my filling?
Cold cream cheese is usually the cause. Ensure the cream cheese is softened to room temperature before beating it with the peanut butter.
Can I freeze peanut butter pie?
Yes, it stays fresh in the freezer for up to 2 months. Freeze the pie without the whipped cream topping, then thaw in the fridge for 4 hours before adding fresh cream.
Can I substitute peanut butter with peanut milk?
No, peanut butter is essential for the filling to set. If you enjoy that nutty flavor, try our peanut milk as a beverage pairing instead.
How to incorporate the whipped topping without streaks?
Use a 'cut and fold' motion with a spatula. Gently folding the topping prevents over mixing and maintains the airy volume of the filling.
No Bake Peanut Butter Pie