Nobake Peanut Butter Pie: Decadent Chocolate Silk Pie Recipe
- Unlocking Pure Dessert Bliss: Why This NoBake Peanut Butter Pie Is Essential
- The Essential Components for Your Chocolate and Peanut Butter Masterpiece
- The Art of Assembly: Preparing Your NoBake Peanut Butter Pie Filling
- Extending the Life and Flavor: Expert Tips and Storage Solutions
- Recipe FAQs
- 📝 Recipe Card
Unlocking Pure Dessert Bliss: Why This NoBake Peanut Butter Pie Is Essential
Okay, listen up. I am absolutely convinced that the person who invented no and bake desserts was a genius who just wanted an excuse to eat dessert faster. And this no bake peanut butter pie? It’s not just fast; it’s aggressively good.
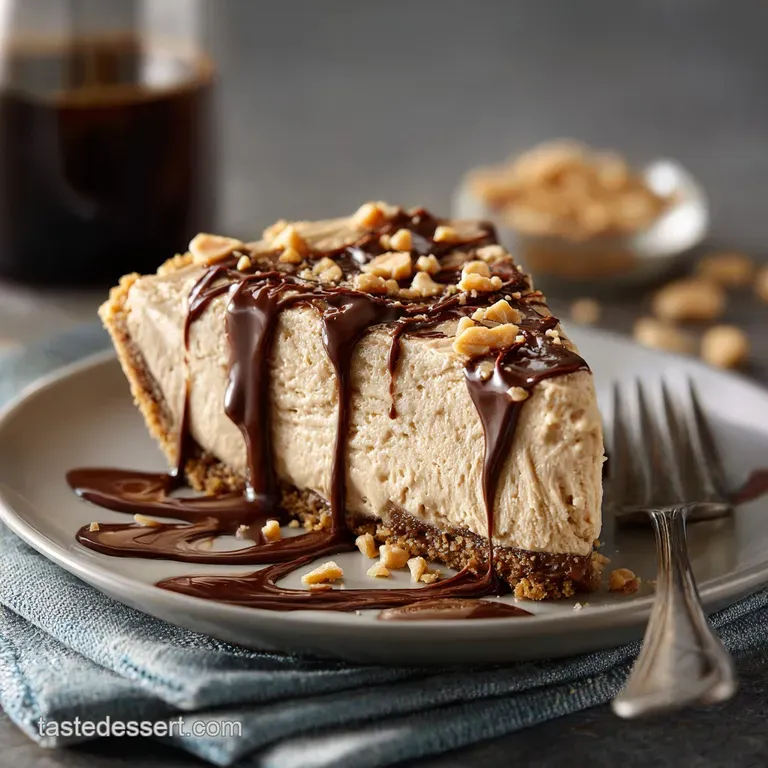
We’re talking about a rich, salty and sweet peanut butter filling that is impossibly airy, all sitting on a dark, crumbly chocolate crust. You don't even have to turn your oven on. It’s brilliant.
If you’ve been scrolling through recipe sites looking for an Easy Peanut Butter Pie that actually delivers that creamy, nostalgic flavour without being dense or overly gelatinous, stop right here. This recipe is the one I give to friends who swear they can’t bake.
It requires almost zero skill, just patience for the chilling time. And trust me, the wait is worth it.
The Velvety Silk Mousse Texture Explained
The magic here is structural engineering via dairy. We are not making a pudding pie. We are making a mousse pie. That texture comes from whipping heavy cream into lofty, stiff peaks, then folding that air into a stable base of butter, powdered sugar, and importantly, full and fat cream cheese.
The cream cheese is the MVP. It doesn’t just add a delicious, subtle tanginess; its fat content stabilises the whole mixture. When chilled, this combination sets up beautifully not like rubber, but like velvet.
It maintains that light, almost airy quality that makes the pie feel decadent but never too heavy.
Oven and Free Excellence: Zero Heat, Maximum Flavor
Who wants to run the oven for an hour just for a dessert? Not me, especially not in July. This is a true zero and heat operation, which means the preparation takes about 20 active minutes. The crust sets in the freezer quickly, and the filling sets in the fridge.
The huge bonus of the no and bake route is the intensity of the flavor. When you bake something, you mute some of the volatile compounds. Here, that rich, roasted peanut flavour from the butter comes through loud and clear. It’s exactly what you want when you’re craving a classic peanut butter dessert.
How This Pie Compares to Store and Bought Alternatives
Have you ever bought one of those frozen peanut butter pies from the grocery store? They’re fine, I guess, but they usually taste mostly of sugar and some kind of stabiliser you can't pronounce. They often use high and fructose corn syrup and the texture is weirdly gelatinous.
This homemade no bake peanut butter pie recipe is genuinely different.
| Feature | Homemade NoBake Pie | Store and Bought Pie |
|---|---|---|
| Texture | Light, velvety, mousse and like | Dense, often rubbery or icy |
| Flavour Profile | Balanced sweet/salty, deep PB flavour | Overwhelmingly sweet, artificial notes |
| Cost/Effort | Low effort, high-quality ingredients | Low effort, mysterious ingredients |
We control the quality of the peanut butter and the amount of salt. That salt is crucial, by the way. It prevents the pie from tasting cloyingly sweet, giving you that satisfying salty crunch against the smooth, sweet filling.
The Essential Components for Your Chocolate and Peanut Butter Masterpiece
Right then, let's talk ingredients and tools. You don’t need anything fancy, but precision matters in the no and bake world.
Equipment Checklist: The Mixer and The Pie Dish
You need a solid 9 inch deep and dish pie plate. Non and negotiable.
The most important tool you’ll need is an electric mixer. I prefer my stand mixer because I can walk away and leave it to whip the cream, but a powerful hand mixer works perfectly fine too. Why the mixer? We need massive air incorporation, and trying to get stiff peaks by hand is a workout nobody asked for.
Seriously, save your biceps.
We also need a food processor for the crust. If you don’t have one, just stick your wafers in a zip and top bag and attack them with a rolling pin until they are fine crumbs. Therapeutic, actually.
Crafting the Perfect Chocolate Crumb Foundation
I always, always use chocolate sandwich cookies (like Oreos) for the base. They already have filling, which provides extra fat and sugar. When you mix the crushed cookies filling and all with the melted butter, you get a beautiful, rich, sticky base.
That’s how you achieve the best no bake peanut butter pie with oreo crust.
CRITICAL WARNING: Do not use low and fat or whipped cream cheese. The water content is too high, and your filling will not set properly. Stick to the full and fat block. I learned that the hard way when I tried to be "healthy" and ended up with soup.
Make sure your butter is completely melted and mixed thoroughly into the crumbs. If you see any dry spots, your crust will disintegrate when you cut it.
Deciding on Dairy: Cream Cheese vs. Mascarpone Substitutions
This recipe calls for cream cheese, and that is usually the key to a successful no bake peanut butter pie with cream cheese filling. It gives you the perfect firmness.
However, if you feel like leaning into ultimate richness, you can swap the cream cheese for mascarpone. Mascarpone is richer, softer, and less tangy. If you make that swap, watch your mixture. Since mascarpone has a higher fat content, the filling might become too stiff.
You might need to hold back about 1/4 cup of the powdered sugar, or add a splash of milk if it looks like concrete. Stick to cream cheese for your first try, though. It’s the easiest path to success.
Related Recipes Worth Trying
- Grandmas Thanksgiving Stuffing: Proper Sage and Butter Recipe — Grandmas Thanksgiving Stuffing defines the holiday table. This fail proof, moist stuffing recipe for turkey features browned butter, sage, and a crisp top....
- Thanksgiving Stuffing: Buttery Sourdough, Sausage, and Sage Casserole — Thanksgiving Stuffing is the absolute backbone of the holiday table. This sourdough stuffing recipe guarantees a crisp top and moist interior, featuring...
- Grandmas Thanksgiving Stuffing: The Proper Herb Butter Classic — Grandmas Thanksgiving Stuffing is the ultimate herb and butter classic. Achieve the perfect balance of moist interior and crispy top with this traditional...
- Maple Pecan Pie: The Ultimate, Non-Soggy Classic Dessert — Maple Pecan Pie, featuring Grade A robust maple syrup for deep flavor and zero corn syrup. Master this classic Southern dessert with our Chefs Signature...
- Pioneer Womans Pecan Pie: The Best Sticky Buttery Classic Recipe — Get the definitive Pioneer Womans Pecan Pie recipe. This sticky, buttery delight uses a classic method to create a deep, gooey filling and a flaky crust....
- Easy Traditional Pecan Pie: The Ultimate Gooey, Perfectly Set Holiday Dessert — This Easy Traditional Pecan Pie recipe delivers a perfect, rich, caramel like filling brimming with nuts. This is the Best Pecan Pie for Thanksgiving or...
The Art of Assembly: Preparing Your NoBake Peanut Butter Pie Filling
The preparation is just as important as the ingredients. The sequence matters.
Pressing the Crust: Achieving Structural Integrity
Once you’ve mixed those glorious chocolate crumbs and butter, press them firmly into the pie dish. I use the bottom of a dry measuring cup to really pack the mixture down. Make sure the sides are just as compact as the bottom.
Immediately stick that crust in the freezer for about 15 minutes. This quick chill sets the butter, essentially gluing the crumbs together. This ensures a crisp, non and crumbling shell when you eventually slice the pie. If you skip this step, you get loose crumbs floating around the plate.
Whipping the Peak: Preparing the Aerated Cream Base
Your heavy cream must be cold. I mean, really cold. If your kitchen is hot, chill your mixing bowl and whisk attachment for ten minutes before starting. Cold temperature helps the fat stabilise faster, leading to higher volume and stiffer peaks.
Whip the cream until it forms stiff peaks. You should be able to lift the whisk and the cream holds its shape perfectly, without flopping over. Stop right there. Overwhipped cream starts to look grainy, and it loses its lightness.
Incorporating the Flavor Bombs: Gentle Folding Techniques
First, beat your softened cream cheese, peanut butter, and powdered sugar until it is fluffy and perfectly smooth. No lumps allowed!
Now comes the critical step. We need to combine this dense, sweet base with our delicate, airy whipped cream. We fold. We do not stir. Stirring will knock all the air out.
Take about a third of the whipped cream and stir it vigorously into the peanut butter mixture. This is called "lightening the base." It makes the peanut butter mixture looser and easier to handle. Then, gently fold in the remaining cream using a large rubber spatula.
Cut down the middle, sweep up the sides, and turn the bowl. Stop folding the second the mixture is uniform. If you see streaks, give it two more gentle folds, then stop. This is how you achieve the perfect, fluffy mousse for your Easy Peanut Butter Pie.
The Crucial Setting Time: Ensuring a Perfect Slice
The moment the filling hits the crust, your immediate urge will be to cut into it. Resist! This pie needs time for the fats in the cream cheese and cream to solidify properly.
Four hours is the absolute minimum. Overnight is best. When you leave it overnight, you guarantee a perfect slice, structurally sound and ready for its close and up. If you cut it too early, the slice will slump. We don't want slumping.
Extending the Life and Flavor: Expert Tips and Storage Solutions
Can I Freeze This No and Bake Delight? (Optimizing For Long and Term Storage)
Absolutely! This NoBake Peanut Butter Pie freezes incredibly well. It’s a fantastic way to make it ahead for a big party or just stockpile dessert.
To freeze it:
- Do not add any whipped cream or fresh peanut toppings yet. Freeze the pie naked.
- Once it’s fully set (at least 6 hours in the fridge), wrap the whole pie tightly in two layers of plastic wrap, followed by a layer of aluminum foil.
- It keeps beautifully for up to three months.
- When ready to serve, thaw it overnight in the refrigerator (still wrapped) or let it sit at room temperature for about 30 minutes for an easier slice. Some people, myself included, love it slightly frozen.
Troubleshooting: What to Do If Your Peanut Butter Mousse is Runny
If you’ve chilled it for four hours and it’s still too soft, there are a few likely culprits:
- Warm Cream: Your cream was not cold enough when whipped, resulting in weak peaks.
- Over and folding: You stirred too aggressively and deflated the airy cream.
- Low and Fat Dairy: You accidentally used low and fat cream cheese or half and half instead of heavy cream.
If it's already mixed and chilling, the best bet is just to give it more time. Sometimes 6- 8 hours does the trick. If it's truly liquid, try removing it, mixing a tablespoon of cornstarch or clear gelatin with a tiny bit of boiling water, letting it cool slightly, and gently folding that into the filling before re and chilling.
Advance Preparation Guide: Serving Pie Perfectly Chilled
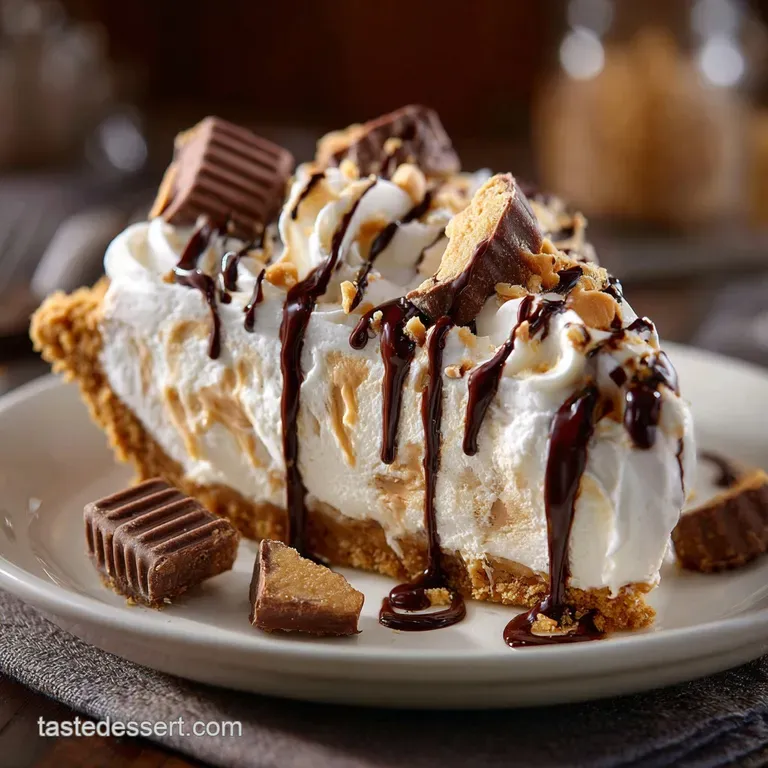
The optimal serving temperature is straight from the fridge. Take it out, garnish it with a light layer of fresh whipped cream and maybe a dusting of cocoa powder or some chocolate shavings, and slice immediately.
For those perfect, clean slices, run your knife under very hot tap water, dry it quickly, and slice. Wipe the knife clean between every cut. It makes a huge difference in presentation.
Flavor Swaps: Customizing the Crumb and the Cream Base
This recipe is robust, meaning you can swap things up easily.
- The Crust: If you aren't feeling the chocolate, use graham crackers, vanilla wafers, or even shortbread. Adjust the melted butter slightly if the cookie you choose is less crumbly.
- The Crunch: Right before the final chill, try adding a layer of no bake peanut butter pie with chocolate ganache over the top of the filling, or sprinkle in some mini chocolate chips before serving.
- Spices: A pinch of cinnamon or nutmeg in the filling gives it a warm, autumnal lift.

Recipe FAQs
3 ingredient no bake peanut butter pie
Always use a conventional, stabilized peanut butter, such as Skippy or Jif; the natural, oily varieties will prevent your pie from setting properly.
No bake peanut butter pie with cream cheese
To ensure a velvety filling, always use fully softened cream cheese and sift your powdered sugar meticulously to prevent any unwelcome lumps.
3 ingredient peanut butter pie
Ensure your cream cheese is completely soft before mixing; this prevents lumps and guarantees a velvety No-Bake Peanut Butter Pie texture.
No bake peanut butter pie without cream cheese
For a lighter filling, increase the chilled heavy cream by half a cup and slightly boost the peanut butter measurement to maintain proper structure and firmness.
Nobake Peanut Butter Pie With Oreo Crust

Ingredients:
Instructions:
Nutrition Facts:
| Calories | 456 kcal |
|---|---|
| Protein | 9.0 g |
| Fat | 31.0 g |
| Carbs | 37.0 g |
