Old Fashioned Banana Pudding with Toasted Meringue
- Rediscovering Nostalgia: The Authentic Baked Pudding Experience
- Why This Truly Old Fashioned Banana Pudding with Meringue Reigns Supreme
- Sourcing the Components for Superior Flavor
- The Building Blocks of True Old Fashioned Banana Pudding with Meringue
- Crafting the Silky Vanilla Custard Base
- Assembling and Baking Your Masterpiece
- Troubleshooting and Enhancing Your Pudding
- Serving Suggestions for This Classic Dessert
- Frequently Asked Questions
- 📝 Recipe Card
Rediscovering Nostalgia: The Authentic Baked Pudding Experience
There are many variations of this beloved dessert, but today we are focusing on the definitive article: the baked version, crowned with a glorious, toasted meringue. When you embark on crafting an Old Fashioned Banana Pudding with Meringue , you aren’t just baking; you are participating in a cherished culinary tradition.
This is the authentic experience, far removed from the quick, no-bake iterations that often populate modern dessert tables. This recipe requires patience and specific techniques, but the reward is a silken, deeply comforting classic that speaks volumes of heritage baking.
Why This Truly Old Fashioned Banana Pudding with Meringue Reigns Supreme
What sets this recipe apart is the complexity achieved through simple, quality ingredients baked into a cohesive, glorious whole. We are aiming for a dish that feels rich, substantial, and beautifully balanced between the warm custard, the softened fruit, and the cloud like topping.
The Difference Between Baked Custard and Layered Desserts
Many people are familiar with the layered Nila Wafer Banana Pudding , which relies on the cookies softening in the refrigerator to create texture. Our Old Fashioned Baked Banana Pudding with Meringue , however, utilizes cornstarch and egg yolks to create a true, dense custard base that is baked until just set.
This baking process marries the flavors, creating a pudding that cuts cleanly into wedges rather than scooping out of a trifle bowl. The structure and texture achieved through baking are entirely different from those popular layered desserts.
A Taste of Grandmother's Kitchen: Heritage Baking Defined
This Grandma's Old Fashioned Banana Pudding with Meringue embodies the ethos of heritage baking: maximizing flavor through careful technique, rather than relying on shortcuts.
By making this Banana Pudding From Scratch , from cooking the vanilla custard to whipping the Italian meringue, you capture the essence of true comfort food the kind that required an afternoon dedicated solely to its creation.
Setting Expectations for Pure, Unadulterated Comfort Food
Be prepared for a dessert that requires commitment. This is not a 30-minute fix. The result, however, is a deeply satisfying dessert that balances the sweetness of the cooked fruit with the slight tang and airy texture of the Old Fashioned Meringue Topping Recipe .
This Old Fashioned Banana Pudding Recipe is designed to serve 8 generous slices, perfect for a family gathering or special occasion where a little extra effort yields spectacular results.
Sourcing the Components for Superior Flavor
The success of any great dessert rests squarely on the quality of its foundational elements. For this Homemade Banana Pudding Recipe , selecting the right components is non-negotiable if we want that superior flavor profile.
We will be aiming for a classic flavor base using buttery shortbread, though substitutions can certainly be made.
The Building Blocks of True Old Fashioned Banana Pudding with Meringue
This masterpiece relies on four distinct elements coming together: the sturdy cookie base, perfectly ripe fruit, a rich cooked custard, and a flawless meringue crown.
Custard Foundation: Dairy, Eggs, and Sweeteners
Our custard calls for whole milk for maximum creaminess, balanced by granulated sugar and thickened precisely with cornstarch. The richness, however, is derived from four essential egg yolks these provide the deep yellow colour and velvety mouthfeel that cheap alternatives simply cannot replicate.
A final stir-in of high-quality unsalted butter and pure vanilla extract elevates this simple base into something truly luxurious.
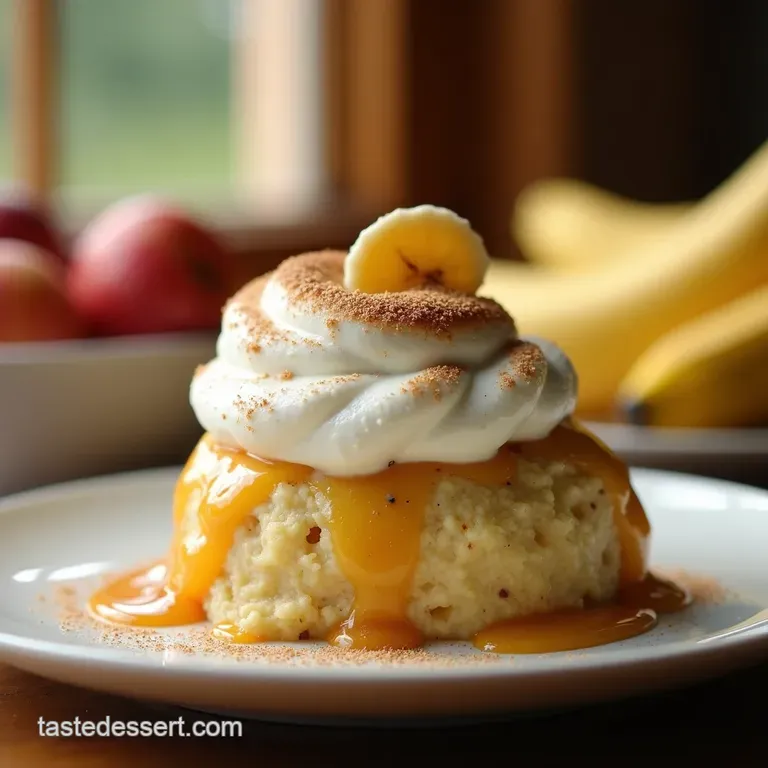
Selecting Bananas at Peak Ripeness (The Golden Rule)
For baking applications, especially those involving slow cooking or prolonged heat, the banana choice is crucial. You must select bananas that are heavily speckled, verging on brown. Underripe, green tipped bananas will remain firm and starchy after baking, offering no sweetness.
We need soft, intensely sweet fruit to mesh seamlessly with the custard; aim for slices about a quarter inch thick for the best distribution.
The Perfect Cookie Base: Shortbread Selection Criteria
While many recipes lean on the familiar Vanilla Wafer Banana Pudding , for a truly old fashioned version, shortbread cookies provide a more robust, buttery foundation.
They offer more structural integrity during the bake than softer wafers, though either works if you are aiming for the classic American texture versus a more traditional bake. You will need about 1.5 cups total, layered throughout the dish.
Ingredients for the Cloud Like Toasted Meringue
The meringue topping is arguably the showstopper. We are employing an Italian meringue technique, which involves cooking the sugar into a hot syrup (reaching 240° F, or 115° C) before pouring it into whipping egg whites.
This cooks the whites, creating a stable, glossy, marshmallow like topping that is far less likely to weep than a traditional French meringue. This component requires the four egg whites we reserved from making the custard base.
Related Recipes Worth Trying
- The Real Deal Classic Southern Homemade Banana Pudding Recipe — Ditch the instant mixes This Homemade Banana Pudding recipe features a rich slowcooked vanilla custard and Nilla Wafers Find the secret to silky smooth...
- Cucumber Caprese Salad with Basil Vinaigrette Light Summer Salad — Forget soggy salads This fresh Cucumber Caprese Salad Recipe swaps bread for crisp cucumber rounds finished with a bright basil vinaigrette Perfect for...
- Ultimate Pecan Pie Cobbler with Fluffy Biscuit Topping — Stop fussing with pie crust This Pecan Pie Cobbler recipe layers gooey filling beneath tender biscuits Its Southern comfort food made simple
Crafting the Silky Vanilla Custard Base
The journey begins with the custard. In a heavy bottomed saucepan, whisk together the sugar, cornstarch, and a pinch of salt ensuring no lumps remain before adding any liquid. This dry mixture is the key to smooth thickening later. You then temper the egg yolks.
This means slowly incorporating about one cup of the milk into the yolks first, whisking continuously until they are fully combined and slightly loosened. Pour this yolk mixture back into the saucepan with the remaining milk and the dry ingredients.
Heat this mixture over medium heat, whisking constantly. It is imperative that you keep the whisk moving across the bottom and sides of the pan to prevent scorching or curdling. Once the mixture thickens significantly and you see large, slow bubbles breaking the surface indicating a brief boil remove it immediately from the heat.
At this point, stir in the butter and vanilla extract until everything melts into a homogenous, deeply fragrant liquid.
Assembling and Baking Your Masterpiece
With the rich custard ready, we move to layering this delightful confection. This preparation needs a 9x13 inch baking dish.
Tempering Eggs: Preventing Scrambled Custard Catastrophes
As detailed above, the tempering process slowly introducing the hot milk to the cooler egg yolks is your insurance policy against ending up with tiny bits of cooked egg rather than smooth custard. Always drizzle the liquid slowly while maintaining a vigorous whisking rhythm.
Layering Technique: Ensuring Even Banana Distribution
Start by lightly buttering your baking dish. Create the first layer using about half of your chosen cookies across the bottom. Arrange half of your sliced bananas atop this cookie layer. Pour half of the hot custard over this section.
Repeat this process: the remaining cookies, the remaining bananas, and finally, the rest of the custard poured carefully over the top to seal everything in.
The Art of the Perfect Bake: Oven Settings and Timing
Place the assembled dish into a preheated oven set to 350° F ( 175° C). The initial bake time runs between 20 and 25 minutes.
You are looking for the edges to appear set and slightly golden, while the very centre still retains a slight, gentle wobble. Overbaking will result in a rubbery texture, so remove it when the wobble is present but minimal. Let it cool slightly while you focus on the magnificent finish.
Whipping Up and Piping the Towering Meringue Topping
While the pudding cools slightly, prepare the Italian meringue. In a small pan, combine the 1 cup of sugar with ¼ cup of water and heat until it reaches exactly 240° F ( 115° C) on a reliable candy thermometer.
Simultaneously, in a stand mixer fitted with the whisk attachment, beat the four room temperature egg whites (reserved from the custard) with ½ teaspoon of cream of tartar until they form soft peaks.
With the mixer running on medium speed, slowly drizzle the hot sugar syrup down the side of the bowl into the egg whites. Once all the syrup is incorporated, increase the speed to high and continue beating until the meringue is stiff, glossy, and the outside of the bowl has cooled down significantly this confirms the sugar has fully stabilized the structure.
Troubleshooting and Enhancing Your Pudding
Even with careful adherence to a Classic Old Fashioned Banana Pudding Recipe , questions can arise. The primary concerns usually revolve around the texture of the custard or the stability of the meringue.
If your custard appears too runny after baking, it means it needed a few more minutes to reach the setting point. If it seems slightly grainy, the yolks were likely added too quickly during tempering.
For the meringue, any weeping (liquid pooling at the bottom) is usually due to not sealing the meringue to the edge of the pudding or not reaching the correct syrup temperature.
Serving Suggestions for This Classic Dessert
The serving experience for this baked pudding is an event in itself, especially when considering the stunning meringue finish.
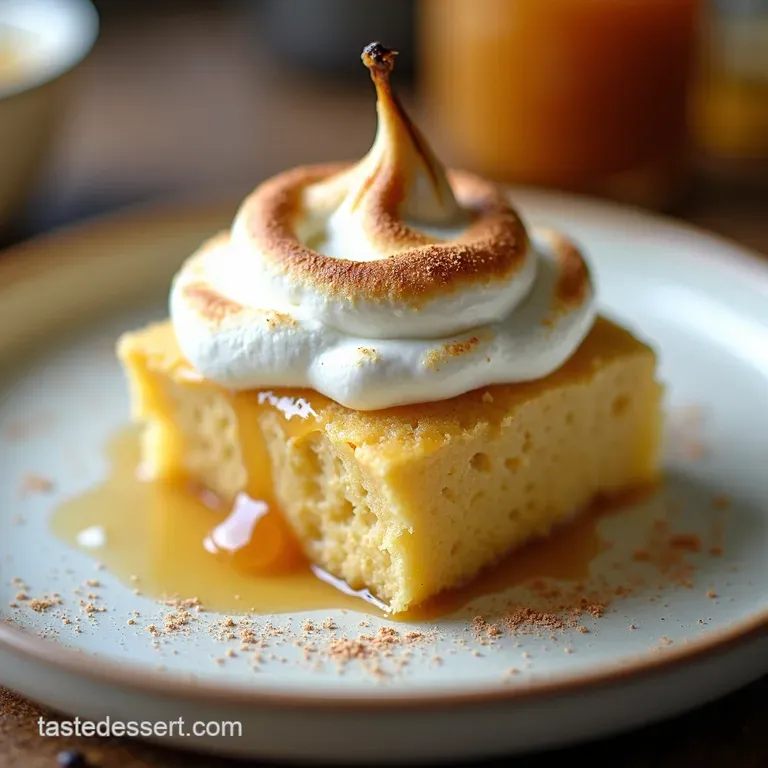
Achieving That Beautifully Toasted Meringue Finish
Once the meringue is spread evenly over the slightly warm pudding ensuring those crucial seals to the dish’s edges you have two options for browning. The preferred method for achieving dramatic peaks is a kitchen torch.
Alternatively, place the dish carefully under a high broiler, keeping the door slightly ajar and watching constantly, as browning can occur in mere seconds. The contrast between the warm, soft pudding and the toasted shell is what makes this dessert so memorable.
Storage Secrets: Keeping Custard Fresh and Safe
Because this recipe contains both dairy and eggs in a baked custard format, proper storage is vital. Allow the pudding to cool at room temperature for no more than two hours. Cover loosely with plastic wrap and refrigerate. It is best eaten within three to four days.
If you are storing it for longer than 24 hours, the meringue may start to slightly deflate or weep, which is normal for this topping style.
Flavor Twists: Subtle Enhancements Beyond Tradition
While this recipe celebrates tradition, subtle enhancements can tailor it to your taste. Consider infusing the milk used for the custard with a vanilla bean pod overnight before cooking, giving the base a deeper, more complex vanilla note.
Alternatively, dusting the bananas with a light sprinkling of cinnamon before layering adds an unexpected warmth that pairs exceptionally well with the rich meringue.

Frequently Asked Questions
My Old Fashioned Banana Pudding with Meringue always seems to weep syrupy liquid after baking. What's the trick to stopping that?
That dreaded weeping is usually down to either an unstable meringue or poor sealing. For this baked custard recipe, make absolutely certain the meringue touches the edges of the baking dish all the way around it forms a crucial seal.
Also, ensuring you cook your Italian meringue syrup to exactly 240°F (115°C) helps stabilise the structure.
Can I make this banana pudding ahead of time? If so, how long does it last in the fridge?
Yes, you absolutely can prepare it ahead! It’s often best after resting for a few hours. You can assemble and bake the custard base a day in advance, keeping it covered tightly in the fridge. Only add the meringue topping shortly before serving, as the baked fruit will soften the custard significantly over time.
What’s the best substitute for vanilla wafers if I don't have any kicking about?
If you don’t have the classic vanilla wafers, don't despair; we can improvise! Thick slices of slightly stale pound cake or butter rich shortbread biscuits work brilliantly, soaking up the custard just as nicely. Just ensure whatever you use is sturdy enough to hold up to the baking process.
My custard seems lumpy after cooking did I mess up the tempering step?
Lumps usually mean the egg yolks scrambled slightly from too much direct heat or being added too quickly. Always remember to temper the yolks by slowly whisking in some of the hot milk before adding the yolk mixture back to the main saucepan.
If you do get lumps, straining the finished custard through a fine mesh sieve before pouring it into the dish is a lifesaver!
I’m nervous about making the Italian Meringue. Can I use a simpler topping for my Old Fashioned Banana Pudding?
It’s understandable; Italian meringue can feel a bit fiddly! If you prefer simplicity, a classic Swiss Meringue, where you heat the whites and sugar over a simmering water bath before whipping, is a stable alternative.
Alternatively, a simple whipped cream topping is delicious, though it won't give you that iconic toasted finish.
Old Fashioned Banana Meringue

Ingredients:
Instructions:
Nutrition Facts:
| Calories | 702 kcal |
|---|---|
| Protein | 8.1 g |
| Fat | 22.8 g |
| Carbs | 72.1 g |
| Fiber | 1.2 g |
| Sodium | 166 mg |
