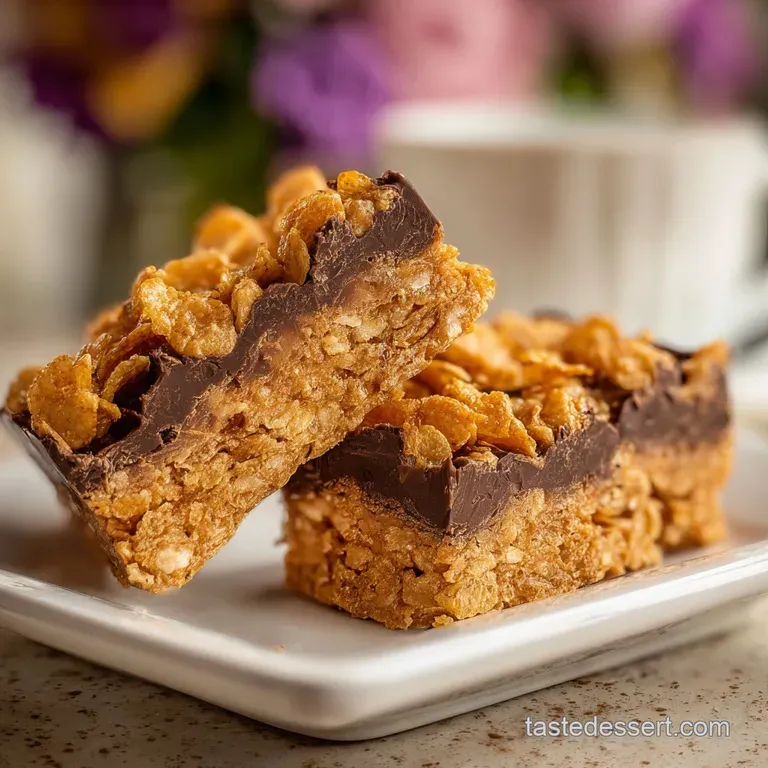
Peanut Butter Cornflake Bars: No-Bake
- Time: Active 10 mins, Passive 5 mins, Total 15 mins
- Flavor/Texture Hook: A noisy, glass like shatter followed by a creamy, salt flecked peanut butter melt.
- Perfect for: Last minute bake sales, hiking snacks, or a nostalgic late night kitchen raid.
- Making The Best Peanut Butter Cornflake Bars
- Why These Bars Shatter So Well
- Choosing The Best Pantry Staples
- Minimal Tools For Busy Cooks
- Creating The Ideal Crunchy Base
- Expert Advice For Clean Slices
- Unique Ways To Mix Flavor
- Best Storage For Long Freshness
- Great Occasions For This Treat
- Recipe FAQs
- 📝 Recipe Card
Making The Best Peanut Butter Cornflake Bars
You know that specific sound when you pour a fresh box of cereal into a bowl? That light, papery rustle is the soundtrack of my childhood Saturdays. I remember standing on a stool, watching my mom swirl a thick ribbon of honey into a bubbling pot of peanut butter.
The kitchen would instantly smell like a toasted nut factory, and the anticipation was almost unbearable. These Peanut Butter Cornflake Bars aren't just a snack; they're a textured experience that hits every single nostalgic note while feeling surprisingly grown up.
What makes this specific version stand out is the refusal to settle for a soggy or rock hard result. We’ve all had those cereal bars that either crumble the second you touch them or require a dental appointment after one bite.
I spent an entire weekend testing honey temperatures just to find the "sweet spot" where the binder stays chewy but firm. It turns out, the secret isn't just in the ingredients, but in how we treat the sugar molecules before they ever meet the flakes.
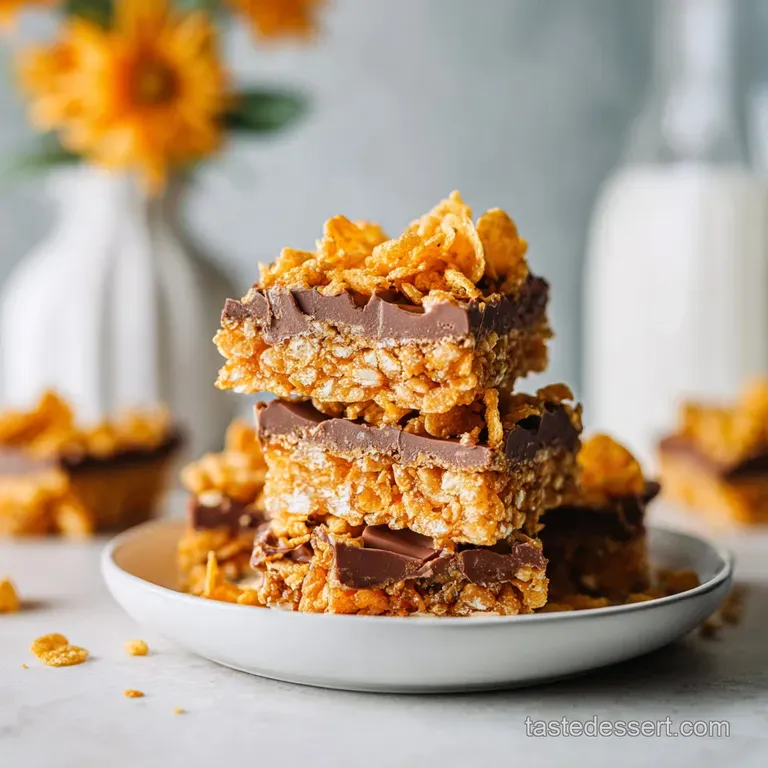
We’re going for a specific sensory goal here: the shatter. When you bite down, those 6 cups (180g) of cornflakes should provide a distinct resistance before yielding to the creamy 1 cup (250g) of peanut butter binder.
We’ve balanced the sweetness with sea salt and a touch of vanilla to ensure it’s not just a sugar bomb. Let’s get into the mechanics of why this works so you can nail it on your first try.
Why These Bars Shatter So Well
The Physics of the Snap: By heating the honey and sugar to a gentle simmer, we create a concentrated sugar syrup that acts as a structural adhesive. As it cools, the mixture moves into a "firm ball" stage, providing enough tension to hold the flakes together without becoming brittle.
- Capillary Action: The honey sugar glaze coats every tiny ridge of the cereal, creating a moisture barrier that prevents the flakes from going limp.
- Emulsification Stability: Adding the peanut butter off the heat prevents the oils from separating, ensuring a velvety, uniform texture throughout the bar.
- Starch Protection: The fat from the peanut butter surrounds the cornstarch in the flakes, keeping them crisp even when submerged in syrup.
- Crystal Inhibition: Brown sugar introduces molasses, which keeps the sugar matrix from crystallizing into a grainy mess, preserving that sought after chew.
| Servings | Ingredient Adjustments | Pan Size | Prep Time |
|---|---|---|---|
| 8 people | 3 cups cereal, 0.5 cup PB | 8x4 Loaf Pan | 10 mins |
| 16 people | 6 cups cereal, 1 cup PB | 9x9 Square Pan | 10 mins |
| 32 people | 12 cups cereal, 2 cups PB | 9x13 Rectangular Pan | 15 mins |
The beauty of the 9x9 square pan for 16 servings is the thickness it provides. You get a substantial bite that feels like a real dessert rather than a thin cracker. If you prefer a thinner, crispier snack, you can spread the 16 serving batch into a larger 9x13 pan, though you'll need to reduce the setting time slightly as the heat dissipates faster across a larger surface area.
Choosing The Best Pantry Staples
The quality of your Peanut Butter Cornflake Bars depends entirely on the chemistry of your cupboard. I’ve found that using a standard creamy peanut butter works much better than the "natural" versions where the oil separates.
The stabilizers in brands like Jif or Skippy help hold the bars together during the cooling process, preventing a greasy bottom layer.
| Ingredient | Science Role | Pro Secret |
|---|---|---|
| Honey (1 cup) | High viscosity binder | Spray the measuring cup with oil first so the honey slides out instantly. |
| Sea Salt (0.5 tsp) | Flavor enhancer | Use flaky sea salt to create tiny "bursts" of contrast against the sugar. |
| Coconut Oil (1 tbsp) | Chocolate softener | This lowers the melting point of the topping, preventing the chocolate from cracking when sliced. |
For the cereal, ensure your 6 cups (180g) of cornflakes are fresh. If the box has been open for a month, the flakes have already absorbed atmospheric moisture and won't give you that signature shatter. If you want to dive deeper into peanut butter treats, you might find the technique in The OldFashioned Peanut recipe helpful for understanding sugar saturation.
- Cornflake cereal (6 cups): The structural skeleton. Substitute: Crisped rice cereal for a lighter, airier crunch.Why this? Cornflakes offer a larger surface area for the syrup to cling to.
- Creamy peanut butter (1 cup): The fatty binder. Substitute: Almond butter for a more toasted, nutty profile.Why this? Provides the "velvety" mouthfeel and essential fats.
- Honey (1 cup): The liquid gold adhesive. Substitute: Brown rice syrup for a less sweet, vegan friendly option.Why this? Creates a more nuanced sweetness than corn syrup.
- Light brown sugar (0.5 cup): The chew factor. Substitute: Coconut sugar for a deeper, caramel like undertone.Why this? Adds moisture and prevents the bars from becoming too hard.
- Pure vanilla extract (1 tsp): The aromatic bridge. Substitute: Almond extract (0.5 tsp) for a wedding cake flavor profile.Why this? Rounds out the sharp sweetness of the honey.
- Sea salt (0.5 tsp): The electrolyte balance. Substitute: Kosher salt if you want a more subtle saltiness.Why this? It's the secret to making these addictive rather than just sweet.
- Semi sweet chocolate chips (1 cup): The bitter contrast. Substitute: Dark chocolate (70%) for a more intense cocoa finish.Why this? Balances the high sugar content of the base.
- Coconut oil (1 tbsp): The gloss agent. Substitute: Unsalted butter for a richer, dairy forward topping.Why this? Keeps the chocolate flexible enough to slice cleanly.
Minimal Tools For Busy Cooks
You don't need a stand mixer or a blowtorch for this. This is "one pot" territory at its finest. I prefer using a heavy bottomed Dutch oven or a thick stainless steel pot. Why? Because thin pots have hot spots that can scorch the honey and sugar before they have a chance to melt together.
A heavy pot distributes the heat evenly, which is crucial for achieving that glass like sugar state.
Chef's Tip: Freeze your buttered spatula for 5 minutes before pressing the mixture into the pan. The cold surface prevents the sticky syrup from clinging to the tool, giving you a perfectly flat top.
You'll also want a 9x9 inch baking pan lined with parchment paper. Leave an overhang on the sides think of it as a "sling." This allows you to lift the entire block of Peanut Butter Cornflake Bars out of the pan once they've set, making the slicing process ten times easier.
No one likes digging bars out of a corner with a butter knife.
Creating The Ideal Crunchy Base
1. Preparing The Foundation
Line your 9x9 pan with parchment paper, ensuring the edges hang over. This is your insurance policy for a clean removal later. Measure out your 6 cups (180g) of cornflakes into a very large bowl bigger than you think you need to allow for vigorous stirring without crushing the flakes.
2. Crafting The Velvet Binder
In a medium saucepan over medium heat, combine 1 cup (340g) honey and 0.5 cup (100g) light brown sugar. Stir constantly until the sugar dissolves and the mixture just begins to bubble at the edges. Note: Do not let it reach a rolling boil or the bars will become rock hard.
3. Merging And Setting
Remove the pot from the heat immediately. Stir in 1 cup (250g) creamy peanut butter, 1 tsp (5ml) vanilla, and 0.5 tsp (3g) sea salt until the mixture is completely smooth and velvety. Pour this golden liquid over the cornflakes.
Use a large spatula to fold the flakes in gently, ensuring every piece is glistening.
4. Finishing With Gloss
Press the mixture firmly into your prepared pan using the back of a greased spoon. In a small microwave safe bowl, heat 1 cup (170g) chocolate chips and 1 tbsp (15g) coconut oil in 30 second bursts. Stir until the chocolate is glossy and completely melted.
Pour this over the bars, spread evenly, and let sit for at least 30 minutes (or 15 in the fridge) before slicing.
| Fresh Approach | Shortcut Method | Result |
|---|---|---|
| Honey & Brown Sugar | Corn Syrup Only | Honey provides floral notes and a softer, more complex chew. |
| Toasted Cornflakes | Straight from Box | Toasting for 5 mins adds a deeper "nutty" crunch that resists sogginess. |
| Stovetop Melting | Microwave Melting | Stovetop offers better heat control to prevent scorching the honey. |
If you love this no bake approach, you should definitely try the NoBake Peanut Butter recipe for a quicker, bite sized snack version.
Expert Advice For Clean Slices
The biggest mistake people make is trying to cut these bars the moment they look "done." If the chocolate is still tacky, you’ll end up with a smeared mess. Patience is a literal ingredient here. I usually wait until the chocolate has fully matte ified.
If you’re in a hurry, 15 minutes in the fridge will do the trick, but don't leave them in there too long or the base will become too difficult to cut through.
Preventing The Hard Bar
The "brick" phenomenon happens when the honey and sugar are boiled for too long. We aren't making hard candy; we are making a binder. As soon as you see those first few bubbles popping on the surface of your honey mixture, pull it off the heat. The residual heat will finish the job.
Achieving A Clean Slice
To get those sharp, professional edges, use a large chef's knife. Run the blade under hot water for 30 seconds, wipe it completely dry, and then make one decisive downward cut. Wipe the blade clean after every single slice.
This prevents the sticky peanut butter base from pulling the chocolate topping down into the middle of the bar.
| Problem | Root Cause | Solution |
|---|---|---|
| Bars are falling apart | Syrup didn't reach temp | Heat honey/sugar until bubbles appear at the edges. |
| Top is too sticky | Chocolate didn't temper | Add a teaspoon more coconut oil or chill for 10 more minutes. |
| Cornflakes are soggy | Old cereal or over mixing | Use a fresh box and fold gently to avoid crushing the flake structure. |
Common Mistakes Checklist
- ✓ Never use "Natural" peanut butter; the lack of stabilizers leads to a greasy, unstable bar.
- ✓ Don't skip the salt; without it, the honey and chocolate become overwhelmingly cloying.
- ✓ Avoid over boiling the honey; stop the moment you see the first bubble to keep the chew.
- ✓ Ensure your cornflakes are fresh; even slightly stale cereal will absorb the syrup and turn mushy.
- ✓ Don't press too hard into the pan; you want to pack them firmly but not crush the air pockets between flakes.
Unique Ways To Mix Flavor
Once you've mastered the classic Peanut Butter Cornflake Bars, the variations are endless. I sometimes toss in a handful of mini marshmallows at the very end of the stirring process don't let them melt completely, just let them get soft and streaky. It adds a "fluffernutter" vibe that is absolutely dangerous.
Boosting The Gooey Factor
If you want a bar that pulls apart like a marshmallow treat, increase the honey by 2 tablespoons and decrease the brown sugar by the same amount. This shifts the sugar to moisture ratio just enough to keep the binder in a semi liquid state at room temperature.
Creating A Healthy Twist
For a version that feels a bit more like a breakfast bar, swap the cornflakes for a mix of toasted oats and puffed quinoa. Use a dark chocolate topping (85% cocoa) and replace the light brown sugar with coconut sugar. It won't have the same "shatter," but it will have a fantastic earthy crunch.
Adding The Kitchen Sink
If you're feeling adventurous, add 1/4 cup of crushed pretzels and 1/4 cup of salted peanuts into the cornflake mix. This doubles down on the salty sweet profile. You can also drizzle white chocolate over the semi sweet layer for a "zebra" effect that looks beautiful on a dessert platter.
Best Storage For Long Freshness
These bars are surprisingly hardy. Because they are a low moisture dessert (thanks to the honey binder), they don't go stale nearly as fast as cookies or cake. You can keep them in an airtight container at room temperature for up to 5 days.
If it's a particularly hot summer, the fridge is better to keep the chocolate from turning into a puddle.
Freezing: These freeze like a dream. Wrap individual squares in plastic wrap and toss them into a freezer bag. They’ll stay fresh for up to 3 months. The best part? You can actually eat them straight from the freezer they don't get rock hard, just extra chewy and refreshing.
Zero Waste: If you find yourself with the "crumbs" at the bottom of the pan after slicing, don't throw them away! Those chocolatey, peanut buttery cornflake bits make the most incredible topping for vanilla bean ice cream. Store the scraps in a small jar and sprinkle them over your next sundae.
Great Occasions For This Treat
These are the ultimate "grab and-go" dessert. Because they don't require refrigeration (unless it's meltingly hot), they are perfect for outdoor picnics or potlucks. I often bring a batch to school events because they are nut forward but familiar enough that kids dive right in. If you want to see how this texture compares to a more traditional baked good, check out The Quintessential Crosshatch recipe for a different take on the peanut butter profile.
Making It Plant Based
To make these vegan, simply swap the honey for brown rice syrup or maple syrup. Keep in mind that maple syrup is much thinner, so you'll need to simmer it for about 2 minutes longer to achieve the same binding strength. Use a vegan chocolate chip brand and ensure your brown sugar is bone char free.
Scaling For Large Crowds
When doubling this recipe for a big party, use a 9x13 pan. Scaling Down (1/2 batch): Use an 8x4 inch loaf pan. Reduce the honey simmering time by 1 minute as the smaller volume heats up significantly faster. Scaling Up (2x batch): Use a 9x13 pan.
Increase the salt to 0.75 tsp rather than a full 1 tsp to avoid over salting, and be prepared to use more elbow grease when folding the 12 cups of cereal!
The sugar to flake ratio is the most important part of the math here. If you mess with the volume of the cereal, the bars will either be too dry to stick or so gooey they never set. Stick to the 6 cup (180g) measurement for the 9x9 pan and you'll have a win every single time.
There’s something so satisfying about a dessert that takes 15 minutes but tastes like you’ve been slaving over a stove all afternoon. Trust me, once you hear that first shatter, you'll be hooked.

Recipe FAQs
Can I substitute corn syrup for honey in these bars?
No, stick with honey. Honey provides a more complex floral sweetness and a better chew than corn syrup, contributing to the desired shatter like texture.
My bars turned out rock hard. What went wrong?
You likely boiled the honey and sugar mixture for too long. The goal is to gently simmer until bubbles appear at the edges, not a rolling boil. Overcooking caramelizes the sugar too much, leading to a brittle bar.
How do I get a clean slice on the chocolate topping?
Run a chef's knife under hot water, wipe it dry, and make one decisive cut. Repeat this process for each slice, wiping the blade clean between cuts to prevent the sticky base from smearing the chocolate.
Can I use natural peanut butter with no added stabilizers?
No, stick with conventional creamy peanut butter. The stabilizers in brands like Jif or Skippy are crucial for holding the bars together and preventing the oils from separating, ensuring a uniform texture.
What's the best way to store leftover Peanut Butter Cornflake Bars?
Store them in an airtight container at room temperature for up to 5 days. If your kitchen is very warm, refrigerating them is better to prevent the chocolate from melting. They also freeze well.
How do I make these bars vegan?
Swap the honey for brown rice syrup or maple syrup and use vegan chocolate chips. Be aware that maple syrup is thinner and may require a slightly longer simmering time to achieve the right consistency.
Can I toast the cornflakes for extra crunch?
Yes, toasting the cornflakes for 5 minutes adds a deeper, "nutty" crunch. This step helps the flakes resist sogginess and contributes to the satisfying shatter when you bite into the bar.
Peanut Butter Cornflake Bars

Ingredients:
Instructions:
Nutrition Facts:
| Calories | 279 kcal |
|---|---|
| Protein | 5.2 g |
| Fat | 11.7 g |
| Carbs | 42.9 g |
| Fiber | 1.9 g |
| Sugar | 28.5 g |
| Sodium | 216 mg |
