Peanut Butter Cream Cheese Balls: Velvety and Rich
- Time:15 minutes active + 60 minutes chilling = Total 75 minutes
- Flavor/Texture Hook: Velvety, rich centers with a crisp chocolate snap
- Perfect for: Holiday platters, party appetizers, or late night sugar cravings
- Easy Peanut Butter Cream Cheese Balls
- The First Decadent Bite
- Why These Treats Work
- Recipe Specifications
- Essential Ingredient List
- Necessary Kitchen Gear
- Simple Step-by-Step Guide
- Solving Common Mixing Issues
- Smart Ingredient Swaps
- Freshness and Storage Tips
- Pro Serving Suggestions
- Recipe FAQs
- 📝 Recipe Card
Easy Peanut Butter Cream Cheese Balls
That smell of toasted peanuts and warm vanilla hitting the air is honestly the best part of my Sunday afternoons. I remember the first time I tried making these for a friend's baby shower, thinking I could just wing the proportions.
I ended up with a sticky mess that looked more like peanut butter soup than actual treats, and I spent an hour trying to "save" it by dumping in more sugar. It was a disaster, but it taught me that the balance of fat and sugar is everything here.
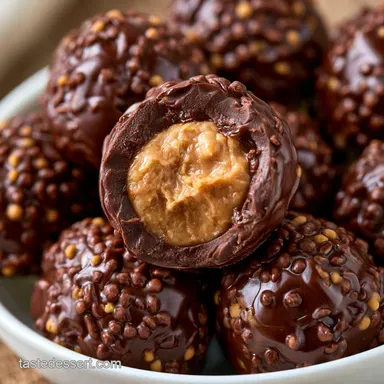
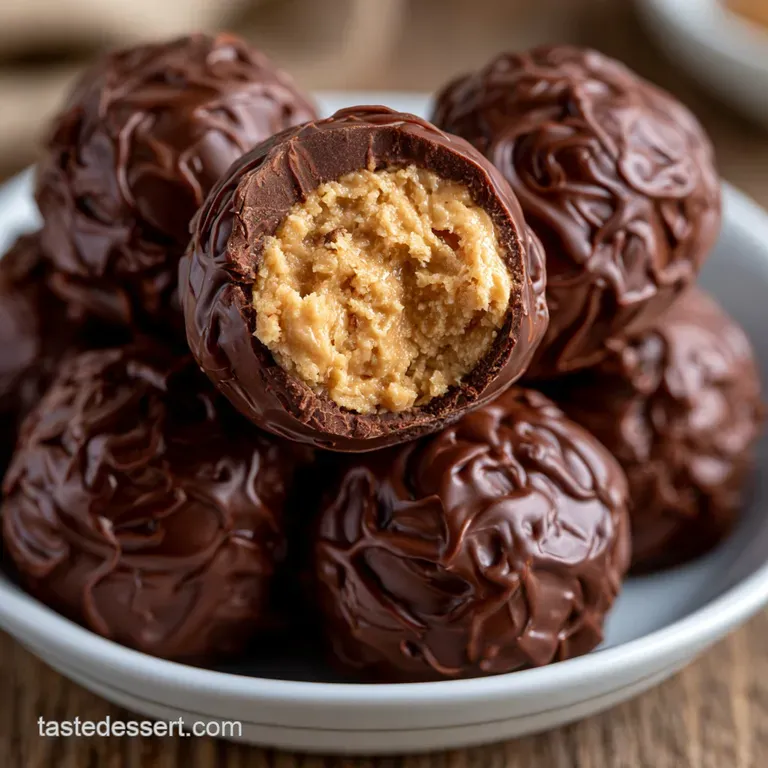
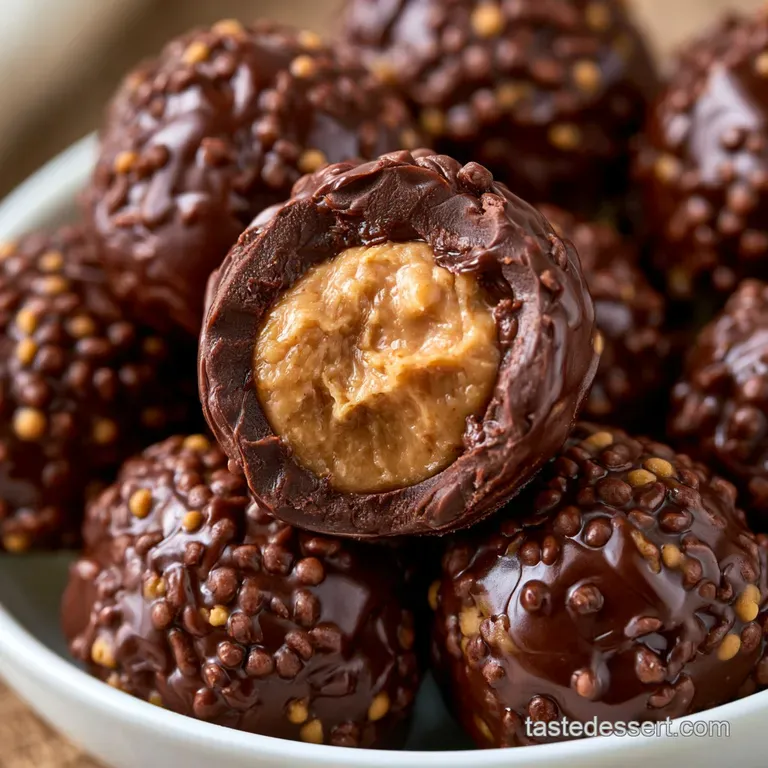
Once I figured out the ratio, it changed everything. These aren't just sweets, they're like little bites of luxury that you can whip up without ever turning on the oven. You get that rich, tangy hit from the cheese and the deep saltiness of the peanut butter, all wrapped in a chocolate shell that shatters when you bite into it.
This is the ultimate recipe for a 3 Ingredient Peanut Butter Ball with Cream Cheese. While we add a few flavor boosters like vanilla and salt to make them truly decadent, the core magic happens between the cheese, the butter, and the sugar.
Trust me, once you try this version, you'll never go back to the butter only versions.
The First Decadent Bite
There is something about the contrast in this treat that just works. You have the cold, dense center that feels almost like a truffle, and then that thin, glossy layer of chocolate. It's the kind of snack that makes people ask for the recipe the second they finish their first piece.
I've brought these to everything from casual movie nights to formal holiday parties, and they always disappear first.
The key is the tang. Most peanut butter treats are just "sweet," but the addition of cream cheese adds a layer of complexity. It cuts through the heaviness of the peanut butter and the sugar, making the whole thing feel lighter on the palate despite being so rich.
It's a homemade quality that you just can't find in store-bought candies.
If you're looking for other no bake ideas to pair with these, you might love my Cottage Cheese Cookie Dough for a different kind of high protein treat. Both of them rely on that creamy, blended base that satisfies a craving instantly.
Why These Treats Work
I used to think this was just mixing things together, but there's actually a bit of logic to why this specific combination stays together.
- Fat Synergy: The saturated fats in the cream cheese and the oils in the peanut butter create a stable, thick emulsion that doesn't leak.
- Sugar Binding: Powdered sugar doesn't just sweeten, it acts as a structural agent that absorbs excess moisture.
- Temperature Setting: Chilling the balls firms up the fats, which prevents them from melting the moment the warm chocolate hits them.
- Glaze Stability: Adding a bit of coconut oil to the chocolate prevents it from becoming too brittle and helps it stay glossy.
| Approach | Base Fat | Prep Time | Texture | Best For |
|---|---|---|---|---|
| Fast/Simple | Butter | 10 mins | Fudgy/Soft | Quick cravings |
| Classic | Cream Cheese | 15 mins | Velvety/Dense | Parties/Gifts |
Recipe Specifications
Before we dive in, let's look at the core components. This recipe is designed for a batch of 24, which is the sweet spot for a standard party platter. Since there's no baking involved, the "cook time" is zero, but don't ignore the chilling phase.
If you skip the 60 minutes in the fridge, your balls will flatten out under the weight of the chocolate.
For the best results, make sure your cream cheese is truly softened. If it's too cold, you'll end up with little white lumps in your mixture, and you'll lose that silky consistency. I usually leave mine on the counter for about two hours, or I give it a very quick 10 second zap in the microwave.
Essential Ingredient List
Gather everything before you start. It's much easier to mix when you aren't hunting for the vanilla extract mid stir.
- 8 oz cream cheese, softened Why this? Provides the tangy, stable base
- 1 cup creamy peanut butter Why this? Adds the primary flavor and oil
- 2 cups powdered sugar, sifted Why this? Binds the dough and sweetens
- 1 tsp vanilla extract Why this? Adds a floral aromatic note
- 1/4 tsp salt Why this? Balances the sugar intensity
- 12 oz semi sweet chocolate chips Why this? Creates the signature snap
- 2 tbsp coconut oil Why this? Ensures a smooth, glossy glaze
| Original Ingredient | Substitute | Why It Works |
|---|---|---|
| Cream Cheese (8 oz) | Mascarpone (8 oz) | Similar fat content. Note: Sweeter and milder than cream cheese |
| Peanut Butter (1 cup) | Almond Butter (1 cup) | Same consistency. Note: Nuttier, less salty profile |
| Powdered Sugar (2 cups) | Maple Powder (2 cups) | Similar binding properties. Note: Stronger, earthy sweetness |
| Semi Sweet Chips (12 oz) | Dark Chocolate (12 oz) | Same melting point. Note: More bitter, less sweet finish |
I always recommend sifting your powdered sugar. I know it feels like an extra step, but according to King Arthur Baking, sifting prevents clumps that can create "sugar pockets" in your dough. Nobody wants a gritty bite in their Peanut Butter Ball with Cream Cheese.
Necessary Kitchen Gear
You don't need a professional kitchen for this, but a few tools make the process way smoother. A hand mixer or a stand mixer (like a KitchenAid) is your best friend here. You could do it by hand, but you'll be working way harder to get the cream cheese and peanut butter completely smooth.
You'll also need a baking sheet lined with parchment paper. Don't use foil, as the chocolate can sometimes stick to it, and you'll end up tearing your beautiful glaze. A small microwave safe bowl for the chocolate and a fork for dipping are the final pieces of the puzzle.
Simple step-by-step Guide
Let's get into the actual making. Right then, let's crack on.
- Beat the softened cream cheese and peanut butter together on medium speed until the mixture is completely homogenous and smooth.
- Slowly incorporate the powdered sugar, vanilla, and salt. Mix until a thick, slightly tacky dough forms that pulls away from the sides of the bowl. Note: Add sugar gradually to avoid a "sugar cloud" in your kitchen.
- Scoop approximately 1 tablespoon of dough and roll it between your palms until it forms a smooth, round ball.
- Place each ball on a parchment lined baking sheet and chill in the refrigerator for 60 minutes. Note: This is non negotiable for the chocolate to set.
- Melt the chocolate and coconut oil in 30 second bursts in the microwave, stirring in between until the glaze is glossy and fluid.
- Using a fork, dip each chilled ball into the chocolate, swirling to coat.
- Place the dipped balls back on the parchment paper.
- Let them set in the fridge for another 15 minutes until the chocolate shell is firm.
Solving Common Mixing Issues
Even with a simple recipe, things can go sideways. Most of the time, it comes down to temperature or ratios. If your dough feels too wet, it's usually because the cream cheese was too warm or you used a very "drippy" natural peanut butter.
Sticky Dough Fixes
If your mixture is sticking to your hands, don't just keep adding sugar. Try popping the whole bowl in the fridge for 15 minutes. This firms up the fats and makes the Butter Ball with Cream Cheese much easier to handle.
Cracking Chocolate Shells
When the chocolate cracks, it's usually because the chocolate was too hot or you didn't add enough coconut oil. The oil keeps the chocolate flexible. If this happens, just melt a bit more chocolate with a touch more oil and "patch" the cracks with a toothpick.
Flattening Center Problems
If your balls are turning into pancakes, they weren't chilled long enough. The core needs to be firm before it hits the chocolate.
| Problem | Root Cause | Solution |
|---|---|---|
| Dough too sticky | Room temp too high | Chill dough 15 mins before rolling |
| Grainy texture | Un sifted sugar | Sift powdered sugar next time |
| Chocolate streaks | Uneven melting | Stir chocolate every 30 seconds |
Common Mistakes Checklist
- ✓ Sifted the powdered sugar to avoid lumps
- ✓ Used room temperature cream cheese for a smooth blend
- ✓ Chilled the balls for the full 60 minutes
- ✓ Added coconut oil to keep the chocolate glossy
- ✓ Used a fork for dipping to minimize excess chocolate
Smart Ingredient Swaps
If you want to change the flavor profile, this recipe is very forgiving. For a more "adult" version, you can add a pinch of cinnamon or even a drop of almond extract. If you're looking for something slightly different, you could try a Biscoff Trifle as another party treat.
For those avoiding dairy, you can use a vegan cream cheese alternative and coconut oil. Just be careful with the brands, as some vegan cheeses have a higher water content, which might require an extra 1/4 cup of powdered sugar to keep the Ball with Cream Cheese from becoming too soft.
For a lower sugar version, you can try using a monk fruit powdered sweetener. However, keep in mind that these don't always bind as strongly as cane sugar, so you'll definitely want to increase the chilling time to 2 hours.
Freshness and Storage Tips
These treat beauties keep surprisingly well. I usually store them in an airtight container in the fridge. They'll stay fresh and velvety for about 5 to 7 days. If you're planning to give them as a gift, just make sure the container is chilled before you put them in to prevent the chocolate from sweating.
If you want to save them for later, they freeze brilliantly. Place them on a tray to freeze individually for an hour, then toss them into a freezer bag. They'll last for up to 3 months. When you're ready to eat them, just let them thaw in the fridge for an hour.
To avoid waste, if you have leftover chocolate glaze, don't throw it away. It's great for dipping strawberries or pretzels. You can also use any leftover peanut butter dough as a filling for a thumbprint cookie.
Pro Serving Suggestions
To make these look like they came from a high end candy shop, the dipping technique is everything. Instead of just dunking them, use the fork to lift the ball straight up and give it a quick swirl. This creates a clean bottom and a smooth top.
If you want to add a bit of flair, sprinkle a tiny pinch of flaky sea salt on top of the wet chocolate immediately after dipping. The salt makes the peanut butter flavor pop and looks beautiful against the dark chocolate.
For a party platter, arrange these alongside some fresh raspberries or green grapes. The acidity of the fruit cuts through the richness of the Peanut Butter Cream Cheese Balls, making the whole spread feel more balanced.
Honestly, don't even bother with low-fat cheese here, the full fat version is what gives you that luxurious mouthfeel.
Recipe FAQs
Do these balls need to be chilled before dipping in chocolate?
Yes, chill them for at least 60 minutes. This firms up the fats, ensuring the balls maintain their shape and don't melt when they hit the warm chocolate glaze.
What should I do if the dough is too sticky to roll?
Add more powdered sugar one tablespoon at a time. Mix until the dough pulls away from the sides of the bowl and is tacky but rollable between your palms.
How to melt the chocolate and coconut oil without scorching?
Microwave in 30-second bursts. Stir thoroughly between each interval to ensure even heating and a glossy finish.
Is it true that butter can be used as a direct replacement for cream cheese?
No, this is a common misconception. Butter lacks the tangy flavor and structural stability of cream cheese, which would result in a greasier, less velvety center.
How to store the finished treats to prevent them from softening?
Store in an airtight container in the refrigerator. This keeps the centers firm and the chocolate snap intact for up to a week.
How to achieve a smooth, professional looking chocolate glaze?
Stir coconut oil into the melted chocolate. This reduces the viscosity of the glaze, allowing it to coat the balls thinly and evenly without clumping.
Can I use dark chocolate chips instead of semi sweet?
Yes, dark chocolate is a great alternative. It provides a deeper, less sweet contrast to the creamy peanut butter. If you enjoyed mastering the chocolate coating technique here, see how the same principle works in our homemade choco tacos.
Peanut Butter Cream Cheese Balls