Peanut Butter Mousse: High Protein and Silky
- Time: Active 5 minutes, Passive 0 minutes, Total 5 minutes
- Flavor/Texture Hook: Glossy, nutty, and incredibly silky
- Perfect for: Post workout fuel, a quick weeknight treat, or a healthy snack for kids
- Silky Whipped Peanut Butter Mousse Secrets
- Why This High Protein Base Works
- Component Breakdown for Better Texture
- Essential Elements and Smart Swaps
- Tools for a Glossy Finish
- Step-by-Step for Maximum Airiness
- Fixing Common Texture Mistakes
- Adjusting Portions for Larger Crowds
- Keeping Your Mousse Fresh Longer
- Debunking Viral Dessert Misconceptions
- Adaptations for Special Nutrition Needs
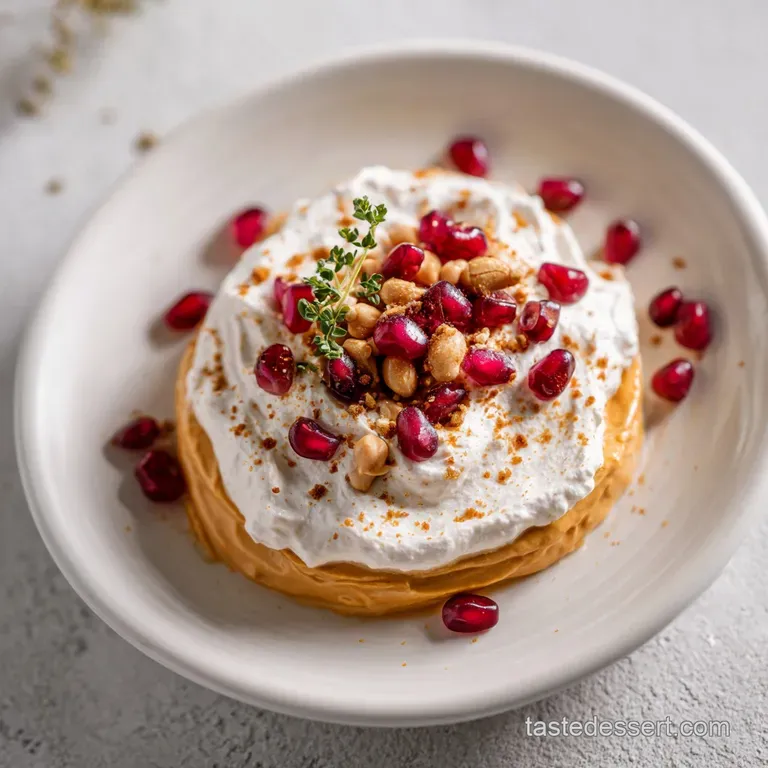
- Garnish Strategy and Color Balance
- Recipe FAQs
- 📝 Recipe Card
Silky Whipped Peanut Butter Mousse Secrets
Forget everything you think you know about cottage cheese. I used to be the biggest skeptic, honestly. I remember staring at that tub of lumpy, watery curds and thinking there was no way it could ever become a dessert. But then I saw the transformation happen in real time.
The moment you hit high speed on that blender, the curds don't just break down; they undergo a complete metamorphosis into a glossy, thick liquid that rivals any pastry cream I've ever made.
You don't need heavy whipping cream or hours of folding egg whites to get a decadent finish. This Peanut Butter Mousse relies on a bit of kitchen magic that happens when you emulsify fats into a high protein base.
The aroma that hits you that deep, roasted scent of natural peanuts mixed with a hint of vanilla is enough to make you want to skip the bowl and eat it straight from the blender jar.
Trust me on this, once you try this method, those oily, sugar laden store-bought puddings will never see your grocery cart again.
We're moving past the "diet food" reputation and into the world of genuine homemade joy. We've all had those moments where we want something sweet but don't want the sugar crash that follows. This recipe is the answer to that specific craving.
It's thick enough to hold its shape on a spoon but soft enough to feel like a cloud. We're going to use specific techniques to ensure it stays velvety and never turns out grainy or thin.
Why This High Protein Base Works
When we talk about making a mousse, we’re usually talking about trapped air. In a traditional recipe, you’re whisking fat and sugar until they form a stable structure. Here, we’re using the natural properties of the cottage cheese to do the heavy lifting.
It's fascinating because the casein protein in the cheese acts as a stabilizer, holding the aeration from the blender blades in place.
- Mechanical Breakdown: High speed blending shatters the curd structure, turning solid milk solids into a perfectly smooth liquid.
- Fat Emulsification: The natural oils in the peanut butter bind with the moisture in the cheese, creating a thick, spreadable consistency.
- Starch Stabilization: The addition of peanut butter powder absorbs excess moisture, ensuring the mousse doesn't weep or separate over time.
- Flavor Neutralization: High speed friction helps the salt and maple syrup penetrate the protein molecules, which masks the "tangy" cheese flavor.
The magic really happens in those first 60 seconds of blending. If you stop too early, you're left with a gritty texture that feels like a mistake. But if you push through until it's glossy, the protein strands align, giving you that signature velvety mouthfeel.
It's a simple physical change that makes all the difference between a "healthy substitute" and a legitimate dessert.
| Method | Texture | Effort Level | Best For |
|---|---|---|---|
| Fresh Blended | Silky, thick, and creamy | 5 minutes | Immediate dessert cravings |
| Chilled Set | Firm, scoopable, like fudge | 30 mins wait | Topping for fruit or pancakes |
| Hand Mixed | Slightly grainy, rustic | Low effort | Quick protein boost on the go |
Choosing the right method depends entirely on how much of a "purist" you are about texture. If you're like me and can't stand a single lump, the high speed blender is your only option.
However, if you're just looking for a quick snack and don't mind a little texture, a vigorous hand whisking can work in a pinch, though it won't be a true mousse.
Component Breakdown for Better Texture
I’ve spent a lot of time experimenting with different brands and fat percentages. It’s not just about grabbing the first thing you see on the shelf. The science of the ingredients determines whether your mousse will be a runny mess or a stiff, beautiful peak.
We want to aim for high fat and low moisture whenever possible to keep things stable.
| Ingredient | Science Role | Pro Secret |
|---|---|---|
| Cottage Cheese (4%) | Provides the protein structure and creamy base | Always use 4% milkfat; fat free versions turn watery when blended |
| Natural Peanut Butter | Acts as the primary fat for emulsification | Stir the jar thoroughly to ensure even oil distribution before measuring |
| Peanut Butter Powder | Absorbs liquid and intensifies the roasted flavor | This is the "secret weapon" that keeps the mousse from being too thin |
| Maple Syrup | Low glycemic sweetener that blends instantly | Avoid honey here as it can be too thick and cause clumping in cold cheese |
The interaction between the peanut butter powder and the liquid base is what really creates the "set." If you've ever made a Peanut Butter Fudge, you know that the ratio of solids to fats is what determines the final bite. Here, the powder acts as a sponge, taking the moisture from the cheese and turning it into a structured foam.
Essential Elements and Smart Swaps
Getting the right ingredients is half the battle. You want to look for quality over quantity here because there are so few components. Each one needs to pull its weight. For instance, using a vanilla extract that’s been sitting in your cupboard for three years won't give you that aromatic punch we're looking for.
- 1.5 cups cottage cheese (4% milkfat)
- Substitute: Whole milk Greek yogurt (drained). Why this? Maintains high protein but adds a more pronounced tartness to the final mousse.
- 1/4 cup creamy natural peanut butter
- Substitute: Almond butter or Cashew butter. Why this? Offers a different nutty profile; cashew butter creates an even creamier, sweeter finish.
- 2 tbsp peanut butter powder
- Substitute: Casein protein powder (vanilla or chocolate). Why this? Casein thickens much better than whey, helping the mousse maintain its airy structure.
- 2.5 tbsp maple syrup
- Substitute: Agave nectar or liquid Stevia. Why this? Liquid sweeteners incorporate without any grittiness, keeping the texture perfectly silky and smooth.
- 1 tsp pure vanilla extract
- Substitute: Vanilla bean paste. Why this? The tiny black flecks look beautiful and provide a much more intense floral aroma.
- 1 pinch sea salt
- Substitute: Kosher salt. Why this? Enhances the roasted notes of the peanuts and balances the sweetness of the syrup.
Right then, let's talk about the cheese. I once tried making this with a 1% fat free version because it was all I had in the fridge. Huge mistake. The lack of fat meant the curds didn't emulsify; they just shattered into a thin, soup like consistency.
Stick with the 4% the mouthfeel is worth every extra gram of fat, and it's what makes this feel like a real treat.
Tools for a Glossy Finish
You don't need a professional kitchen, but a standard food processor often fails where a high speed blender succeeds. The goal is to pulverize the curds, not just move them around. If your blender has a "liquify" or "smoothie" setting, that's going to be your best friend for this recipe.
- High Speed Blender: Necessary for achieving a zero grain texture (like a Vitamix or Ninja).
- Silicone Spatula: Crucial for scraping the thick mousse out from under the blades.
- Small Ramekins: Perfect for individual portions and helping the mousse set faster in the fridge.
- Measuring Spoons: Accuracy matters when balancing the salt and vanilla against the heavy peanut flavor.
If you only have a food processor, you'll need to run it for about 3 minutes instead of 1. You'll also want to stop frequently to scrape the sides. It might not get quite as silky, but it will still be delightful.
Just don't try to use a hand mixer you'll end up with peanut butter flavored lumps, and nobody wants that.
step-by-step for Maximum Airiness
The order of operations is the most important part of this process. If you throw everything in at once, the peanut butter can coat the curds, making it harder for the blades to break them down. We want to work in stages to ensure the base is liquid before we add the heavy fats and powders.
- Place the cottage cheese in a high speed blender alone. This is the most critical step for success. Note: Blending the cheese first ensures no lumps remain before other ingredients thicken the mixture.
- Blend on high for 45 60 seconds. Watch for the transition from "chunky" to "glossy." until the mixture is completely liquid and velvety with zero visible grains.
- Add the creamy peanut butter and peanut butter powder. Pour these right into the center of the liquid base. Note: The powder will begin absorbing moisture immediately, so move quickly to the next step.
- Pour in the maple syrup, vanilla extract, and sea salt. These liquid aromatics help the fats incorporate more smoothly.
- Pulse 5 10 times. Use short bursts rather than a long continuous blend. until the color is uniform and the mixture looks like soft serve ice cream.
- Scrape down the sides with a silicone spatula. Ensure no pockets of dry powder are hiding in the corners of the blender jar.
- Give it one final 5 second pulse. This ensures total emulsification of the peanut oils into the protein base.
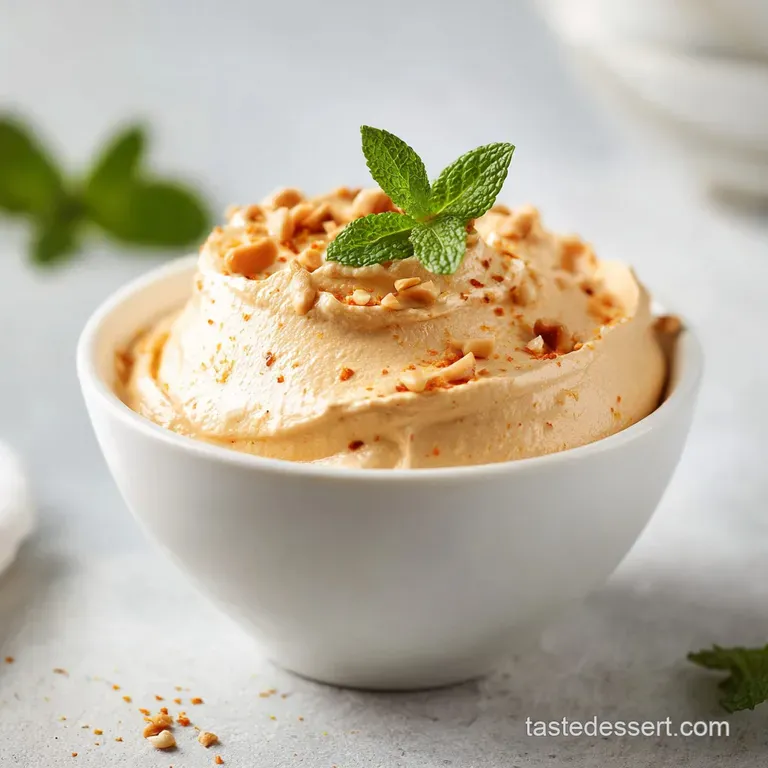
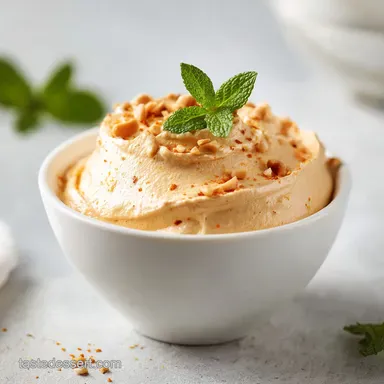
- Pour the mixture into ramekins or small bowls. Use the spatula to get every last bit this stuff is liquid gold.
- Serve immediately for a soft texture. It will be similar to a thick pudding at this stage.
- Chill for 30 minutes for a firmer set. This allows the proteins to "re knit" and the fats to solidify, until the surface doesn't jiggle when the bowl is moved.
One mistake I once made was adding the salt at the very end without pulsing. I ended up with a salty "hot spot" in one bite and a bland mousse in the next. Pulsing ensures that the salt crystals are evenly distributed, which is vital because salt is what makes the peanut flavor truly pop.
Fixing Common Texture Mistakes
Even with a simple recipe, things can go sideways. Usually, it's a matter of temperature or the specific brand of ingredients you're using. If your mousse doesn't look like the photos, don't panic. Most texture issues can be fixed with a few seconds of extra blending or a quick trip to the freezer.
Why Your Mousse Is Grainy
If you can still see little white specks, you didn't blend the cheese long enough before adding the other ingredients. Once the peanut butter goes in, the mixture becomes too thick for the blades to catch those tiny curd fragments effectively.
| Problem | Root Cause | Solution |
|---|---|---|
| Runny Mousse | Too much liquid or low-fat cheese | Add 1 tbsp extra peanut butter powder and pulse again |
| Gritty Texture | Blender speed too low | Blend on the highest setting for a full 60 seconds before adding fats |
| Too Salty | Used salted peanut butter + sea salt | Balance with an extra teaspoon of maple syrup or a dollop of yogurt |
Adjusting Overly Runny Mousse
Sometimes, different brands of cottage cheese have more "whey" (liquid) than others. If your mousse looks more like a drinkable yogurt than a dessert, you need to add more solids. Start with a tablespoon of the peanut butter powder.
If that doesn't work, a tablespoon of Greek yogurt can help provide more structure without thinning the flavor.
- ✓ Always pat the top of the cottage cheese with a paper towel if there is visible liquid in the tub.
- ✓ Ensure your peanut butter is at room temperature for easier emulsification.
- ✓ Don't skip the chilling step if you want a true mousse like "lift" and firmness.
- ✓ Use a high power setting; low speeds will only stir the curds, not pulverize them.
- ✓ Scraping the bottom of the blender is just as important as scraping the sides.
Adjusting Portions for Larger Crowds
Scaling this recipe is fairly straightforward because it doesn't involve baking or complex chemical leaveners. However, you do have to be careful with the blender capacity. If you overfill it, the blades won't be able to create the vortex necessary to pull the curds down and shatter them.
If you're looking to make a massive batch for a party, work in two serving increments. This keeps the motor from overheating and ensures every single cup is as smooth as the first. When scaling up, I usually keep the salt and vanilla at a 1.5x ratio rather than doubling them completely.
Too much vanilla can make the mousse taste "boozy," and too much salt can quickly overwhelm the sweetness of the maple.
For a smaller snack, you can technically halve the recipe, but most blenders struggle with such a low volume of food. The blades might just spin in the air without touching the cheese. If you're only making it for one, I suggest making the full batch and saving half for the next day. It holds up beautifully in the fridge. For more snack ideas that handle scaling well, check out these NoBake Peanut Butter Energy Bites which are perfect for meal prepping.
Keeping Your Mousse Fresh Longer
Storage is simple. Because this is essentially a dairy product, it needs to stay cold. I prefer to keep mine in glass jars with tight sealing lids. This prevents the mousse from picking up any "fridge smells," which dairy is notorious for doing.
- Fridge: Store in an airtight container for up to 3 days. After day three, the moisture might start to separate slightly. If that happens, just give it a quick stir with a spoon to bring it back together.
- Freezer: You can freeze this! It won't stay a "mousse" once thawed, but if you eat it partially frozen, it tastes exactly like high protein peanut butter ice cream. It will stay good in the freezer for about 1 month.
- Zero Waste: If you have leftover mousse that you're tired of eating with a spoon, use it as a dip for apple slices or celery. You can also smear it onto a toasted bagel or use it as a filling for crepes.
Don't throw away the "dregs" at the bottom of the blender! Pour in a little almond milk and some ice, hit blend, and you've got a world class peanut butter smoothie. It's a great way to make sure none of that protein packed goodness goes to waste.
Debunking Viral Dessert Misconceptions
There’s a lot of noise online about "magic" 2 ingredient desserts. Let's set the record straight: you cannot just stir peanut butter into cottage cheese and get a mousse. The myth that "stirring" is enough is why so many people have a bad experience with this dish.
Without the high shear force of a blender, you're just eating chunky cheese with peanut flavor.
Another common myth is that fat free cottage cheese is "healthier" for this recipe. In reality, the fat is what provides the satiety and the texture. Using fat free cheese often leads to people eating twice as much because it’s not as satisfying.
The Maillard reaction isn't involved here since there's no heat, but the emulsification of fats is just as important for that "melt in-your mouth" feeling.
Finally, some people claim you can't taste the cottage cheese at all. To be honest, if you have a very sensitive palate, you might catch a tiny hint of tang. But that's where the salt and vanilla come in. They neutralize those lactic acid notes, leaving you with nothing but pure, nutty bliss.
Adaptations for Special Nutrition Needs
This recipe is naturally quite flexible. If you're following a specific lifestyle, you don't have to miss out on the Peanut Butter Mousse experience. The base is so sturdy that it can handle quite a few tweaks without falling apart.
Crafting a Keto Cottage Cheese Peanut Butter Mousse
To make this keto friendly, simply swap the maple syrup for a liquid monk fruit sweetener or allulose. You'll also want to ensure your peanut butter has no added sugars. Since the cottage cheese already has some natural lactose, this swap keeps the net carbs as low as possible while maintaining that decadent fat content.
Creating a Chocolate Cottage Cheese Peanut Butter Mousse
This is my favorite variation. Add 1 tablespoon of high-quality unsweetened cocoa powder to the blender along with the peanut butter. You may need an extra teaspoon of maple syrup to balance the bitterness of the chocolate. It ends up tasting like a Reese’s cup in spoonable form.
It’s absolutely brilliant and feels much more indulgent than it actually is.
For those who need a break from peanuts, you can easily use sunflower seed butter. It's a great nut free alternative that still provides that rich, roasted flavor profile. Just be aware that sunflower butter can sometimes turn a slightly greenish tint when it reacts with certain proteins, but it’s perfectly safe to eat and still tastes velvety.
Garnish Strategy and Color Balance
A mousse can look a bit "beige" on its own. To make this a truly delightful experience, we need to think about presentation. I use a three color accent strategy to make the dish pop. It's all about creating visual contrast so the eye is as happy as the stomach.
- Deep Brown Accents: Add a handful of dark chocolate shavings or cocoa nibs right before serving. This provides a "shatter" texture that contrasts with the silky mousse.
- Bright Red Accents: A few fresh raspberries or a sliced strawberry on top. The acidity of the fruit cuts through the richness of the peanut butter, and the red looks stunning against the tan base.
- Golden Tan Accents: A sprinkle of crushed salted peanuts or a dusting of the peanut butter powder. This reinforces the main flavor and adds a much needed crunch.
Add these garnishes only when you are ready to eat. If you put the peanuts or chocolate on before chilling, they can lose their texture. The cold environment of the fridge will make the chocolate turn waxy and the peanuts turn soft.
For the best sensory experience, keep the mousse smooth and add the "crunch" at the very last second. It's these little touches that transform a simple blender recipe into a masterpiece you'd be proud to serve to friends.

Recipe FAQs
Can you mix peanut butter with cottage cheese?
Yes, they are an excellent pairing. Blending them together creates a high protein base where the natural oils in the peanut butter emulsify perfectly into the liquid cottage cheese, resulting in a rich, mousse like texture.
What kind of cottage cheese is best for mousse?
Use 4% milkfat cottage cheese. The higher fat content is essential for achieving a luxurious, creamy mouthfeel that lower fat versions cannot replicate.
Why is my cottage cheese mousse runny?
You may have skipped the initial blending stage. Failing to liquefy the cottage cheese for 45 60 seconds before adding other ingredients prevents the proteins from breaking down sufficiently to hold a firm shape.
Is cottage cheese mousse good for you?
Yes, it is a nutrient dense option. It provides a significant boost of protein compared to traditional sugar heavy desserts, making it a satisfying treat.
How to get a perfectly smooth, grain free texture?
Blend the cottage cheese alone for 45 60 seconds first. Scraping down the sides with a spatula during this process ensures every curd is pulverized into a glossy liquid before you introduce the peanut butter and powder.
How to ensure the mousse sets firmly?
Chill the mixture for 30 minutes after blending. While it is ready to eat immediately, the refrigeration time allows the fats to stabilize, creating a structure similar to the creamy consistency found in chilled desserts.
Is it true I must add heavy cream to get it fluffy?
No, this is a common misconception. You can achieve an airy texture simply by using the specified pulse method on the blender to incorporate air without needing extra fats.
Peanut Butter Mousse
Ingredients:
Instructions:
Nutrition Facts:
| Calories | 450 calories |
|---|---|
| Protein | 30.7 g |
| Fat | 24.1 g |
| Carbs | 31.5 g |
| Fiber | 2.2 g |
| Sugar | 22.6 g |
| Sodium | 712 mg |
