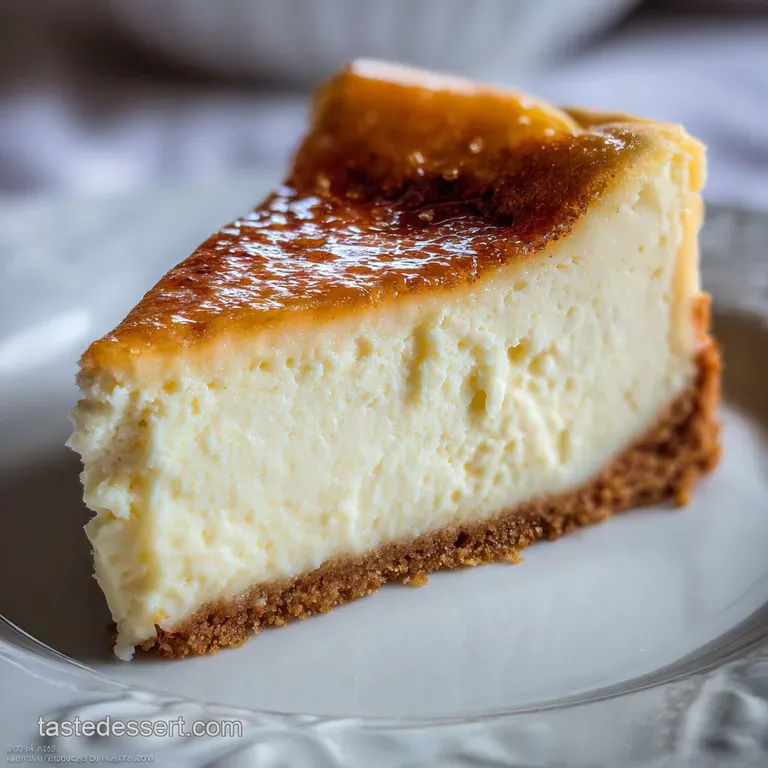
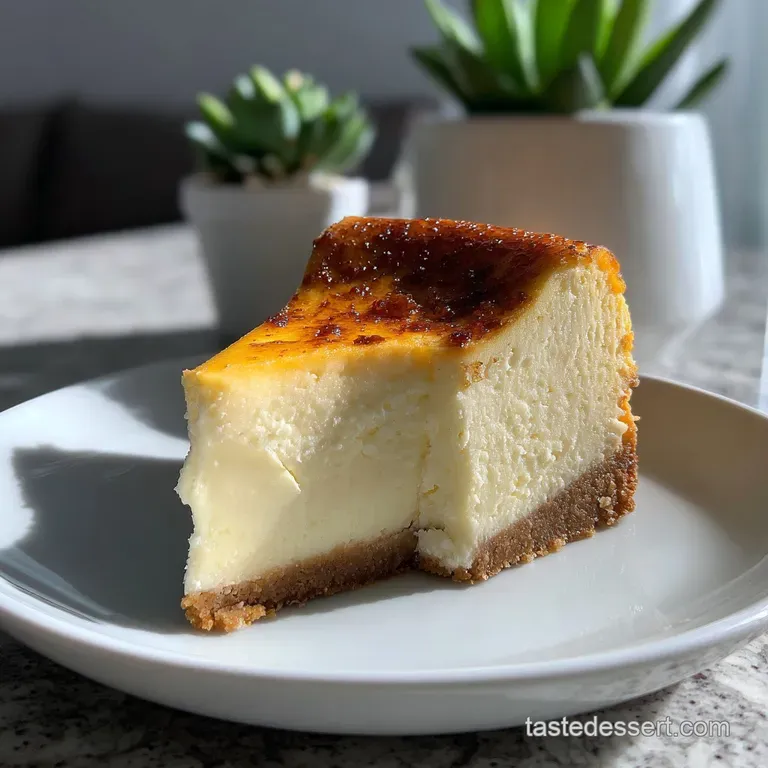
Perfect New York Cheesecake Recipe: Rich and Tangy
- Time: Active 30 minutes, Passive 1 hours 30 mins, Total 2 hours (plus chilling)
- Flavor/Texture Hook: Velvety smooth filling with a buttery, shatter crisp crust
- Perfect for: Milestone birthdays, holiday centerpieces, or impressing your mother in-law
- Perfect New York Cheesecake Recipe Rich Creamy and Tangy
- Essential Recipe Performance Specs
- Required Components and Budget Swaps
- Necessary Tools for Success
- Step-by-Step Culinary Walkthrough
- Professional Methods and Common Errors
- Adaptations for Every Occasion
- The Drafty Kitchen Myth
- Storage and Freshness Guidelines
- Presentation and Serving Suggestions
- Recipe FAQs
- 📝 Recipe Card
Perfect New York Cheesecake Recipe Rich Creamy and Tangy
I still remember the first time I tried to make a "proper" cheesecake. I was so excited, but I ended up with something that looked more like the Grand Canyon than a dessert. There was a crack so deep I could have hidden my car keys in it.
I realized then that while cheesecake feels intimidating, it’s really just about managing temperature and air. Once you get those two things down, you're the master of the kitchen.
This perfect New York cheesecake recipe promises a rich, creamy, and tangy dessert. I've stripped away all the fuss and kept what actually matters so you don't have to spend a fortune on "premium" brands to get that iconic, dense yet-smooth texture.
We're going for that heavy, fork clinging consistency that defines a true New York slice, balanced with enough citrus and sour cream to keep it from feeling too heavy.
Honestly, don't even bother with low-fat cheese here. We're making a statement, not a salad. I've tested this with store brand cream cheese versus the expensive silver blocks, and let me tell you, as long as it's full fat and at room temperature, your wallet won't know the difference, but your taste buds will certainly celebrate.
Let's get into how we transform these basic staples into something truly delightful.
Essential Recipe Performance Specs
The Physics of the Velvet Crumb: Emulsifying room temperature fats with eggs creates a stable protein lattice that traps minimal air, resulting in a dense, creamy texture. The addition of cornstarch acts as a safety net, binding to egg proteins to prevent them from over coagulating and curdling.
| Method | Bake Time | Texture Result | Best For |
|---|---|---|---|
| Classic Water Bath | 1 hours 30 mins | Ultra creamy, no browning | The "Gold Standard" |
| Fast Bake (No Bath) | 55 minutes | Denser, browned edges | Quick cravings |
| Mini Version | 22 minutes | Light and airy | Individual servings |
Choosing the right method depends on how much time you have, but for that true New York feel, the classic water bath is the way to go. It keeps the edges from cooking faster than the middle, which is the main reason those pesky cracks happen in the first place.
Required Components and Budget Swaps
Getting the right balance of ingredients is the key to transforming a basic bake into a masterpiece. Using high-quality vanilla bean paste makes a huge difference, but if you're on a budget, a good extract works just as well. I often use the technique found in my New York Style recipe to get that perfect crust to filling ratio.
Component Analysis
| Ingredient | Science Role | Pro Secret |
|---|---|---|
| Cream Cheese | Structural base | Must be full fat for the correct mouthfeel and stability. |
| Sour Cream | Softens protein | Adds the signature "tang" and prevents a rubbery texture. |
| Large Eggs | Binding agent | Add them last to avoid whipping too much air into the batter. |
When it comes to the foundation, the crust needs to be sturdy enough to hold up that heavy filling without becoming a soggy mess. I like to use a mix of graham crackers and a pinch of sea salt to really make the sugar pop.
| Original Ingredient | Substitute | Why It Works |
|---|---|---|
| Graham Crumbs (1.5 cups) | Digestive Biscuits | Similar crunch. Note: Slightly less sweet, so add 1 extra tbsp sugar. |
| Sour Cream (1 cup) | Greek Yogurt (Full fat) | Same acidity and fat. Note: Ensure it is plain, unflavored yogurt. |
| Vanilla Bean Paste (1 tbsp) | Vanilla Extract (1 tbsp) | Provides flavor. Note: You'll lose the pretty black bean specks. |
The lemon juice is non negotiable. Even if you don't like "lemon" flavored things, that tiny amount of acid is what reacts with the dairy to create that signature New York tang. It also helps the proteins set properly, giving you a cleaner slice when you go in with your knife.
Necessary Tools for Success
You don't need a professional pastry kitchen, but a few specific items will make your life much easier. First, a 9 inch springform pan is essential. Don't try to make this in a regular cake pan unless you plan on eating it straight out of the tin with a spoon (which, honestly, no judgment here).
Chef Tip: Always wrap the outside of your springform pan in two layers of heavy duty aluminum foil. This creates a waterproof seal so the water bath doesn't leak in and turn your crust into mush.
A stand mixer or electric hand mixer is your best friend here. You want to beat the cream cheese until it's as smooth as silk before adding anything else. If you have lumps at the start, you'll have lumps at the end.
Also, grab a large roasting pan that can comfortably fit your springform pan with room to spare for the water.
step-by-step Culinary Walkthrough
- Preheat and Prep. Set your oven to 325°F. Grease your springform pan and line the bottom with parchment paper. Note: This ensures the cake releases perfectly later.
- Pulse the Crust. Combine 1.5 cups graham cracker crumbs, 5 tbsp melted butter, 2 tbsp sugar, and 0.25 tsp sea salt. Mix until it looks like wet sand.
- Pack the Base. Press the mixture firmly into the bottom of the pan. Bake 12 mins until golden and smelling like toasted honey.
- Cream the Cheese. Beat 32 oz room temperature cream cheese and 1 cup sugar until completely smooth and glossy.
- Add Aromatics. Mix in 1 cup sour cream, 1 tbsp vanilla bean paste, and 2 tsp lemon juice. Note: Scrape the bowl often to catch hidden lumps.
- Incorporate Eggs. Add 4 large eggs one at a time on low speed until just combined and velvety.
- Sift in Starch. Fold in 2 tbsp cornstarch gently. Note: This stabilizes the eggs for a crack free finish.
- Prepare the Bath. Place the foil wrapped pan in a roasting dish and pour in the batter. Fill the roasting dish with 1 inch of hot water.
- The Long Bake. Bake for 1 hours 30 mins until the edges are set but the center still jiggles like Jell O.
- The Slow Cool. Turn off the oven and crack the door. Let it sit for 1 hour until the temperature drops gradually.
Professional Methods and Common Errors
The biggest mistake people make is rushing the cooling process. If you take a hot cheesecake and put it straight into a cold fridge, the sudden temperature change causes the cake to contract rapidly, leading to those giant cracks. Patience is the most important "ingredient" in this recipe.
Dealing with Surface Cracks
If your cake cracks, it's usually because it was overbaked or cooled too quickly. The internal temperature should hit 150°F when it's done. If it goes much higher, the eggs get tough and pull away from each other. If you do get a crack, don't panic!
A nice fruit compote or a layer of sour cream topping hides everything perfectly.
Fixing the Soggy Crust
A soggy bottom usually means water from your bath leaked through the foil. Next time, try using "extra wide" heavy duty foil so there are no seams at the bottom. You can also place the springform pan inside a slightly larger cake pan, then place that into the water bath for a double layer of protection.
Managing Lumpy Batter
Lumps happen when the cream cheese is too cold. If you forgot to take it out of the fridge, you can soften the unwrapped blocks in the microwave for 15-20 seconds. Once you add the eggs, it’s much harder to get rid of lumps, so make sure the cheese and sugar are a perfect, smooth paste before moving on.
| Problem | Root Cause | Solution |
|---|---|---|
| Grainy Texture | Overbaked eggs | Pull the cake when the center still jiggles. |
| Lumpy Filling | Cold cream cheese | Use room temp ingredients and beat cheese first. |
| Leaking Crust | Poor foil seal | Use one continuous sheet of heavy duty foil. |
Common Mistakes Checklist:
- ✓ Always use room temperature eggs and dairy to ensure a smooth emulsion.
- ✓ Avoid overbeating the batter once the eggs are added to prevent air bubbles.
- ✓ Use a water bath to maintain a gentle, even heat during the long bake.
- ✓ Let the cake cool in the oven with the door cracked for at least an hour.
- ✓ Chill the cheesecake for a minimum of 6 hours (preferably overnight) before slicing.
Adaptations for Every Occasion
If you want a different flavor profile, it's easy to tweak this base. Much like the steps in this How to Bake recipe, you can swap the graham crackers for Oreo crumbs to make a chocolate version. Just omit the extra sugar in the crust since the cookies are already quite sweet.
Scaling Down for Two
If you aren't feeding a crowd, you can halve this recipe easily. Use a 6 inch springform pan and reduce the baking time by about 20 minutes. Use 2 large eggs and keep the rest of the ratios the same. It’s perfect for a quiet date night at home.
Doubling for Crowds
Doubling this recipe requires two separate 9 inch pans. Do not try to bake one giant, extra tall cheesecake, as the center will never set before the edges burn. When baking two at once, rotate the pans halfway through and increase the salt and spices by only 1.5x to keep the flavors balanced.
- If you want a Deeply Rich cake
- Use 100% full fat Philadelphia brand and extra heavy sour cream.
- If you want a Tangier cake
- Increase lemon juice to 1 tablespoon and add the zest of one whole lemon.
- If you want an Easy Release
- Always line the bottom of the pan with parchment paper, even if it's non stick.
The Drafty Kitchen Myth
Many people believe that even a tiny draft in the kitchen will ruin a cheesecake. While you don't want to blast it with an air conditioner, the real culprit is usually the oven's temperature fluctuations, not the room air. As long as you use a water bath, the cake is pretty well insulated from minor kitchen breezes.
Another common misconception is that you must use expensive European style butter for the crust. Honestly, regular unsalted butter is just fine. The graham crackers are the star of the show there, and the butter's main job is just to hold them together so they don't fall apart when you're trying to eat.
Storage and Freshness Guidelines
Cheesecake is the ultimate make-ahead dessert because it actually tastes better after 24 hours. The flavors meld and the texture becomes more set and "New York" in style. You can store the finished cake in the fridge for up to 5 days.
Keep it covered so it doesn't pick up any weird fridge smells nobody wants onion scented cheesecake!
If you have leftovers, this cake freezes beautifully. Slice it first, then wrap each piece tightly in plastic wrap followed by foil. It will stay fresh in the freezer for up to 2 months. To eat, just let a slice thaw in the fridge for a few hours.
For a zero waste tip, if you have extra graham cracker crust mixture, don't toss it! Sprinkle it over some vanilla yogurt or use it as a topping for an apple crumble. You can even freeze the leftover crust crumbs in a small bag for your next baking project.
Presentation and Serving Suggestions
To get those perfect, clean bakery style slices, use a thin bladed knife. Dip the knife in a tall glass of hot water and wipe it dry between every single cut. It sounds like a hassle, but it's the difference between a messy plate and a stunning presentation.
I love serving this with a simple berry sauce or just a few fresh raspberries on top. The brightness of the fruit cuts through the richness of the cheese perfectly. If you're feeling fancy, a drizzle of salted caramel or a dollop of whipped cream can turn a simple slice into a five star dessert experience.
Whatever you do, make sure the cake is fully chilled before you even think about cutting into it. Trust me, the wait is worth it!

Recipe FAQs
Can I skip the water bath and avoid cracking?
No, the water bath is crucial for the signature texture. It provides gentle, moist heat, ensuring the edges don't cook faster than the center, which prevents rapid contraction and cracking.
How to ensure the cream cheese is smooth before mixing?
Beat the room temperature cream cheese alone with the sugar first. Continue beating until the mixture is completely glossy and smooth, scraping down the bowl frequently to catch any unmixed cold spots.
How to clean slices without tearing the cheesecake?
Dip a thin, sharp knife into hot water and wipe it dry between every slice. This ensures the blade glides cleanly through the dense filling without dragging or causing fissures.
Is it true that I must bake this for over an hour and a half?
No, the long bake is necessary for density, but the cooling is non-negotiable. While baking time might shorten slightly for smaller pans, the extended, slow cool down in the turned off oven prevents thermal shock.
How to make the crust perfectly sturdy and not soggy?
Bake the crust separately for 12 minutes until golden brown before adding the filling. This pre-baking sets the butter and crumbs, creating a barrier against the moist filling. If you enjoy working with sturdy doughs, the technique applies to our Cinnamon Rolls Homemade recipe.
What is the secret ingredient that makes New York cheesecake so tangy?
The secret lies in the ratio of sour cream to cream cheese, boosted by lemon juice. The mild acid in the sour cream slightly curdles the milk proteins, delivering that signature rich tanginess without overpowering the dairy flavor.
Can I freeze the finished cheesecake for later?
Yes, chilling overnight is mandatory, but freezing works well too. Wrap individual slices tightly in plastic wrap and foil to prevent freezer burn; they maintain quality for up to two months.
Perfect New York Cheesecake

Ingredients:
Instructions:
Nutrition Facts:
| Calories | 491 kcal |
|---|---|
| Protein | 7.9 g |
| Fat | 36.9 g |
| Carbs | 32.9 g |
| Fiber | 0.5 g |
| Sugar | 24.2 g |
| Sodium | 333 mg |
