Tuna Melts the Proper Pub Lunch Recipe for Crunchy Cheesy Perfection
- Elevating the Classic: Why Your Next Tuna Melt Will Be Perfect
- Stocking the Larder: Ingredients for Superior Tuna Melts
- Tools of the Trade: Equipment for the Golden Crunch
- Phase One: Crafting the Crunchy Tuna Salad
- Phase Two: Assembling and Griddling Your Tuna Melts
- Troubleshooting and Mastering Your Next Batch
- Customizing Your Comfort: Delicious Variations on Tuna Melts
- Recipe FAQs
- 📝 Recipe Card
Elevating the Classic: Why Your Next Tuna Melt Will Be Perfect
Listen, I know what you’re thinking. A tuna melt? Isn't that just a relic of sad cafeteria lunches and dodgy roadside diners? I’m telling you, friend, those memories are wrong.
A proper tuna melt the kind that serves as the perfect, satisfying Proper Pub Lunch Tuna Melt —is pure, unadulterated comfort food that deserves to be in your regular rotation.
We’re talking golden, shatteringly crisp bread, and an interior that is savoury, creamy, tangy, and bursting with gooey, melted cheese. This isn't just about mixing tuna and mayo; this is about technique.
Solving the Soggy Sandwich Syndrome
This is where 90% of home cooks go wrong. Nobody wants that depressing moment when you pick up your sandwich and the bottom slice is pale, damp, and floppy. Yuck. The fix is two-fold, and both steps are non-negotiable. First, you have to drain your tuna like you're preparing it for a high stakes cooking competition.
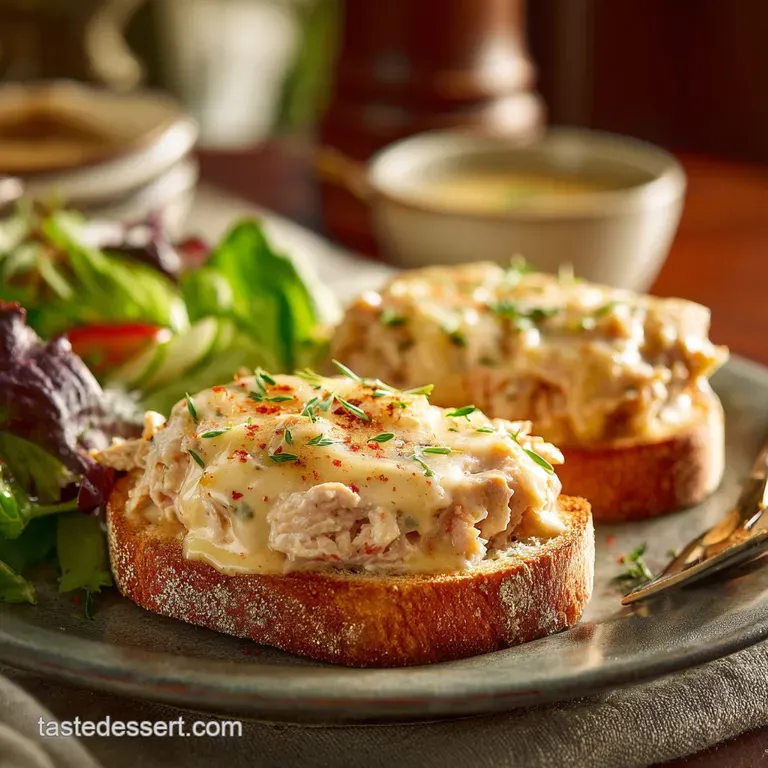
Press it. Squeeze it. Get rid of the water or oil. Second, and this is my holy grail tip: you need a moisture shield. We achieve this by laying down a layer of shredded cheese directly onto the bread before we put the tuna filling down. The cheese melts first, sealing the bread. It’s brilliant.
The Essential Blend of Tangy and Creamy
A basic tuna salad is fine. But we don't do "fine" here, do we? The secret to a truly memorable filling is balancing the richness of the mayonnaise with the necessary acid and crunch. You need that tiny hit of Dijon mustard for savoury depth and a squeeze of fresh lemon juice to cut through the fat.
Honestly, that bit of fresh lemon is crucial. Don’t use the stuff in the plastic bottle. Throw in some finely diced celery too you need that texture contrast against the creamy filling and the soft, melted cheese.
A Brief History of the Beloved Pub Lunch
While the concept of hot sandwiches is ancient, the tuna melt itself really took off in the US in the 1960s, quickly becoming the staple diner dish. It crossed the pond and found its place on pub and cafe menus as the ultimate easy Protein Lunch .
Think about it: high protein, cheap, satisfying, and quick. It’s a workhorse of a meal, and while some people insist tuna melts on english muffins are the superior route (which is great for portion control, admittedly), I prefer the full-on, messy, proper sandwich experience.
Stocking the Larder: Ingredients for Superior Tuna Melts
We are aiming for creamy, tangy, and crunchy, which means we need great raw materials. Forget that low-fat mayo you need the real, full fat stuff for richness. And while we’re on the subject of fat, let’s talk cheese.
We are grating it ourselves, because pre-shredded cheese is coated in starches that inhibit a proper, luxurious melt. Trust me on this.
Tools of the Trade: Equipment for the Golden Crunch
You don't need anything fancy here. A mixing bowl, a fork, and a pan. That’s it. However, the quality of your pan impacts the final texture massively.
Selecting the Best Tinned Tuna (Oil vs. Water)
I tend to prefer tuna packed in water because it drains slightly easier, but tuna packed in olive oil (if it’s high-quality oil) provides a richer flavour base. Just know that if you go the oil route, you will spend longer pressing that oil out.
Regardless of which you choose, you must squeeze and drain until you think, "Surely this is too dry?"
Which Cheese Melts Best? (Hint: Go Mature)
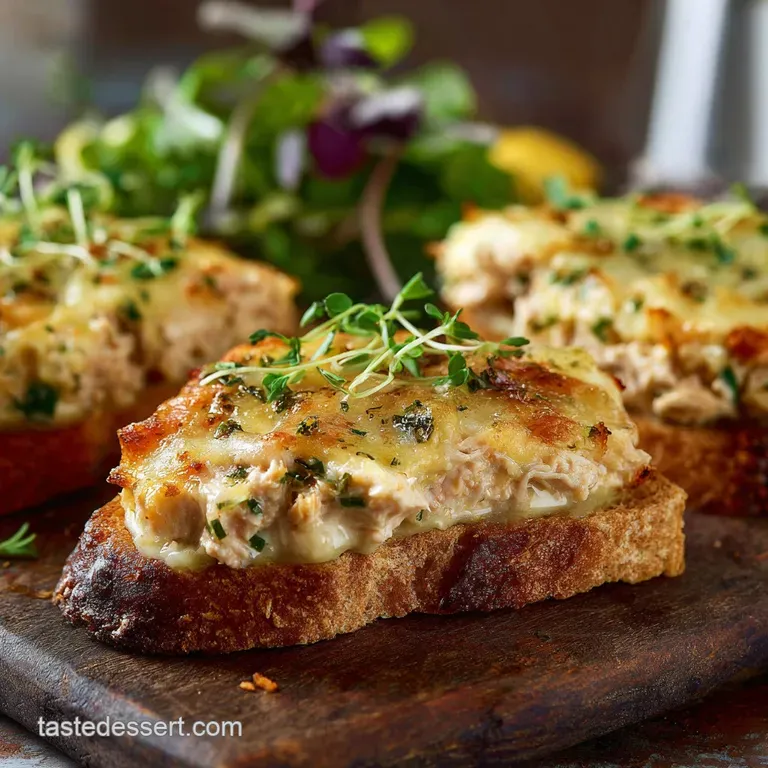
We need sharp flavour and serious meltability. Mature Cheddar is the gold standard for a reason. It has enough moisture to turn into that signature goo without splitting.
Crucial Cheese Note: If you want that amazing, stringy pull, introduce a 50/50 blend of mature Cheddar and grated Gruyère. Gruyère melts like a dream, giving you that authentic cafe look.
The Perfect Loaf: Sourdough vs. Classic White
If you are making the classic, nostalgic sandwich, you absolutely must use thick cut white bread. A slightly sturdy loaf that can handle the filling weight. If you want something with better structure and a tangier flavour, sourdough is fantastic.
I’ve even done tuna melts in the oven using ciabatta rolls sliced open, but for pure stovetop success, stick to a sturdy, well buttered tin loaf.
Griddle Pan vs. Skillet: Achieving the Flawless Sear
Either works, but I personally prefer a sturdy cast iron skillet (or a Griddle Pan ) because it retains heat so well and cooks evenly. The key isn't the pan type; it’s the heat setting. We are staying low-to-medium low .
If you try to hurry this, the outside burns before the cheese reaches maximum ooze potential.
Related Recipes Worth Trying
- Cracking Canned Tuna Ceviche A 15Minute ZeroCook Recipe — This zerofuss Canned Tuna Ceviche is a doddle to make Its bright zesty and a surprisingly elegant Healthy Tuna Ceviche that comes together in under 30...
- Perfect Canned Tuna Croquettes Crispy Creamy Spanish Croquetas — Elevate pantry tuna These authentic Canned Tuna Croquettes Spanish croquetas de atún feature a velvety béchamel interior and a shatteringly crisp Panko...
- Healthy Avocado Tuna Salad Recipe No Mayo All Flavour — Swap the mayo for creamy avocado in this Easy Tuna Salad Recipe Its a fresh vibrant upgrade perfect for your next Avocado Tuna Salad Sandwich Find out how...
Phase One: Crafting the Crunchy Tuna Salad
This isn't rocket science, but it needs your attention. Once your tuna is aggressively drained, you’ll mix it with your mayo, Dijon, lemon juice, and plenty of freshly cracked pepper. The tiny dice on the celery and shallots/onions is important. We want them to integrate, not dominate.
Texture Tips for the Mix:
- Don’t mash the tuna to a paste. Leave some flakes intact for texture.
- Taste, taste, taste! If it tastes bland now, it will taste bland in the sandwich. Add a little salt until it pops.
- Let it sit for five minutes. This allows the celery to slightly soften and the flavours to meld beautifully.
Phase Two: Assembling and Griddling Your Tuna Melts
Right then, time to get crispy. The assembly order is everything.
The Art of Draining: Ensuring a Dry Base
As mentioned, this step is mandatory. Use a fork and press the tuna firmly against the side of the bowl or use a sieve. I sometimes even put the drained tuna on a paper towel for 30 seconds while I’m prepping the other ingredients.
Folding in the Flavours: Seasoning and Texture Balance
Remember that tiny bit of lemon juice? It makes the entire mix sing. Ensure you don't over fold the mixture; you don't want it to become homogenous sludge. Just enough folding to incorporate the dressing.
Strategic Layering: Maximizing Cheese Goo
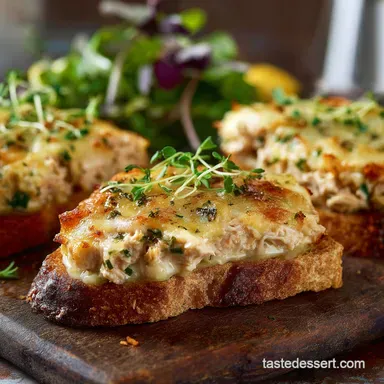
Here is the layering magic for the ultimate Crunchy cheesy tuna melt : Bread (buttered side down) -> Cheese Layer 1 -> Tuna Filling -> Cheese Layer 2 -> Bread (buttered side up).
By using a cheese buffer on both sides, you guarantee maximum melt, minimal sogginess, and serious cheese pull.
The Low-and-Slow Technique for an Even Golden Crust
This is where you earn your stripes. Place the assembled melt on your pre-heated, medium low pan. Let it sit there, undisturbed, for a good 4 to 5 minutes. Peek under it. It should be deeply golden and sizzling gently.
Flip it carefully, press down lightly with your spatula, and repeat the cooking on the second side. That gentle, patient heat is what ensures the cheese inside is molten lava, not chilly lumps.
Serving Suggestions: What Pairs Best with Crispy Tuna Melts
You cannot, in good conscience, serve this without something crunchy and tart on the side. A simple bowl of kettle chips (salt and vinegar, obviously), or a quick coleslaw dressed with vinegar, not mayo. The classic pairing, however, is a piping hot bowl of simple, creamy tomato soup.
Dipping that crunchy crust into the warm soup is the definition of happiness.
Troubleshooting and Mastering Your Next Batch
Preventing the Dreaded Filling Leak
The leak happens when you overfill the sandwich or spread the filling right to the very edge. When the cheese melts and the bread presses down, the filling has nowhere to go but out. Solution: leave a 1/2 inch border clear around the entire perimeter of the bread when spreading the tuna mix.
Best Practices for Storage and Reheating
Let's be real, this is best eaten immediately. That fresh crunch is ephemeral. However, if you must save some mix, the tuna filling holds up perfectly in an airtight container in the fridge for 2-3 days. If you've already assembled and cooked the sandwich and need to reheat it, avoid the microwave!
Reheat your tuna melts in air fryer at 350°F (175°C) for 3- 5 minutes, or pop it back into the skillet on low heat until warmed through and re-crisped.
Customizing Your Comfort: Delicious Variations on Tuna Melts
Spice It Up: Adding Jalapeños or Hot Sauce
If you like a kick, try adding a tablespoon of minced pickled jalapeños or 1/2 teaspoon of smoked paprika and a dash of cayenne to the tuna mixture. Using Monterey Jack or Pepper Jack instead of Cheddar works beautifully here and guarantees a fantastic melt.
The Patty Melt Approach: Substituting Rye Bread and Onions
This is a deep dive into diner excellence. Swap the white bread for marble rye, and sauté thin slices of white onion until they are deeply caramelized and sweet. Mix those onions into the tuna before assembly. This gives you a more complex, earthy flavour profile.
Nutritional Breakdown: How These Tuna Melts Fit Your Diet
Yes, it’s rich. Yes, it has butter and full fat cheese. But it’s also packed with protein. This is a highly satisfying, substantial meal. Because we are using quality ingredients and focusing on protein, it definitely keeps you full for hours.
If you need to watch carbs, switch to whole grain bread or opt for the open faced broiled method. It's a proper, hearty comfort meal perfect for when you need a little grounding and a lot of crunch.

Recipe FAQs
Classic tuna melt recipe
To guarantee the cheese is perfectly gooey, ensure your griddling temperature remains low and patient; if the bread browns prematurely, cover the pan for the last minute or two to trap steam and fully melt the center.
For the creamiest results, always drain your tuna meticulously before mixing, as excess moisture leads to a soggy filling that undermines the sandwich structure. If you lack fresh celery, a small amount of finely chopped dill pickles or capers provides a wonderful substitution, enhancing both the necessary crunch and tangy profile.
Open faced tuna melt
To adapt this recipe for an open faced version, pre-toast the bread slightly, top it generously with the tuna mixture and cheese, then transfer it to a baking sheet. Finish the melt under a preheated broiler or salamander for 2 to 3 minutes, ensuring the cheese is bubbling and just browned before serving immediately.
This intense direct heat is crucial for a perfect, crusty melt without a soggy base.
Simple tuna melt recipe
For truly exceptional tuna melts, adopt a low-and-slow griddling technique; this gentle heat (medium low) is crucial for fully melting the sharp cheddar cheese throughout the interior before the bread scorches.
To enhance the texture, gently press the sandwich with a spatula during cooking to ensure maximum contact with the pan, guaranteeing a beautiful golden brown, crisp exterior.
Tuna melt ingredients
For the quintessential Tuna Melts, thoroughly draining your canned tuna is non-negotiable; excess moisture guarantees a soggy filling. Balance the richness of the full fat mayonnaise with a crucial addition of finely diced celery for texture and a dash of lemon juice and Dijon mustard for necessary tang.
Always opt for mature cheddar, freshly grated, as it melts far more smoothly than pre-shredded varieties.
What do you put in a tuna melt?
A truly great tuna melt relies on a creamy, balanced tuna mix, utilizing full fat mayonnaise and brighteners like fresh lemon juice and Dijon mustard. The essential textural contrast comes from finely diced celery or shallot.
For the ultimate sandwich, pair this filling with sharp, freshly grated mature cheddar cheese and be sure your canned tuna is very well drained to prevent any interior sogginess during griddling.
What is the secret to a good tuna melt?
The foundational secret is meticulous preparation: ensure your high-quality tuna is exceptionally well drained to maintain structure, and always include finely diced celery for that necessary textural crunch.
For cheesy perfection, master the low-and-slow griddling technique; patient, gentle heat ensures the sharp mature cheddar melts into a warm, gooey interior before the bread browns.
Proper Pub Lunch Tuna Melts Recipe
Ingredients:
Instructions:
Nutrition Facts:
| Calories | 581 kcal |
|---|---|
| Protein | 14.5 g |
| Fat | 52.9 g |
| Carbs | 1.6 g |
| Fiber | 0.2 g |
| Sodium | 234 mg |
