The Ultimate Indoor Smores Bars Graham Cracker Base Chocolate Swirl and Toasted Marshmallow Topping
- The Indoor Bonfire: Why These Smore Cookie Bars Are Your New Go-To Dessert
- Nostalgia Baked Right: Capturing Campfire Magic Without the Smoke
- Assembling the Components for Stellar Smore Cookie Bars
- Essential Pantry Staples for Deep Flavor Profiles
- Mastering the Three-Step Assembly Process
- Achieving Peak Marshmallow Toasting in the Oven
- Pro Tips for Unforgettable Smore Cookie Bar Results
- Variations to Elevate Your Next Batch
- Recipe FAQs
- 📝 Recipe Card
The Indoor Bonfire: Why These Smore Cookie Bars Are Your New Go-To Dessert
There’s a certain undeniable magic associated with s’mores. That sticky, slightly smoky sweetness achieved only by balancing a marshmallow over flickering flames, sandwiching it between crisp graham crackers and a slab of melted chocolate. It’s the taste of summer evenings and shared stories.
But what if I told you that you could capture every glorious element of that experience the gooiness, the crunch, the satisfying richness without ever needing a match? Welcome to the world of Smore Cookie Bars .
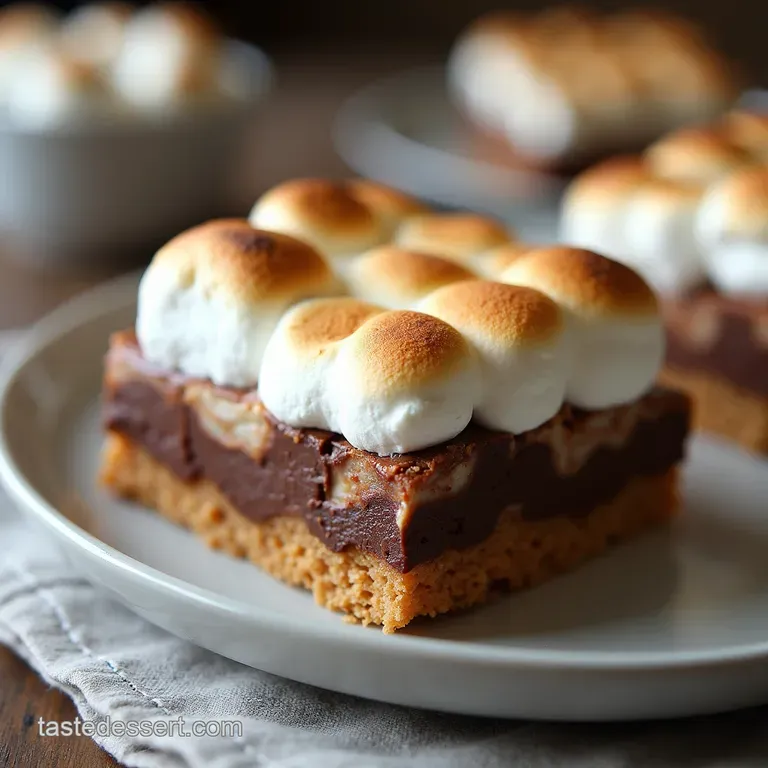
These delightful squares bottle that campfire nostalgia and serve it up neatly in a 9x13-inch pan, making them the ultimate treat for any evening gathering or solitary craving.
Nostalgia Baked Right: Capturing Campfire Magic Without the Smoke
Our goal here is simple: translate the architectural brilliance of a s'more into a decadent, easy-to-manage baked good. This Smore Cookie Bars Recipe achieves this harmony through distinct, perfectly calibrated layers.
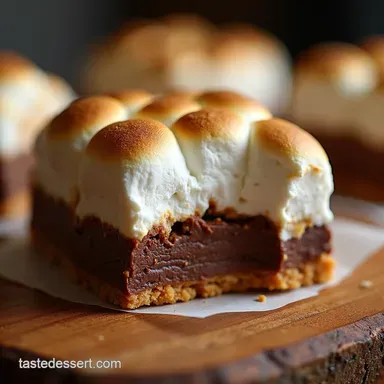
We begin with a sturdy, buttery base, introduce a rich, chocolate loaded cookie dough, and finish with a blanket of toasted meringue perfection. This isn't just a dessert; it’s an experience designed for maximum flavour impact with minimal fuss.
Decoding the Perfect Gooey-to-Crunch Ratio
The success of these Cookie Bar Recipes No Campfire lies entirely in the balance. Too much graham cracker, and it becomes dry; too much cookie dough, and it overpowers the classic flavour.
We use just enough melted butter in the crushed graham crackers to bind them into a cohesive base that bakes up firm yet tender. This foundation is crucial, as it must support the weight of the two subsequent layers without collapsing.
A Superior Alternative to Stick Roasting
Let’s be honest, roasting marshmallows on sticks often results in two outcomes: either a barely warmed, limp puff or a completely incinerated, carbonized shell. Baking allows for controlled, even heat application to the cookie base, followed by a quick broil that perfectly inflates and toasts the Smores Cookie Bars Mini Marshmallows topping evenly across the entire surface.
It’s predictable, clean, and consistently delicious.
The Allure of the Layered Brown Butter Base
While the main cookie layer uses softened butter for optimal texture, the graham cracker crust benefits immensely from melted butter. This ensures the crumbs saturate completely, creating a dense, chewy foundation reminiscent of a classic cheesecake crust.
This slight difference in butter application between the layers is a small detail that yields major textural rewards in our final Smores Chocolate Chip Cookie Bars .
Assembling the Components for Stellar Smore Cookie Bars
Creating these Easy Smores Cookie Bars involves preparing three distinct components sequentially. First, we establish our foundation. Next, we mix the rich, chewy cookie dough studded with chocolate. Finally, we prepare the topping.
The structure of this recipe is incredibly forgiving, which is why I classify this as an Easy bake even if you are new to the kitchen, you'll succeed wildly here.
Essential Pantry Staples for Deep Flavor Profiles

To achieve that deeply satisfying flavour profile, ingredient quality matters, particularly when dealing with only a few core tastes. We rely on good butter, robust vanilla, and of course, quality chocolate.
The estimated prep time for getting these staples ready is about 25 minutes before they hit the oven.
Selecting the Ideal Chocolate Chunks and Chips
For the core gooey layer within the cookie dough, I recommend using a blend. While one cup of standard semi sweet chocolate chips works perfectly, incorporating roughly chopped semi sweet or dark chocolate bars adds textural variation.
The chunks melt slower and create deeper puddles of molten chocolate, ensuring every bite of your Smores Chocolate Chip Cookie Bars is adequately luscious.
The Secret to a Sturdy, Buttery Graham Cracker Foundation
The crust requires 1 ½ cups of finely crushed graham cracker crumbs, mixed with ¼ cup of granulated sugar and 6 tablespoons of melted unsalted butter. The key here is pressing firmly. Use the bottom of a measuring cup to compact this mixture into the pan.
We then give this base an 8-minute head start in the oven at 350° F ( 175° C). This pre-bake step is non-negotiable; it prevents the crust from absorbing moisture from the cookie dough above it and becoming soggy, ensuring the Graham Cracker Crust Cookie Bars remain wonderfully crisp.
Required Baking Gear: Pans and Parchment Paper Notes
The essential piece of equipment is a 9x13-inch baking pan. However, the true secret weapon is parchment paper. You must line the pan with enough parchment so that it overhangs two opposite sides.
These overhangs become handles a "sling" that allow you to lift the entire cooled slab out of the pan for clean, professional looking squares later. Do not skip this crucial step if you want picture perfect results.
Related Recipes Worth Trying
- The Best Chocolate Chunk Cookies with Chewy Centres — Tired of flat biscuits This Gooey Chocolate Chunk Cookies Recipe uses brown butter for deep flavour Foolproof method for perfect cookies every time
- Chewy Ruby Chocolate and Pistachio Cookies Recipe — Discover the definitive recipe for stunning Ruby Chocolate and Pistachio Cookies These aesthetic bakes feature a delightful tartness and crunch Get the...
- The Best Edible Cookie Dough Frosting Recipe No Raw Eggs — This homemade cookie dough frosting tastes just like the real thing but its totally safe to eat Its unbelievably creamy perfect for cakes and cupcakes
Mastering the Three Step Assembly Process
Once the crust is par-baked, it’s time to build. The cookie dough itself comes together by creaming ½ cup of softened butter with ¾ cup of packed light brown sugar and ½ cup of granulated sugar until fluffy.
After incorporating one large egg and a teaspoon of vanilla, we gently fold in the dry mixture (1 ¾ cups flour, 1 tsp baking soda, ½ tsp salt). Remember, mixing is done only until just combined; overmixing develops gluten, resulting in a tough bar, not the chewy texture we crave in the Best Smores Dessert Bars .
To assemble, crumble about two-thirds of this cookie dough evenly over the warm crust. Then, scatter the one cup of chocolate chips across this layer. Finally, randomly dollop the remaining one-third of the dough across the chocolate. This random distribution ensures chocolate oozes through every section when it melts.
Achieving Peak Marshmallow Toasting in the Oven
After the layered bars bake for 18– 22 minutes at 350° F ( 175° C) until the edges are golden, the final act begins. The heat trapped in the cookie base is perfect for immediately melting the marshmallows.
As soon as the pan comes out, scatter 5 cups of standard large marshmallows over the entire surface, ensuring dense coverage.
Baking the Compressed Graham Crust to Golden Perfection
As mentioned, the initial bake ensures the crust is set before the wet cookie dough is added. This foundational baking time at 350° F builds the structure that keeps our Smores Cookie Bars satisfyingly solid enough to hold the weight of the topping.
Techniques for Swirling the Melted Chocolate Layer
Because we dollop the remaining dough over the chocolate chips rather than spreading it flat, the chocolate naturally begins to melt and swirl upward into the cookie dough during the bake. This creates those glorious, irregular veins of dark chocolate that contrast beautifully with the lighter dough.
Broiler Tactics: Monitoring the Final Marshmallow Puff
This is where you must focus your attention entirely. Switch your oven to the high broil setting. Place the bars on the upper middle rack. Broil for just 2 to 4 minutes, watching constantly. The marshmallows will inflate dramatically and transition from white to a deep, burnished gold.
The moment they hit that perfect toasted colour, pull them out immediately. They should look beautifully puffed and slightly gooey the exact texture you get when making Smores Cookie Bars with Marshmallow Fluff in traditional form, but simplified.
Pro Tips for Unforgettable Smore Cookie Bar Results
For the absolute best experience when making these Smores Cookie Bars , remember that patience during cooling is as important as precision during assembly. The bars need time to set up after that intense blast from the broiler.
If you try to cut them too early, the warm, gooey layers will slump and smear.
Variations to Elevate Your Next Batch
While the classic combination is unbeatable, these bars are excellent canvases for variation. They are inherently rich, making them phenomenal when paired with strong beverages or contrasting textures.
Cooling and Cutting: The Secret to Clean Squares
Allow the bars to cool fully at room temperature for at least two hours, or speed the process by chilling them in the refrigerator for 45 minutes. Once completely cooled, use the parchment sling to lift the slab onto a cutting board.
A sharp, long knife (wiping the blade clean between cuts) will yield 16 perfect, Instagram worthy squares.
Storage Solutions for Maintaining Maximum Gooiness
Store the cooled, cut Smore Cookie Bars in an airtight container at room temperature for up to three days. If you want to preserve that gooey marshmallow texture, avoid the refrigerator, as it can dry out the marshmallow topping.
Incorporating Nutty Notes: Adding Browned Almonds or Pecans
If you enjoy texture alongside your chew, consider adding ½ cup of finely chopped, lightly toasted pecans or sliced almonds along with the chocolate chips. The slight bitterness and crunch of the nuts pair beautifully with the sweetness of the s’mores components, creating a more complex flavour profile in these Smores Cookie Bars .
Nutritional Snapshot of These Decadent Bars
It’s important to acknowledge that these bars are an indulgent treat, fitting squarely into the dessert category. Expect them to clock in around 350 to 400 calories per generously sized square, packed with the satisfying fats and sugars required for true comfort food. Enjoy responsibly!

Recipe FAQs
Can I make these S'more Cookie Bars ahead of time?
You absolutely can prep these ahead, but there's a crucial timing element! You can bake the crust and cookie layers completely and store them wrapped tightly at room temperature for up to two days. However, the marshmallows must be added and toasted right before serving, or they’ll deflate and get sticky.
My marshmallows melted into a gooey puddle instead of toasting nicely what did I do wrong?
That’s usually a case of the bars being too cool when you put the marshmallows on, or the broiler being too far away. Make sure the bars are still warm from the oven when you layer the marshmallows on, and place them under a preheated, high broiler on the upper middle rack.
Keep your eye on them; they brown incredibly fast!
I don't have graham crackers. Can I use something else for the base of my S'more Cookie Bars?
Yes, fear not, biscuit shortages happen! Digestive biscuits (if you can find them) work brilliantly and offer a very similar flavour profile. Alternatively, use vanilla wafers or even shortbread cookies crushed finely; just be sure to slightly reduce the added sugar in the crust mix if the biscuits are already quite sweet.
How should I store leftovers if they don't all get scoffed immediately?
Storage is tricky because of the marshmallow topping; once cooled, they are best kept in an airtight container at room temperature for up to three days. Avoid the fridge if possible, as the cold tends to harden the cookie layer and make the marshmallows chewy rather than soft.
If you must refrigerate, let them come up to room temperature before serving.
Can I skip the butter creaming stage for the cookie dough to save time?
While you could mix everything cold, I wouldn't recommend skipping the creaming step. Creaming the softened butter with the sugars whips air into the dough, which is what gives these bars that essential soft, chewy texture we all look for in a good cookie.
Using melted butter here will result in a much denser, flatter bar, so take the extra few minutes!
Smore Cookie Bars Recipe
Ingredients:
Instructions:
Nutrition Facts:
| Calories | 269 kcal |
|---|---|
| Protein | 2.4 g |
| Fat | 12.6 g |
| Carbs | 38.2 g |
| Fiber | 0.2 g |
| Sodium | 1792 mg |
