Peanut Butter Pie: the Ultimate No-Bake Cloud Pie
- The Ultimate No and Bake Peanut Butter Pie: Why This Dessert Reigns Supreme
- Gathering Your Ingredients for the Peanut Butter Cloud Pie
- Master the Method: Step and by-Step No and Bake Instructions
- Decoding the Decadence: Why This Peanut Butter Pie Recipe Works
- Expert Tips and Troubleshooting for the Perfect No and Bake Pie
- Serving the Ultimate Peanut Butter Pie: Presentation and Pairings
- How to Store, Freeze, and Prep Ahead
- Recipe FAQs
- 📝 Recipe Card
The Ultimate No and Bake Peanut Butter Pie: Why This Dessert Reigns Supreme
Okay, stop everything. We need to talk about this pie. It’s like eating a salty, chocolatey cloud a filling so incredibly light it feels illegal, perfectly balanced by a deep, dark cookie crust that stays crisp, never soggy.
Forget those dense, heavy slices that sit in your stomach; this is pure, airy peanut butter mousse bliss.
I call this the "lifesaver pie" because, honestly, you don't even need to turn on the oven, and the whole thing takes about 20 minutes of active work. It’s cheap, uses pantry staples, is shockingly impressive, and the perfect emergency dessert when you need something show and stopping now .
Seriously, if you can operate a mixer, you can nail this.
I've made every mistake in the book with PB pies flat filling, gritty texture, soggy crusts but this specific technique, particularly how we handle the whipped cream and cream cheese, solves everything. Grab your mixer, pull out that jar of Jif, and let’s make the best Old Fashioned Peanut Butter Pie: Easy No and Bake Diner Dessert Recipe you’ll ever try.
Defining the Cloud Pie: Mousse Texture Over Density
The difference between a great no and bake pie and a mediocre one is texture. We are aiming for a mousse , not a pudding or a fudge. That means maximum air. The secret here is separating the dairy: we beat the cream cheese and peanut butter base until smooth, and then we separately beat the heavy cream into perfect stiff peaks.
Folding these two together is the key it locks the air into the filling, giving you that featherlight slice.
Essential Equipment and Prep Checklist
Look, technically you could do this with a whisk and brute force, but your arm would fall off. For a truly light and airy result, an electric mixer is non and negotiable.
- Stand mixer or sturdy hand mixer (with a whisk attachment).
- Food processor for the crust (or just use a big plastic bag and a rolling pin it works!).
- Make sure your cream cheese has been sitting out for at least an hour. Seriously, if it’s cold, you will get lumps. Lumps are bad.
How Long Does This Recipe Really Take?
Most of the time is hands and off chilling, which is fantastic. You can easily make the entire thing while watching a half and hour sitcom.
| Stage | Time |
|---|---|
| Active Mixing Time | 20 minutes |
| Chill Time (Minimum) | 4 hours |
| Best Results Chilling | Overnight (8+ hours) |
Gathering Your Ingredients for the Peanut Butter Cloud Pie
We aren't messing around here. Quality ingredients, especially the stuff that acts as the binder (PB, cream cheese), make a huge difference in whether your pie sets or sinks.
For the Ultra and Crisp Dark Chocolate Crust
I prefer dark chocolate wafers here because they provide a lovely bitterness that cuts through the rich, sweet filling. If you can’t find those, Oreos (without the filling) or even plain graham crackers work just fine.
The Light & Creamy Peanut Butter Filling
This filling uses the magic combination of heavy cream and cream cheese. The cream cheese provides the necessary stability, while the heavy cream provides the volume and air.
Ingredient Deep Dive: Choosing the Best Peanut Butter and Cream Cheese
This is where I learned my hardest lesson. Trust me: SKIP the natural, oil and separating peanut butter.
- Peanut Butter: You need a standard, stabilised creamy PB (think Jif, Skippy, Peter Pan). The oil in natural peanut butter (the kind you have to stir vigorously) will destabilise the cream cheese mixture and your pie might never set properly. Use the cheap stuff this time. It’s brilliant.
- Cream Cheese: Full and fat block only. Don't try the spreadable stuff in the tub. The stabilizers in the block are crucial for achieving that firm, clean slice.
Smart Swaps: Dairy and Sugar Alternatives
Here are my go and to solutions if you are missing something:
| If You Need This... | Try This Substitute... |
|---|---|
| Heavy Whipping Cream | Full and fat Coconut Cream (chilled, use only the thick solids) |
| Cream Cheese | Neufchâtel cheese (slightly lower fat) or high and quality vegan block cheese |
| Powdered Sugar | Granulated sugar finely ground in a food processor (pulse until powder consistency) |
| Chocolate Wafers | Graham crackers + 2 Tbsp cocoa powder (for a chocolate crust) |
Master the Method: Step and by-Step No and Bake Instructions
Phase 1: Preparing and Setting the Crust
- Process and Combine: Pulse your chocolate wafers into fine crumbs in a food processor. Pour the melted butter and salt over the top. Mix until the crumbs look like wet sand. They should hold together when squeezed.
- Press and Chill: Press the crumbs firmly into a 9 inch pie plate. Use the bottom of a flat glass or measuring cup to really compact the base and sides. Tip: This compression is crucial for preventing a crumbly crust later. Stick it straight into the freezer for 15 minutes. This sets the butter fast and guards against sogginess.
Phase 2: Whipping the Light and Airy Filling Base
- Whip the Cream: Pour your ice cold heavy cream into a clean, dry bowl. Beat on high speed until it forms stiff peaks. You should be able to turn the bowl upside down (carefully!) and the cream won't budge. Transfer the whipped cream to the fridge immediately.
- Cream the Base: In the same bowl (no need to wash, just use the paddle attachment now), beat the softened room and temperature cream cheese until it is silky smooth. This takes about 1 minute.
- Add the Flavour: Beat in the peanut butter, sifted powdered sugar, and vanilla until everything is completely uniform. Scrape down the sides of the bowl often. The mixture should be thick, creamy, and lump and free.
Phase 3: Achieving That Mousse and Like Consistency (The Gentle Fold)
This is the most important step for achieving that cloud and like texture. Do not use the mixer here!
- Start the Fold: Get the whipped cream out of the fridge. Add about a third of the whipped cream to the peanut butter base and gently fold it in with a rubber spatula. This lightens the base.
- Finish Folding: Add the remaining whipped cream in two more additions. Use a motion like cutting down the middle and sweeping up the sides of the bowl, turning the bowl as you go. Stop folding immediately when you see no more white streaks. A few wispy streaks are better than deflated volume.
Chef's Note: If you overmix the filling during the folding stage, you will crush all the beautiful air you just beat into the cream. The result will be dense and sticky. When in doubt, stop early.
Phase 4: Assembling, Chilling, and Setting the Pie
- Fill and Smooth: Spoon the light, fluffy filling into the chilled crust. Gently smooth the top into a slight dome.
- Garnish and Set: If you’re adding crushed peanuts or chocolate shavings, sprinkle them on now. Cover the pie loosely (I put toothpicks in the filling before applying plastic wrap so the wrap doesn't stick) and refrigerate for a minimum of 4 hours, or preferably overnight. The NoBake Peanut Butter Pie: The Ultimate Creamy, Decadent Recipe variant is even better overnight!
Decoding the Decadence: Why This Peanut Butter Pie Recipe Works

This recipe is structured for maximum stability and minimal effort.
- The Cream Cheese Barrier: Cream cheese, when used at room temperature, beats beautifully and sets up like concrete when chilled. It’s what holds the pie together and prevents the filling from weeping.
- Butter vs. Oil in the Crust: Using melted butter instead of vegetable oil to bind the crust crumbs provides superior flavour and, crucially, a firmer set when chilled.
- No Gelatin, Maximum Fluff: Because we achieve volume by whipping the cream separately and relying on the setting power of chilled butter and cold cream cheese, we completely avoid the need for finicky gelatin or heavy pre and made products like Cool Whip. This gives us a superior, fresher flavour and texture.
Expert Tips and Troubleshooting for the Perfect No and Bake Pie
Common Mistake 1: Lumpy Filling
The Fix: Your cream cheese was too cold. If you start beating cold cream cheese, it separates and clumps instead of becoming smooth. You must start with fully room and temperature cream cheese.
If you realize your base is lumpy before adding the whipped cream, gently heat the bowl over a saucepan of simmering water (a makeshift double boiler) for about 30 seconds, stirring vigorously, until the lumps dissolve.
Common Mistake 2: The Filling Won't Set
The Fix: This happens for two main reasons: a) You used natural, oil and separating peanut butter (see my warning above). b) You over and mixed the filling after adding the whipped cream, deflating the air needed for structure.
If you think your pie won't set, try adding it to the freezer for 3– 4 hours instead of the fridge. This often salvages the structure, though the texture might be slightly denser.
Common Mistake 3: Soggy Crust
The Fix: You didn't chill (or freeze) the crust before adding the filling. The quick freeze sets the butter firmly, forming a waterproof barrier against the creamy filling.
Serving the Ultimate Peanut Butter Pie: Presentation and Pairings
This pie is rich, so a sharp contrast in flavour is always welcome.
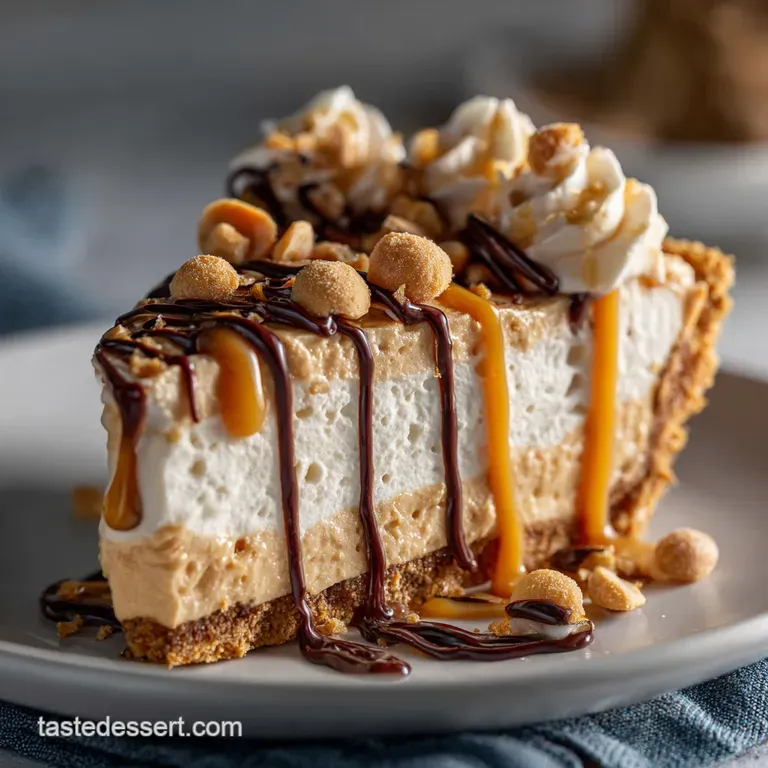
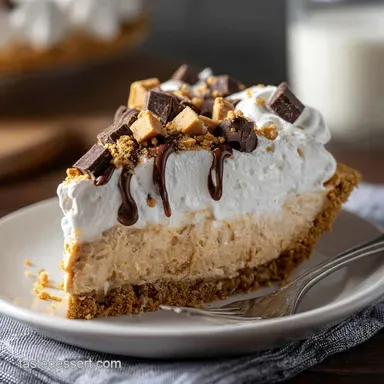
- Gourmet Garnish Ideas for the 'Cloud' Aesthetic: I love a heavy dusting of cocoa powder or a few dark chocolate shavings for visual contrast. Don't forget the chopped, roasted salted peanuts that crunch and extra salt are essential.
- Sauce It Up: A light drizzle of raspberry sauce or even a tiny amount of warmed dark chocolate ganache is always a winner.
- Pairing: Serve with something sharp and clean. Espresso, strong black coffee, or a small glass of milk helps cut through the sweetness.
How to Store, Freeze, and Prep Ahead
Best Practices for Refrigerator Storage
The pie keeps beautifully in the fridge for up to 5 days . Keep it tightly covered (plastic wrap or a cake dome). It actually tastes best after the first 8 hours when the flavours have married, so it’s an ideal make and ahead dessert.
Can You Freeze Peanut Butter Pie? (And How to Defrost)
Yes! This is one of the best desserts for freezing.
- To Freeze: Once fully set (after its initial 4+ hour chilling), wrap the entire pie (still in the dish) tightly in two layers of plastic wrap, followed by a layer of aluminum foil.
- Shelf Life: It stays excellent for up to 2 months.
- To Defrost: Transfer the frozen pie to the refrigerator the night before you plan to serve it. Allow 8– 12 hours to thaw completely.
- Serving: Never try to cut it frozen. Let it sit on the counter for 10 minutes after thawing for optimal slicing consistency.

Recipe FAQs
Why is my peanut butter filling too runny and soft?
This usually happens if the cream cheese or heavy cream was not sufficiently chilled, or if the whipped cream was overmixed past the soft peak stage. Ensure your heavy cream is beaten to stiff peaks and then folded into the peanut butter mixture gently, preventing deflation.
If the mixture seems extremely loose before chilling, incorporate 1 tablespoon of powdered sugar into the peanut butter base to help stabilize the fats.
How should I store the leftover pie, and can I freeze it?
The pie should be stored in the refrigerator, covered loosely, for up to 4 days for optimal flavor and texture. Yes, this pie freezes beautifully due to the high fat content; wrap it tightly in plastic wrap and foil, and freeze for up to 2 months.
Thaw overnight in the refrigerator before serving, but avoid thawing at room temperature.
Can I use a graham cracker or vanilla wafer crust instead of the dark chocolate crust?
Absolutely. While the dark chocolate crust offers a wonderfully salty and bitter counterpoint to the sweet filling, a traditional graham cracker or vanilla wafer crust works perfectly well.
Simply ensure you use the same amount of butter or binding agent specified in the original recipe to achieve the correct density and setting firmness for the no-bake shell.
Should I use natural peanut butter or processed (like Jif/Skippy) for this recipe?
For this no-bake recipe, processed, shelf stable peanut butter (like Jif, Skippy, or Peter Pan) is highly recommended. Natural peanut butter often separates oil which leads to a much greasier texture and inconsistent setting quality, making it difficult to achieve the desired mousse like structure.
The stabilizers in commercial brands ensure a consistently creamy filling.
My filling tastes great but came out very dense, not "cloud like." What went wrong?
A dense filling is a classic sign of overmixing once the whipped cream is introduced, which knocks the vital air out of the mousse structure. When folding the whipped cream into the peanut butter base, use a large spatula and a light hand, completing the mixture in 2-3 quick additions until just combined.
Stop folding immediately before every streak of white cream disappears.
How long does the pie truly need to chill before serving?
While a minimum of 4 hours is necessary for the structure to begin holding, chilling the pie for a full 8 hours or, ideally, overnight yields the best results for clean slicing. A properly chilled pie will maintain its airy, mousse like structure when you cut into it and will hold up better once served at room temperature.
Can this recipe be adapted to be vegan or dairy-free?
Yes, this adaptation is possible with careful substitutions. Substitute the cream cheese with a high-quality vegan cream cheese alternative, and swap the heavy whipping cream for chilled full fat coconut cream (the solid part of canned coconut milk) whipped to stiff peaks.
Ensure your chocolate crust cookies are also verified as dairy-free.
Ultimate No Bake Peanut Butter Pie
Ingredients:
Instructions:
Nutrition Facts:
| Calories | 1379 kcal |
|---|---|
| Protein | 29.5 g |
| Fat | 105.7 g |
| Carbs | 88.2 g |
