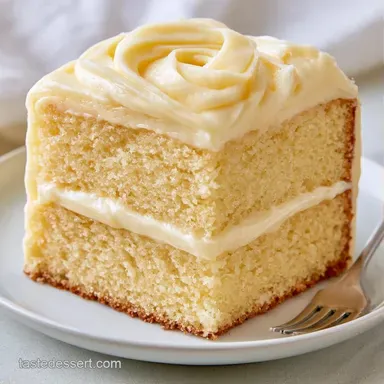
Vanilla Velvet Cake with Buttercream Frosting

- Time: 30 min active + 30 min baking + 120 min cooling and frosting
- Flavor & Texture: Creamy vanilla with a tight, tender crumb
- Perfect for: Classic family celebrations
Vanilla Velvet Cake
The sound of a serrated knife slicing through a flat, dense, yet soft layer is the best part of this bake. It isn't a light, airy sponge. It is a dense, creamy experience that feels nostalgic and timeless.
This recipe gives you a high-end result without needing a professional pastry kit. You get an ivory-colored crumb that holds up to heavy frosting but still melts away when you eat it.
It is a dependable choice for birthdays or any day you want a classic, cherished dessert on the table.
What You'll Need
For the Batter
- 375 g cake flour Why this? Lower protein content ensures a tender crumb
- 300 g granulated sugar
- 12 g baking powder
- 3 g fine sea salt
- 225 g unsalted butter, softened
- 120 ml vegetable oil Why this? Maintains moisture after refrigeration
- 4 large eggs, room temperature
- 240 ml full-fat buttermilk, room temperature
- 15 ml pure vanilla extract
- 60 g white chocolate, melted and cooled Why this? Cocoa butter provides a more luxurious mouthfeel
For the Syrup
- 100 g granulated sugar
- 120 ml water
- 5 ml pure vanilla extract
For the Cream Cheese Buttercream
- 450 g full-fat cream cheese, chilled
- 225 g unsalted butter, softened
- 600 g powdered sugar, sifted
- 10 ml pure vanilla extract
- 1 g salt
| Original Ingredient | Substitute | Why It Works |
|---|---|---|
| Cake Flour | All-purpose flour (minus 2 tbsp per cup) | Comparable protein levels. Note: May be slightly less tender |
| Buttermilk | Milk + 1 tbsp lemon juice | Replicates the acidity. Note: Thinner consistency than real buttermilk |
| White Chocolate | Extra butter (30g) | Increases fat content. Note: Lacks the distinct white chocolate taste |
Tools for the Job
To properly aerate the butter, use a stand mixer equipped with the paddle attachment. You will also need two 8-inch round cake pans. I suggest having a serrated knife ready for leveling the cakes and a pastry brush for applying the syrup.
Key Steps
Phase 1: The Foundation and Emulsion
- Heat the oven to 180°C (350°F). Grease two 8-inch round cake pans and line their bases with parchment paper.
- Using a stand mixer, cream the 225 g softened butter, 120 ml vegetable oil, and 300 g granulated sugar on medium-high for 4–5 minutes. Keep going until the blend is light and airy.

- Incorporate the 4 eggs individually, beating for 30 seconds after each addition. Stir in 60 g cooled melted white chocolate and 15 ml vanilla extract until smooth.
Phase 2: The Final Fold
- Lower the mixer speed. Add one-third of the sifted flour mix (cake flour, baking powder, salt), followed by half of the 240 ml buttermilk. Repeat this process, finishing with the remaining flour.
- Stop the mixer once no more flour is visible. Note: Over-mixing will make the vanilla velvet cake batter too dense and bread-like.

Phase 3: Baking and Precision Cooling
- Distribute the batter equally between the two pans.
- Bake for 28–32 minutes. The cakes are ready when a toothpick poked into the middle comes back with several moist crumbs but no wet batter.

- Leave the cakes in the pans for exactly 15 minutes, then transfer them to a wire rack to cool completely to cool entirely.
- Once cold, use a serrated knife to level the tops by slicing off the domes.
Phase 4: Assembly and Finishing
- In a pan, combine 100 g sugar, 120 ml water, and 5 ml vanilla. Heat until the sugar has dissolved, then brush the syrup generously over each cake layer.
- Whip 450 g chilled cream cheese and 225 g softened butter until smooth. Gradually blend in 600 g sifted powdered sugar, 10 ml vanilla, and 1 g salt.
- Apply a thin crumb coat of frosting and chill in the fridge for 30 minutes.

- Finish with the final layer of buttercream and store the cake in the refrigerator.
What Can Go Wrong

Fixing Curdled Batter
This occurs when eggs are too cold, causing the butter to seize. If the mixture appears separated, gently warm the bowl over a water bath for 30 seconds while mixing on low to restore the emulsion.
Addressing a Collapsed Center
A collapse in the middle is often caused by expired baking powder or opening the oven too soon. Always test your leavening agents before you begin.
Smoothing Grainy Frosting
If the buttercream is gritty, the butter and cream cheese likely weren't fully emulsified before the sugar was added. Beat the fats alone for another 2 minutes before adding the sugar.
| Problem | Fix |
|---|---|
| Curdled batter | Warm the bowl slightly via a water bath |
| Sunken middle | Use fresh baking powder and don't peek |
| Grainy frosting | Beat fats longer before adding sugar |
Dietary Adaptations
To try a different flavor, create a Lemon Velvet version by mixing 1 tablespoon of lemon zest into the batter and stirring some lemon juice into the simple syrup. For a more fruity result, a thin layer of raspberry jam between the cake layers works wonderfully.
For a gluten-free alternative, use a 1:1 gluten-free baking flour blend. Keep in mind that the crumb will be a bit denser and may require an extra 5 minutes of baking. If you prefer other classic styles, you might enjoy a Red Velvet Marble Cake for a bolder appearance.
| Option | Change | Result |
|---|---|---|
| Lemon | Mix zest into batter | Zesty, citrus notes |
| Raspberry | Add jam layer | Tart contrast to sweet frosting |
| gluten-free | Use 1:1 GF flour | Heavier crumb, slightly different lift |
Freezing and Reheating Guide
Because of the cream cheese frosting, this cake must stay chilled. Keep it in a cake carrier in the fridge for up to 4 days.
If you want to freeze it, wrap unfrosted layers tightly in plastic wrap and then aluminum foil. They keep for up to 3 months. Thaw them in the refrigerator overnight before you start frosting.
For the best experience, let the vanilla velvet cake sit at room temperature for 30–60 minutes before serving. This softens the butter, restoring that signature melt.
Presentation Tips
To get those sharp, professional edges, don't skip the crumb coat. It seals in the loose bits of cake so the final layer of frosting stays clean. Use an offset spatula to smooth the sides in one long, sweeping motion.
I like to finish the top with a few fresh berries or a simple dusting of powdered sugar for a timeless look.
What Makes the Texture Work
The texture of this cake comes down to how the fats and acids interact.
- The Fat Hybrid: Using both butter and oil ensures the cake has a rich taste but doesn't turn into a brick when it's cold.
- Buttermilk Acidity: The acid in the buttermilk breaks down the gluten in the cake flour, which creates a tighter and more tender crumb.
- White Chocolate: The cocoa butter in the chocolate adds a lush weight to the cake that makes it feel more substantial than a standard sponge.
According to King Arthur Baking, the protein content in flour is the biggest factor in cake texture, which is why cake flour is the best choice here to keep things soft.
High in Sodium
952 mg of sodium per serving (41% of daily value)
American Heart Association recommendation: no more than 2,300 mg of sodium per day
Tips to Reduce Sodium
-
Reduce Added Salt
Try omitting or significantly reducing the fine sea salt in the batter and the salt used in the frosting.
-
Substitute Cream Cheese
Look for a lower-sodium version of cream cheese or use a small amount of homemade nut-based cream to lower processed sodium.
-
Low-Sodium Leavening
Replace the standard baking powder with a sodium-free baking powder alternative.
-
Homemade Buttermilk
Create your own buttermilk using low-sodium milk and a tablespoon of lemon juice or vinegar instead of store-bought versions.
-
Boost Aromatics
Use extra vanilla extract or a bit of fresh lemon zest to enhance the flavor profile without relying on salt.
Good to Know
Can buttermilk replace milk and vinegar?
Yes, buttermilk is the required liquid for this specific recipe.
Tip: Ensure it is at room temperature to prevent the batter from curdling.
How do I measure the cake flour so the cake is not dense?
Scoop the flour into the measuring cup and level the top with a knife.
Tip: Sift the flour after measuring to remove any lumps.
Is a stand mixer acceptable for mixing the batter?
Yes, a stand mixer with the paddle attachment is the recommended tool.
Tip: Beat the butter, oil, and sugar for 4–5 minutes until pale and fluffy.
Does sifting the dry ingredients twice really improve the cake?
Surprisingly, no. Sifting the flour, baking powder, and salt once is sufficient for this batter.
Tip: Stop mixing immediately after the flour streaks disappear to maintain tenderness.
Is it true that the frosted cake can be stored at room temperature?
Not true. The cream cheese buttercream must be kept in the refrigerator.
Tip: Chill the cake for 30 minutes after the crumb coat to stabilize the frosting.
Would half-and-half work as a substitute for buttermilk?
Not recommended: the cake will be slightly richer and lack the characteristic tang.
Tip: Stick to full-fat buttermilk for the most tender, velvet crumb.
How to achieve perfectly flat cake layers?
Trim the domed tops with a serrated knife once the cakes are completely cold.
Tip: Use a wire rack for cooling to prevent the bottoms from becoming soggy.
Could this batter be baked as cupcakes?
Yes, this recipe adapts well to cupcake liners.
Tip: Monitor them closely as they will bake much faster than the 8-inch pans.
Vanilla Velvet Cake with Buttercream