Pineapple Bars Recipe Easy Zesty Crumble Bars with Oatmeal Crust
- Why These Pineapple Bars Are Your Next Baking Project
- The Anatomy of a Perfect Crumble: Buttery Layers and Jammy Filling
- Sourcing the Supplies for the Ultimate Pineapple Bars
- Essential Baking Equipment Checklist
- Crafting the Multipurpose Shortbread Base and Crumble
- Assembling and Baking Your Tropical Dessert Layers
- Expert Tips for Cooling, Storing, and Serving
- Adjusting the Recipe: Variations and Dietary Swaps
- Recipe FAQs
- 📝 Recipe Card
Why These Pineapple Bars Are Your Next Baking Project
I swear, for years, I tried to nail the perfect tropical pineapple dessert recipe that wasn't just a sad, mushy pile of fruit baked into wet cake. It was a personal mission. I wanted that sunny, bright, tangy flavour, but it had to have texture. It had to be sliceable.
It had to feel like a proper bake, you know?
These Pineapple Bars are the result of many failed attempts (and yes, a few soggy bottoms). What we have here is the gold standard: an incredibly sturdy, buttery shortbread crust loaded with oats for chew, topped with a thick, almost jam-like pineapple filling, and then covered again with the same crumbly magic.
They are comforting, they ship well (if you’re mailing a care package), and honestly, they just taste like sunshine. Forget those sickly sweet, overly engineered recipes. We’re keeping it simple and delicious, just the way your grandma intended.
The Anatomy of a Perfect Crumble: Buttery Layers and Jammy Filling
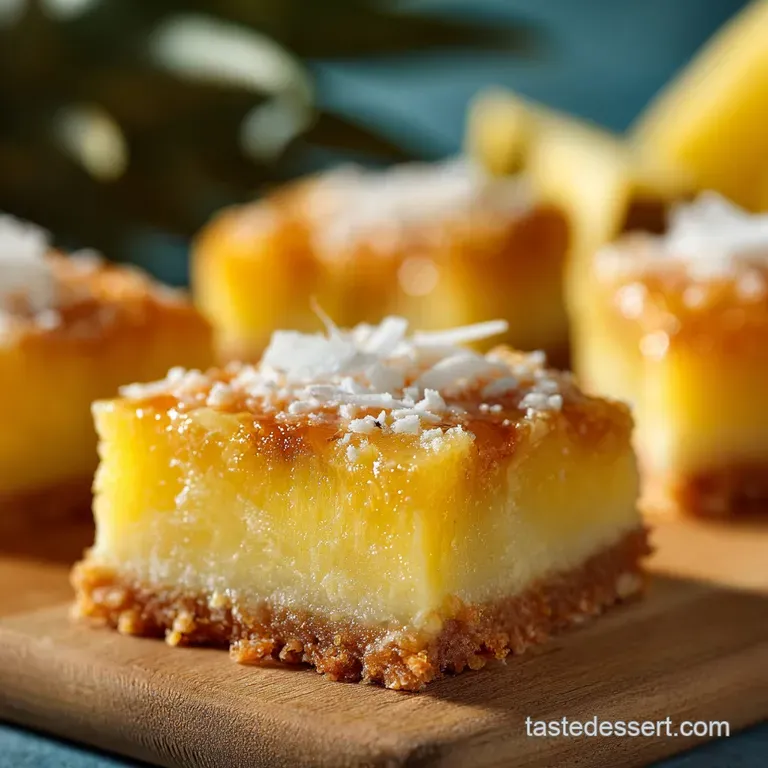
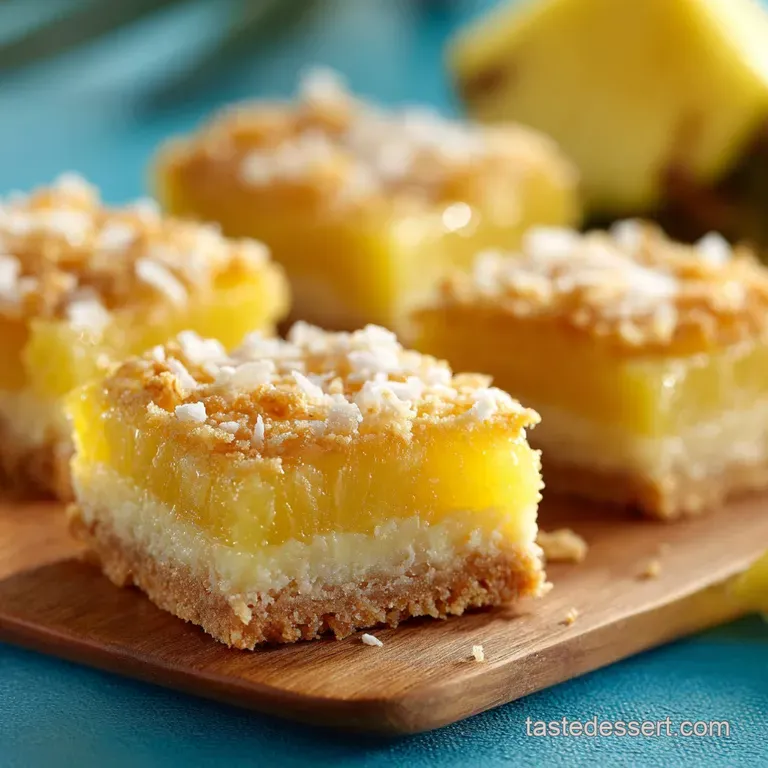
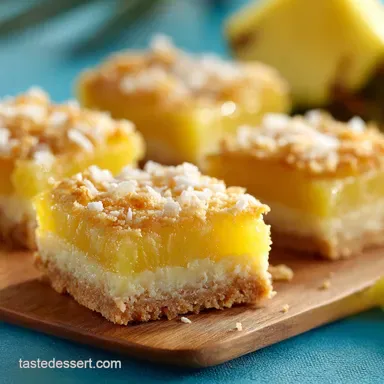
The secret to why this recipe is so stellar lies in the balance of textures. You have three distinct layers working together. The foundation is a thick shortbread base, enriched with brown sugar for depth and rolled oats for structure. This base has to be tough enough to hold the fruit without collapsing.
Then you have the filling this is not just pineapple dumped on dough. We cook that down with a little cornstarch and lemon, turning it into a stable, zesty compote. The heat transforms that simple crushed pineapple into pure tropical pineapple bliss.
Finally, the topping (which is the exact same mixture as the base, brilliant, right?) bakes up extra crispy and golden. It’s heaven in bar form.
The Secret to a Perfectly Golden, Crunchy Topping
You want a topping that screams "homemade," not a uniform flat slab. The key here is temperature and technique. Because we use very cold, cubed butter and cut it into the dry ingredients (flour, oats, sugar), the crumble mixture stays distinct and chunky.
When you scatter that cold crumble over the warm filling and hit it with the oven heat, the butter melts slowly, coating the dry ingredients and creating those little pockets of crunchy, golden goodness. Also, avoid pressing the topping down. Scatter it lightly. Let gravity (and the oven) do the work.
A Proper Job: Achieving Tropical Zing Without Soggy Bottoms
Right, let’s talk sogginess. This is where most tropical bar recipes fail. Pineapple is inherently wet. If you dump canned pineapple straight onto a crust, you are basically steaming your bottom layer, resulting in that dreaded soggy bottom. The absolute non-negotiable step here is draining.
You must drain the crushed pineapple until you are convinced no more liquid can possibly come out. Use a fine mesh sieve and press, press, press. Then, we use a generous dose of cornstarch in the filling mixture itself, which acts like a thickener, ensuring that any residual moisture turns into a jammy consistency, not soup.
From Kitchen Classic to Bake Off Showstopper
While these are fundamentally simple shortbread bars (a total kitchen classic), the bright yellow filling makes them look totally spectacular. They look complex, but they are deceptively easy.
They’re the perfect treat for when you need to bring something impressive to a potluck but only have thirty minutes of prep time. Plus, because they travel well and hold their shape beautifully (if you let them cool properly!), they always impress.
No fancy techniques required, just good ingredients and proper chilling.
Our Commitment to high-quality, Simple Ingredients
I’m a firm believer that if you only use simple ingredients, they had better be the best you can afford. This recipe lives or dies by the butter. Seriously. Go for real butter, unsalted, and ensure it’s fridge cold. Also, use old-fashioned rolled oats, not quick cooking or instant.
Quick oats absorb moisture too fast and can make your crust gluey instead of crumbly. This is a tropical pineapple bliss bars recipe that rewards quality.
Sourcing the Supplies for the Ultimate Pineapple Bars
You probably have most of this stuff in your pantry already, which is the beauty of baking this kind of comfort food. But when you hit the shops, be deliberate about two things: the pineapple and the lemon.
For the pineapple, we are using canned crushed pineapple (more on why in a minute), which is surprisingly effective because the pieces are already small and manageable. For the lemon, please, please, please use a fresh lemon.
That burst of fresh zest and juice is non-negotiable; it lifts the entire flavour profile from 'sweet' to 'zingy and bright.'
Essential Baking Equipment Checklist
You don't need a massive stand mixer for this, though it speeds up the initial creaming process. I often just use my hands (if the butter is very cold) or a pastry blender.
- 8x8 inch (20x20 cm) Metal Baking Pan (A darker pan might require lowering the temperature slightly, heads up!)
- Parchment Paper (The kind that sticks up on two sides to act as a handle. Essential for clean slicing.)
- Mixing Bowls
- Fine mesh Sieve (For draining the pineapple do not skip!)
- Wire Rack (For cooling. Air circulation is your friend.)
Mastering the Oat-to-Flour Ratio for the Crust
We use a hearty 1.5 cups of flour to 1 cup of rolled oats. This ratio is brilliant because the flour holds the structure, and the oats provide that chewy, nutty texture that makes the difference between plain shortbread and a proper crumble bar.
The oats also absorb a little of the pineapple moisture during baking, further ensuring the crust stays crisp. If you don’t have oats, the recipe still works, but it will be slightly less rustic and crunchy.
Canned Versus Fresh Pineapple: Making the Right Choice
I know, I know. Fresh is usually better. But hear me out on this pineapple bars with fresh pineapple dilemma. For this specific recipe, canned crushed pineapple in juice is actually superior and easier. Why?
Because the crushed texture is perfect for a smooth, jammy filling, and the flavour of canned pineapple is already concentrated and reliably sweet/tart. If you insist on fresh, you must cook it down in a saucepan for about 15 minutes before mixing it with the cornstarch.
You need to evaporate nearly half the water content first, or your bars will be soup. Trust me, stick to the can here. It's one of those rare exceptions where convenience wins.
CRITICAL NOTE: If your canned pineapple says "in syrup," rinse it thoroughly before draining, or your filling will be sickly sweet. We want the ones canned "in juice."
Preparing the Zesty Filling Components
Aside from the drained pineapple, the zest is everything. Take the zest of a whole medium lemon, and then use the juice for acidity. The acid cuts through the richness of the butter and the sweetness of the sugar, creating that delightful zing.
Combine this with the cornstarch first, mixing well before you heat or bake anything. Cornstarch is the magic binder that stops this filling from running everywhere.
Getting Your 8x8 Pan Ready for Success
We’re using an 8x8 inch pan here, which gives you nice, thick, chunky bars. If you use a 9x13 pan, you’ll need to increase the recipe by about 50%, or your bars will be too thin. Whatever pan you use, line it with parchment paper, allowing the paper to hang over the long sides like little wings.
This will be your handle later for lifting the entire block out for clean cutting. No need to grease the parchment, just the exposed sides of the pan.
Pre-Baking Tasks: Setting Up for a Smooth Process
Before you even turn on the oven, make sure your butter is diced and cold, and your pineapple is draining. My favourite pre-baking task is prepping the filling ingredients (lemon zest, cornstarch, etc.) in a separate bowl.
That way, once the crust is mixed and pressed, you can immediately pour and proceed, without faffing about with measurements while the dough warms up.
Related Recipes Worth Trying
- The Ultimate Pineapple Rum Cake Buttery Moist Soaker Recipe — The perfect Pineapple Rum Cake recipe from scratch This Caribbean soaker cake is unbelievably moist featuring crushed pineapple and a buttery spiced rum glaze
- Foolproof Graham Cracker Toffee Bars Buttery Snap Recipe — This buttery Cracker Toffee recipe aka Christmas Crack yields the ultimate Graham Cracker Toffee Bars Foolproof steps guarantee a crisp snap never a soggy...
- The Proper Blondie Fudgy Salted Caramel Bars Recipe — Tired of dry cookie recipes These soft cookie recipes feature brown butter for unbeatable flavour A truly yummy cookie bar dessert Find out how to make them
Crafting the Multipurpose Shortbread Base and Crumble
The base is the star of this pineapple bars recipe easy approach because it does double duty. You start by mixing all your dry ingredients (flour, oats, sugars, salt, baking powder) together. Then, using your cold butter cubes, you "cut" the butter in.
You can use a pastry cutter, but honestly, clean, cold hands work just fine. You rub the butter into the flour mixture between your thumb and forefingers until you have a mixture that resembles coarse, wet sand, with some pea-sized chunks of butter still visible. That’s texture development right there.
Assembling and Baking Your Tropical Dessert Layers
Once the dough is ready, you need to divide it quickly. Grab about one cup of that mixture and stick it in the fridge immediately that’s the crumble topping, and keeping it cold is non-negotiable.
Combining Dry Ingredients for the Perfect Crumb Texture
We use a combination of brown sugar and granulated sugar. The brown sugar adds moisture, chewiness, and that lovely caramelized colour, while the granulated sugar ensures crispness. Whisking them with the flour and oats first ensures every single bit of oat gets coated.
Pressing the Bottom Layer Firmly Into the Tin
Take the large portion of the crumb mixture and dump it into your prepared pan. Use the bottom of a flat measuring cup or glass to press the mixture down very firmly and evenly across the bottom and slightly up the sides. You want a solid, compact foundation for the filling.
If the base isn't firm, it won't be able to hold the weight of the fruit.
Chilling the Reserved Crumble Topping
While the base is getting pressed, that reserved topping (remember, about a cup) is chilling in the fridge. This keeps the fat solid. When you scatter it over the filling just before baking, those cold crumbs will hold their shape better, resulting in a superior, crunchier top layer. Don't skip the chill!
Slowly Cooking Down the Pineapple Jam Filling
In this recipe, we are using the oven heat to cook the filling, which relies heavily on the cornstarch. You don't need to cook it on the stovetop first (unless you used fresh pineapple, as noted before).
By draining the pineapple so well, the cornstarch only has to deal with the minimal residual moisture, allowing it to set beautifully during the 35– 40 minutes of bake time.
Distributing the Filling Evenly Over the Crust
Once the base is pressed, carefully spread the pineapple filling over the crust. Use a rubber spatula, but don't press too hard. You don't want to disrupt that compacted crust below. Just a gentle, even layer, spreading edge-to-edge.
Achieving the Signature Golden Brown Finish
Bake these at 350°F (175°C) for around 35 to 40 minutes. You know they are done when the filling is visibly bubbling around the edges (meaning the cornstarch has activated) and the crumble topping is a deep, rich golden brown. That colour is flavour!
If they look pale after 30 minutes, give them another five, especially if you want that wonderful crunch.
Expert Tips for Cooling, Storing, and Serving
Seriously, I can’t stress this enough: impatience is the enemy of the perfect bar cookie.
The Critical Importance of Complete Cooling Before Slicing
If you slice these bars warm, they will stick to the knife, the filling will weep, and the whole thing will look messy. The cornstarch needs the ambient cooling time (at least two hours, preferably more) to fully set up the filling into that jammy texture.
Once they are fully cool, use the parchment paper wings to lift the slab onto a cutting board. Now you can use a large, sharp chef's knife to get those perfect, clean cuts.
Freezer, Fridge, and Counter: Maximizing Shelf Life
- Counter: Store at cool room temperature in an airtight container for up to 3 days. They stay beautifully crisp.
- Fridge: They can last up to 5 days, but the crust might soften slightly due to the chilled moisture.
- Freezer: Absolutely! Cut the bars, then wrap them individually in plastic wrap and store them in a freezer bag or container for up to 3 months. Thaw at room temperature.
Troubleshooting: Why Is My Filling Runny?
If you followed the instructions exactly and your filling is still runny, there are usually two culprits:
| Problem | Solution |
|---|---|
| Insufficient Draining | You didn't press enough liquid out of the crushed pineapple. |
| Insufficient Cooling | You sliced them while they were still warm. Chill longer! |
If the problem is draining, unfortunately, you can’t fix it now, but you can serve the bars in a bowl with a spoon they'll still taste great! If it’s cooling, just put them back in the fridge for another hour.
Nutritional Breakdown and Serving Suggestions
These are a lovely, hearty treat definitely not diet food, but worth every single calorie. They are fantastic served simply with a hot cup of black tea (the acidity of the tea cuts the richness perfectly).
If you’re feeling fancy, a small scoop of good coconut sorbet or ice cream on the side just amps up the tropical vibe.
Adjusting the Recipe: Variations and Dietary Swaps
This shortbread base is so forgiving, you can play around with it endlessly.
Making These Bars gluten-free or Vegan Friendly
- gluten-free: Swap the AP flour for a 1:1 gluten-free baking blend that includes xanthan gum.
- Vegan Friendly: Substitute the butter with a solid plant based butter (like Miyoko’s or Earth Balance sticks). Make sure the brand you choose has a high fat content; avoid tub margarines. The texture will be slightly different but still fantastic.
Flavor Twists: Adding Coconut, Macadamia, or Spice
I love adding extra layers of flavour to the crust for depth.
- Coconut Crumble: Substitute ¼ cup of the flour in the crust with finely shredded, unsweetened coconut. It adds incredible aroma and texture.
- Macadamia Crunch: Mix in ½ cup of roughly chopped, roasted macadamia nuts into the reserved crumble topping before scattering.
- Spiced Zing: Add ½ teaspoon of ground ginger and a pinch of nutmeg to the dry ingredients for the crust. It gives a warming depth that pairs beautifully with the sharp pineapple.

Recipe FAQs
My filling seems a bit runny after baking did I muck it up?
It’s a common blunder, mate! The key to avoiding a "soggy bottom" is ruthlessly draining the crushed pineapple before mixing; if it's too wet, the filling won't set, and the crust will steam instead of baking crisp.
How long will these delightful Pineapple Bars stay fresh on the counter?
If you keep these Pineapple Bars stored in an airtight tin at room temperature, they’ll be perfectly scrummy for 3 4 days; if you need them to last longer, pop them in the fridge for up to a week.
I tried to cut them straight out of the oven and they just dissolved what went wrong?
Ah, patience is a virtue in baking! The cornstarch needs a good two hours (minimum!) of cooling time to set the jammy filling properly; slicing them warm will inevitably lead to a glorious but messy pile rather than neat bars.
Can I swap out the butter for something else if I need them dairy-free?
Absolutely! You can use a solid, plant based baking stick or vegan butter alternative in equal measure; just ensure it is very cold before cutting it into the flour mixture for that proper flaky shortbread texture.
I’m not a fan of lemon; can I skip the zest in the filling mixture?
You can skip it, but the lemon zest is crucial for balancing the sweetness of the pineapple and sugar; if you omit it, the bars might taste a bit too rich, so consider swapping it for a tiny splash of lime juice for acidity.
Zesty Oatmeal Pineapple Bars Recipe
Ingredients:
Instructions:
Nutrition Facts:
| Calories | 393 kcal |
|---|---|
| Protein | 3.5 g |
| Fat | 1.4 g |
| Carbs | 34.6 g |
| Fiber | 3.1 g |
| Sodium | 3 mg |
