Bake Happy Pulla: Delightfully Sweet Bread
Okay, friends, gather around because i have a little story to share. a few years back, i decided to throw a brunch party to bring some sunshine into our dreary winter.
I wanted to impress my friends with something special, so i scoured every recipe book i owned. that's when i stumbled upon this gem bake happy pulla: delightfully sweet bread ! the name alone made my mouth water, and the thought of soft, pillowy bread brhelping together that heavenly aroma of cardamom?
Oh my gosh, yes, please!
As i stood there in my tiny kitchen, flour flying everywhere, i discovered that baking this traditional finnish sweet bread isn’t just about following a recipe.
It’s about creating moments, adding a little magic, and enjoying the process. no fancy gadgets required! just a little patience, love, and a sprinkle of flour.
So, grab your apron, because we’re diving into this delightful braided bread recipe reinventing holiday baking and brunches everywhere.
Recipe Overview
Let’s chat about where this beautiful bread comes from. pulla , which hails from finland, has been around for ages, and its history is as rich as it is delicious.
It’s often served during holidays, celebrations, and even everyday coffee breaks yep, it’s the ultimate coffee bread ! fast forward to today, and you’ll find this cardamom bread popping up in bakeries all across the u.
S. it’s gained a massive following, especially among those of us who love to indulge in dessert breads .
Now, don’t sweat the complexity! i'd rate it medium difficulty. the trickiest part is mastering the brhelping technique , but once you get that down, you’ll be a pro! the whole process takes around two hours, including rises just a little patience, trust me!
Budget wise, it’s pretty friendly too.
You can whip up a stunning loaf for under $10, and it yields about ten servings . perfect for sharing or for hoarding all to yourself (no judgment here!).
Key Benefits
Now let’s get to the good stuff the real reasons you need this bread in your life. first off, health benefits .
It’s got wholesome ingredients like milk, eggs, and flour, plus the sprinkle of that ground cardamom is not just for flavor; it’s said to improve digestion and blood circulation! who knew your brunch bread could do that?
What i absolutely love about it is its versatility. you can make it for any occasion . family gatherings? check. cozy coffee mornings? check.
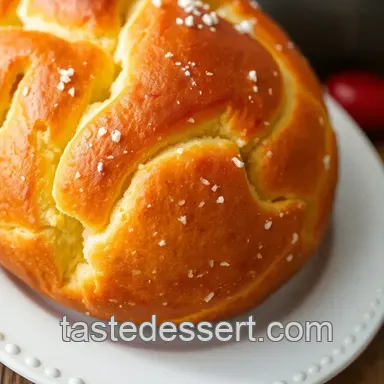
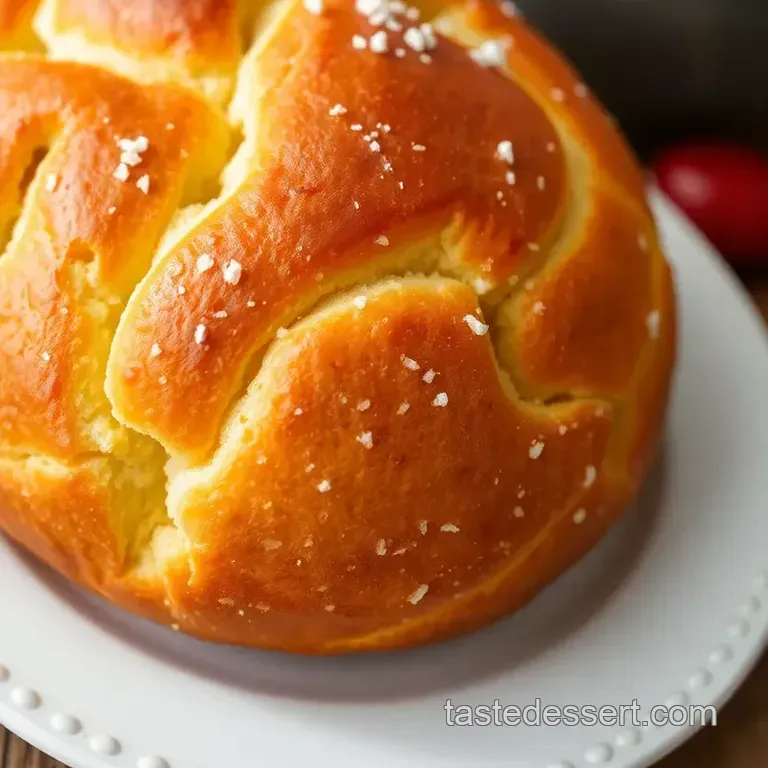
Want to impress your partner with homemade bread? double check! there’s something so heartwarming about serving up a braided loaf , especially when topped with some sliced almonds or a dusting of powdered sugar the epitome of festive bread recipes .
Plus, i find it’s way more personal than store-bought options. you can switch up ingredients to match your vibe maybe toss in some dried fruits or nuts to elevate your sweet bread dough even more.
And those bread baking tips, like using an egg wash for bread , will help you achieve that perfect golden crust.
How can you not fall in love with all those endless variations?
With that in mind, let’s gather everything you’ll need to take this from mixing and kneading dough to having the best brunch centerpiece on your table.
Get your ingredients ready, and let’s make this happen!
Your Essential Ingredient Guide for Bake Happy Pulla
Alright, folks! pull up a chair and let’s chat about the nuts and bolts of baking, starting with bake happy pulla: delightfully sweet bread.
This finnish sweet bread is not just a treat; it’s like a warm hug on a chilly day. trust me, once you dive into making this, you'll crave it at least once a week.
Premium Core Components
First things first: let's talk ingredients. For our sweet bread, we want everything fresh and top-notch. Here’s a quick rundown:
Flour: 4 cups (500g) of all-purpose flour is a must. Look for a bag that feels soft and has no lumps.
Sugar: You need 1/2 cup (100g) granulated sugar. If it’s clumpy, it’s probably old. Fresh sugar should flow like, well, sugar!
Yeast: grab a packet of active dry yeast (2 1/4 tsp, or 7g). when you mix it with warm milk, it should foam up after about 5- 10 minutes.
If it doesn’t, throw it out. that yeast is a no-go!
Milk & butter: warm that milk to about 110° f ( 43° c) . follow it up with 1/3 cup (80ml) melted unsalted butter.
These are your fats they’re key for that soft bread texture we crave!
Signature Seasoning Blend
Now, let’s add some pizzazz! for our pulla, cardamom is king. use 1/2 tsp ground cardamom and, if you’re feeling adventurous, a dash of cinnamon (2 tsp) doesn’t hurt either.
Both of these spices bring a fragrant warmth that’ll have your kitchen smelling like a cozy coffee shop.
Freshness tips: Make sure your spices are not expired. A quick whiff should tell you if they’ve lost their kick.
Smart Substitutions
Life happens, right? Sometimes we don’t have every single ingredient. No worries!
If you're out of all-purpose flour, whole wheat flour works too but you might need a tad more liquid.
For a dairy-free option, swap that whole milk for almond milk or oat milk. Your Pulla will still be yummy!
Running low on sugar? You can use honey or even coconut sugar. It’s a little different, but you’ll be surprised!
Kitchen Equipment Essentials
Let’s not forget about the gear. Here’s what you definitely need:
Mixing Bowls: Grab a couple. You’ll thank me later.
Rolling Pin: If you don’t have one, a wine bottle will do just fine I've been there!
Baking Sheet & Parchment Paper: This is key for a clean bake.
Pastry Brush: Perfect for that egg wash! You want a shiny crust, don’t you?
Freshness Tips and Selection Criteria
As you gather this stuff, pay attention. Freshness is crucial. When selecting ingredients, always smell your flour and spices. Rancid butter will ruin your braided bread recipe ! Check expiration dates, and when in doubt, throw it out!
A Quick Note on Storage
Bread doesn’t last forever, but you can keep it fresh. once your bake happy pulla is baked and cooled, wrap it in a clean kitchen towel or plastic wrap.
It should be good for about 3 days at room temperature. for longer storage, consider slicing it up and freezing those bad boys! just pop them out when you need that burst of joy.
So, whether you’re baking for the holidays or just looking for a sweet brunch bread idea , these tips will set you up for success.
Remember, the goal is to enjoy each moment in the kitchen and, honestly, to create something that’ll make you and your loved ones feel good.
Now, let’s get to the fun part how to put all these tips into action with those step-by-step instructions! Buckle up, because your home is about to smell amazing, and you’re going to impress everyone with your delightful Finnish sweet bread !
Getting Started with Professional Cooking Method
When it comes to cooking, especially if you’re diving into something as lovely as bake happy pulla: delightfully sweet bread , it’s vital to nail down some professional cooking methods.
Trust me, these steps might seem simple, but they make a world of difference in the kitchen!
Essential Preparation Steps
First on the list is mise en place. it’s just a fancy french term for “everything in its place.” gather all your ingredients before you get started.
I mean, nothing is worse than mixing dough and realizing you forgot the sugar!
Now, let’s talk time management . your pulla dough requires some rising time (about 1 hour ), so plan ahead. while the dough is rising, you can clean up, prep your filling, or even scroll through instagram for some baking inspiration.
Organization strategies are also key. make sure your workspace is clear and tidy. this not only keeps you from losing track of your ingredients but also speeds up the cooking process.
A messy kitchen can feel chaotic, so let’s keep it chill.
And hey, safety first! always keep those kitchen tools sharp and your workspace clean. it's easy to forget this in the heat of a baking frenzy, but trust me you don’t want to be fumbling with sharp knives or crazily hot broilers.
Step-by-step Process
Let’s break it down nice and easy.
Prepare the dough mix warm milk ( 110° f/ 43° c) , sugar, and yeast. let it foam for about 5- 10 minutes .
Then add melted butter, eggs, flour, salt, and cardamom. get your hands in there and knead for about 5- 7 minutes until smooth.
First Rise – Pop your dough into a greased bowl, cover it, and let it rise for 1 hour in a warm place.
Prepare the Filling – While you wait, mix softened butter, brown sugar, cinnamon, and cardamom in a bowl.
Shape the Loaf – After the first rise, punch down that dough! Roll it out, spread the filling, then twist it into a beautiful braid.
Second Rise – Place it on a baking sheet and let it rise again for 30 minutes.
Preheat the Oven – Turn up that oven to 350° F ( 175° C) .
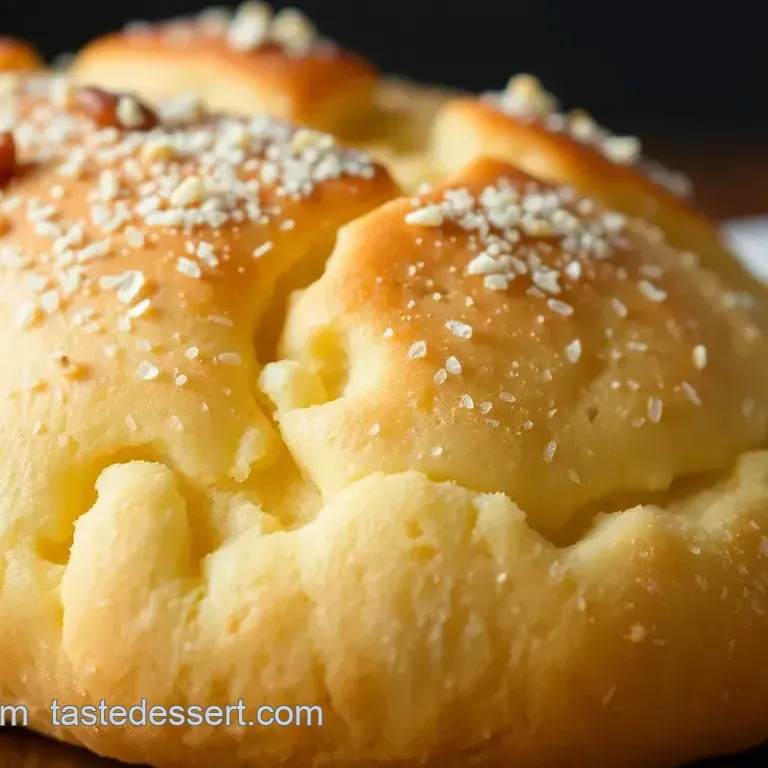
Bake – Give it a gentle egg wash before baking for about 25- 30 minutes until it’s golden brown.
Cool – Let it cool before slicing because no one likes a gummy slice of bread!
Keeping temperature control in mind is super important. You want that bread to be fluffy inside and golden outside. If it gets too dark during baking, your pulla could turn out dry instead of delish!
Expert Techniques
You know what might make your bake happy pulla stand out? using professional techniques. for instance, when you’re kneading, remember to stretch and fold the dough.
This not only helps with gluten development but also gives you that soft bread texture that feels like a cozy hug!
Remember those quality checkpoints ? The bread should sound hollow when you tap it on the bottom. If it is too soft, it needs a few more minutes.
Success Strategies
Now, let's chat about the common slip ups. One major pitfall is not letting your dough rise enough. If you skimp on the time, your pulla will be dense, and nobody wants that!
Check for quality assurance tips : Always check the expiration date on your yeast. Old yeast = flat dough.
Oh, and did i mention the joy of make-ahead options? you can prepare the dough a day in advance. just pop it in the fridge after the first rise.
This gives you a little head start when you whip it out for warm, fresh bread in the morning.
So, whether you’re celebrating holidays with traditional pulla or just enjoying a lazy sunday brunch, these professional cooking methods will set you up for success.
The wonderful smells of cardamom and cinnamon might just turn your home into a cozy bakery!
As we round off this enchanting journey of baking, let’s shift gears to explore more about this amazing recipe and other delightful treats in the next section: additional information .
Grab your apron, and let’s keep those baking adventures rolling!
Pro Tips & Secrets
Let me tell you, baking the bake happy pulla: delightfully sweet bread is a true joy, but it can also have its quirks.
I've had my fair share of baking flops, so here are some of my personal insights to help you out.
First off, time saving techniques can be game changers! if you know you're going to be busy, make the dough the night before.
Just let it rise in the fridge. it slows down the yeast action, but that’s totally okay. you’ll wake up to delicious smells and be ready to go!
Next, let’s talk flavor enhancement . you can’t go wrong with a splash of vanilla extract or even a teaspoon of orange zest in your dough.
This little tip always surprises my friends who knew something so simple could elevate sweet bread dough? you can get super creative with it!
Now, presentation is key! a little garnish can turn a homemade loaf into something instagram worthy. try using sliced almonds or even a sprinkle of pearl sugar on top before baking.
It’s a simple thing, but oh my gosh, it makes the bread look fancy !
Perfect Presentation
Let’s dive into how to make your bake happy pulla shine on the table. plating can seem intimidating, but it doesn’t have to be.
Start with good lighting when snapping a pic; natural light is always best.
If you want to impress, use a cutting board or a nice plate. garnish ideas are easy! dust with powdered sugar or even some cinnamon for that extra flair.
Adding some fresh mint leaves right next to your bread can brighten things up visually.
Color combinations matter too. The golden brown hue of the baked pulla looks fab against a darker wood background. You could even add a colorful fruit salad on the side to make everything pop!
Storage & make-ahead
Now, let’s be real sometimes life gets in the way of baking. No worries! You can totally make this sweet bread dough ahead of time.
Storage guidelines are simple: wrap your cooled pulla in plastic wrap and pop it in the fridge. oh, and it can last about 3 to 4 days there.
If you've got extra dough, you can freeze it! just let it rise and roll it up. when you're ready to bake, let it thaw in the fridge overnight, then do your second rise.
Easy peasy!
For reheating instructions, you can zap slices in the microwave for about 15 seconds, or pop them in an oven set to 350° f until warm.
Nothing beats the smell of fresh bread wafting through your home again!
Creative Variations
The beauty of finnish sweet bread is you can twist it to your heart’s content! why not explore some seasonal twists ? in the fall, try adding pumpkin spice to the filling.
You know everyone loves a seasonal vibe!
Let’s talk dietary modifications if you want something lighter, you can swap in whole wheat flour for a healthier version.
And how about some dried fruits in bread ? toss in some raisins or even cranberries. it’s a fun surprise in every bite.
Regionally, you can also adapt it! Think about adding specific spices you enjoy or using local nuts. You’ve got options!
Complete Nutrition Guide
Feeling guilty after indulging? let’s break it down a bit. a slice of this delightful bread packs around 250 calories .
It has a solid 5g protein , which isn't too shabby for a treat. and don’t forget about those health benefits from cardamom it’s known to help digestion!
Keep in mind your dietary considerations . If you’re watching sugar intake, swapping brown sugar for coconut sugar can cut some of that out, and you won’t sacrifice the taste!
Portion guidance is also key. I recommend slicing it thin for a snack or dessert. You can enjoy the soft bread texture without the guilt!
Expert FAQ Solutions
Okay, I get it. You still might have some questions! If your bread isn’t rising properly, check if your yeast is fresh nobody wants flat pulla!
Sometimes dough can get a bit too sticky. adding a little more flour can fix it. and remember, your bread should sound hollow when tapped on the bottom.
That’s your golden ticket to know it’s cooked!
If you want to explore more variations, feel free to get wild with flavors and toppings. There’s no wrong way to enjoy this bread!
Final Thoughts
So, why not roll up your sleeves and give the bake happy pulla: delightfully sweet bread a shot? there’s something incredibly fulfilling about making your own homemade bread .
Whether it's a cozy brunch or a festive gathering, this bread is sure to bring joy to the table.
Trust me, you'll feel a sense of accomplishment with every bite and your taste buds will thank you! Happy baking, friends!
Bake Happy Pulla Delightfully Sweet Bread