Skittles Candy Cake with Buttercream Border

- Servings12
- Total2 Hrs 50 Mins
- Calories1225 kcal
- Time: 20 min active + 30 min baking + 120 min cooling and chilling
- Flavor & Texture: Buttery cake with tart, chewy candy
- Perfect for: Birthday parties and colorful celebrations
You don't need a professional cake mold to keep the sweets secure. A basic biscuit cutter and a thick ring of frosting stabilize the candy core to prevent it from collapsing.
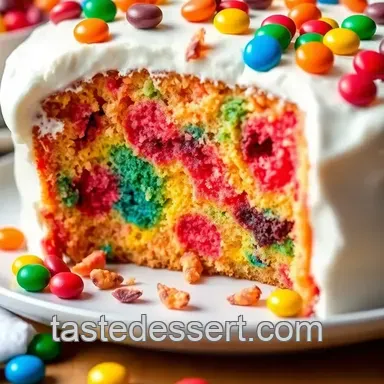
This treat adds a playful touch to any gathering. It combines a classic vanilla cake with a concealed core of zesty, colorful candies that tumble out as soon as you cut the first slice.
The final result is decadent, featuring a soft crumb and velvety buttercream. This skittles candy cake focuses more on the visual spectacle than intricate flavors, making it a hit with guests of all ages.
Why This Cake Works
Buttercream Wall: Piping a thick ring of frosting acts like a structural dam, stopping the candy from leaking into the cake. Room Temp Fats: Using softened butter ensures the batter emulsifies correctly, which keeps the crumb tender and helps it rise evenly.
The Ingredient Role
| Ingredient | What It Does | Best Swap |
|---|---|---|
| Unsalted Butter | Adds richness and structure | Margarine (slight flavor shift) |
| Powdered Sugar | Stabilizes the buttercream | None (essential for texture) |
| Whole Milk | Adds moisture and tenderness | Buttermilk (tangier result) |
| Baking Powder | Lifts the cake layers | Baking soda + acid (adjust ratio) |
The right balance of fat and sugar keeps the cake from becoming too dense. This allows the layers to support the weight of the candy filling without compressing.
Ingredients and Substitutes
For the Cake Base
- 3 cups (375g) all-purpose flour
- 2 cups (400g) granulated sugar
- 1 tbsp (12g) baking powder
- 1/2 tsp (3g) salt
- 1 cup (225g) softened unsalted butter Why this? Helps achieve a rich, tender crumb
- 4 large eggs
- 1 cup (240ml) whole milk
- 2 tsp (10ml) vanilla extract
- Gel food coloring (Red, Yellow, Blue, Green, Purple)
For the Candy Filling
- 32 oz (900g) Skittles
For the Stability Buttercream
- 2 cups (450g) softened unsalted butter
- 6 cups (720g) powdered sugar
- 3 tbsp (45ml) heavy cream Why this? Ensures the frosting is firm yet pourable
- 1 tsp (5ml) vanilla extract
- 1 pinch salt
| Original Ingredient | Substitute | Why It Works |
|---|---|---|
| Whole Milk (1 cup) | Buttermilk (1 cup) | Similar moisture levels. Note: Adds a light tang and softens the cake |
| Unsalted Butter | Vegetable Shortening | Provides a stable fat. Note: Does not have the same buttery taste |
| Gel Food Coloring | Liquid Food Coloring | Provides color. Note: Use a smaller amount to avoid thinning the batter |
The Gear You Need
Prepare three 8-inch round cake pans and have a stand or handheld mixer ready. For perfectly smooth, professional-looking sides, an offset spatula is the ideal tool.
To cut out the center, use a 2-inch round biscuit cutter. Alternatively, a narrow glass or circular cookie cutter will work. You will also need a pastry bag with a wide round nozzle to create the frosting dam.
Putting It Together
Phase 1: Baking the Layers
- Set your oven to 350°F (180°C) and grease three 8-inch round cake pans.
- Mix 1 cup (225g) softened butter and 2 cups (400g) granulated sugar until the mixture is light and airy.
- Incorporate 4 large eggs individually, then mix in 2 tsp (10ml) vanilla extract.
- Gradually add the dry ingredients (3 cups flour, 1 tbsp baking powder, 1/2 tsp salt) and 1 cup (240ml) whole milk, stirring until just combined. Note: Avoid overmixing to prevent a tough cake.
- Distribute the batter among five bowls and stir in red, yellow, blue, green, and purple gel food coloring. Pour the colored mixtures into the three prepared pans.

- Bake for 25-30 minutes until a cake tester inserted into the middle comes out clean. Remove from the oven and let the layers cool entirely.
Phase 2: Creating the Surprise Core
- Whip 2 cups (450g) softened butter, 6 cups (720g) powdered sugar, 3 tbsp (45ml) heavy cream, 1 tsp (5ml) vanilla extract, and a pinch of salt; blend until smooth.
- Place the first cooled cake layer on a cake board. Use a 2-inch round biscuit cutter to carve out a cylinder from the center.
- Pipe a sturdy ring of stability buttercream around the interior edge of the hole to act as a dam.
- Fill the hollow center with Skittles candies until they are level with the top of the layer.

- Repeat the cutting, damming, and filling process for the second and third layers, stacking them carefully to finish your homemade skittles candy cake.
Phase 3: Assembling and Finishing
- Apply a thin crumb coat of buttercream across the exterior of the cake and refrigerate for 30 minutes.
- Spread the final layer of buttercream over the cake, smoothing it with an offset spatula.

- Decorate the top and bottom borders of the cake with extra Skittles candies.
Avoiding Kitchen Disasters
Preventing Cake Crumbs
If the layers feel too fragile when cutting the center, place the cakes in the freezer for 15 minutes. Cold cake is significantly easier to carve without tearing the edges.
Stopping Melting Frosting
Ensure your butter is softened but not oily. If the buttercream feels too soft to hold the candy, chill the bowl for 10 minutes and whip it again. This is essential for a quick skittles candy cake that stays upright.
Preventing Candy Leaks
If candies are pushing through the sides, your frosting dam is too thin. Pipe a wider, firmer ring of buttercream to ensure the "wall" can handle the weight of the candies.
Serving Your Treat

Use a sharp, serrated knife to slice the cake. The knife should glide through the buttercream and cake, and you'll see the candies tumble out of the center.
I like to serve this on a white platter to make the colors of the frosting and candy really pop. Since it's quite sweet, a few fresh berries on the side can add a nice balance.
Keeping It Fresh
Store the cake in an airtight container in the fridge for up to 5 days. The high butter content in the frosting keeps it stable, but the fridge prevents it from softening too much.
For the best texture, let the cake sit at room temperature for 30-60 minutes before serving. This restores the velvety feel of the buttercream and makes the cake layers softer.
You can freeze the un decorated cake layers wrapped in plastic wrap for up to 3 months. Just thaw them in the fridge overnight before you start the assembly process.
Other Fun Versions
Cupcake Version
For a Skittles Cupcake Recipe, bake the colored batters in cupcake liners. Instead of a core, push a few candies into the top of the frosting after piping.
Zesty Lemon Cream
Swap the vanilla in the buttercream for lemon extract or a tablespoon of fresh lemon zest. The citrus notes complement the tartness of the candies in this skittles candy cake.
Chocolate Twist
If you want something colder, try this Chocolate Ice Cream Cake recipe. You can use the same "core" method with candies to add a surprise to a frozen dessert.
Common Questions
How to assemble the candy core?
Press a round biscuit cutter into the cake center, pipe a thick buttercream dam around the edge, and fill with Skittles.
Tip: Ensure the buttercream ring is thick enough to stop candies from leaking into the crumb.
Can I make the layers rainbow colored?
Stir different gel food colorings into separate bowls of batter before baking.
Tip: Divide the batter equally to ensure all colored layers are the same height.
Is it possible to use a different cake flavor?
Yes, any sturdy vanilla or flavored base works well.
Tip: For a warm twist, try a spice cake base instead of vanilla.
How should I store the cake?
Keep the cake in the refrigerator because the frosting contains heavy cream.
Tip: Bring the cake to room temperature for 30 minutes before serving for a softer texture.
Skittles Candy Cake with Butter Sponge
Ingredients:
Instructions:
Try These Next

Traditional American Flag Cake: Baked
This Traditional American Flag Cake is an American Flag Cake from Scratch.

Classic White Flag Cake
Bake a Classic White Flag Cake with our Homemade Flag Cake Recipes.

Homemade Patriotic Sheet Cake
Create a Homemade Patriotic Sheet Cake for your party. This Fourth of July cake recipe is a flag…

Applesauce Cake for 12 Servings
Spiced and tender Applesauce Cake. This guide includes a list of equipment needed to ensure a moist…

Homemade Chocolate Ice Cream Cake: Rich
Try this Homemade Chocolate Ice Cream Cake with fudgy cocoa. This homemade chocolate ice cream cake…

Classic Peach Dump Cake
This Classic Peach Dump Cake is a nostalgic treat. This Peach Dump Cake Recipe is simple and sweet.
