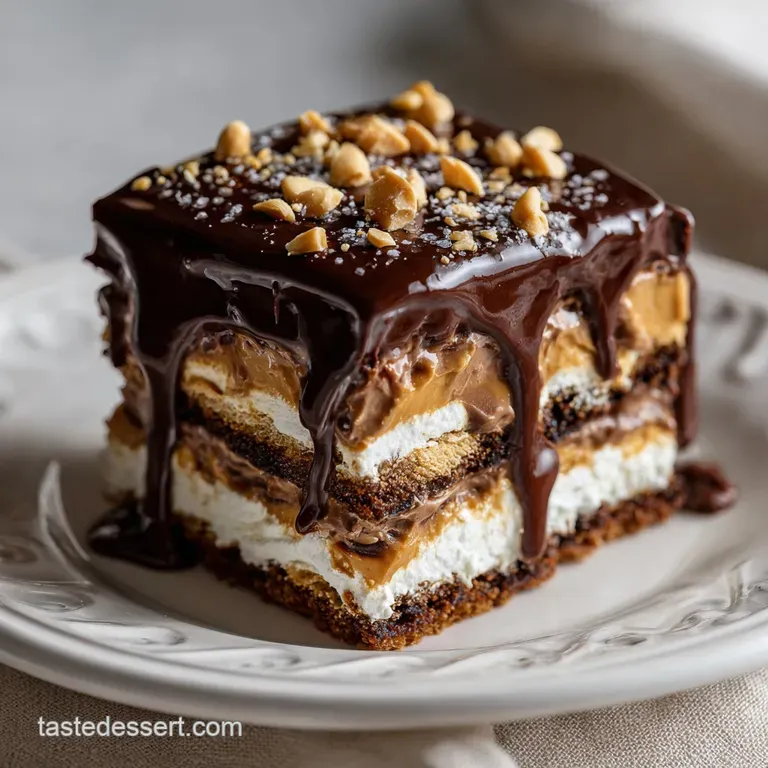
Chocolate Peanut Butter Lasagna
- Time: Active 25 minutes, Passive 4 hours, Total 4 hours 25 minutes
- Flavor/Texture Hook: Velvety chocolate meets a salty sweet Nutter Butter crunch
- Perfect for: Summer potlucks, high impact birthdays, or stress free weekend hosting
- Why This No Bake Dessert Maintains Perfect Structural Integrity
- Component Analysis and Ingredient Deep Dive
- Selecting the Elements for the Perfect Recipe
- The Simple Tools Required for Transforming Cookies
- Step by Step Construction of the Ultimate No Bake Treat
- Practical Solutions for Achieving Perfectly Defined Professional Layers
- Creative Ways to Customize Your Dessert
- Preserving the Texture and Freshness of Your Dessert
- Presenting Your Homemade Creation for Maximum Visual Impact
- Recipe FAQs
- 📝 Recipe Card
Why This No Bake Dessert Maintains Perfect Structural Integrity
You know that sound when you first crack open a fresh package of Nutter Butters? That sweet, nutty aroma just hits you instantly. The last time I made this Chocolate Peanut Butter Lasagna, my entire kitchen smelled like a candy shop explosion, and I wasn't even mad about it.
I was literally standing over the counter with a rolling pin, crushing those cookies into the perfect sandy rubble, feeling like a mad scientist of sweets.
I remember the first time I tried a version of this at a neighborhood block party. It was a total soggy mess because the cook tried to use actual liquid cream without stabilizing it. It was basically a sweet soup in a pan.
I spent the next three weekends in my kitchen transforming that disaster into the structural masterpiece I’m sharing with you today. We're talking distinct, velvety layers that actually hold their shape when you slide that spatula in.
- Molecular Anchoring: The hydrogenated fats in peanut butter act as a binder for the powdered sugar, creating a structural mousse that resists compression from the heavy pudding layer.
- Starch Gelatinization: Using cold whole milk with instant pudding allows the modified cornstarch to hydrate rapidly, creating a firm "ganache style" core.
- Fat Saturation: Melting the unsalted butter and mixing it with cookie crumbs creates a moisture proof barrier that keeps the crust from turning into mush.
- Emulsification Stability: Cream cheese serves as the heavy duty emulsifier, holding the air bubbles in the whipped topping so the dessert doesn't "weep" over time.
| Method | Total Time | Texture Profile | Best For |
|---|---|---|---|
| Standard No Bake | 4 hours 25 mins | Velvety and creamy | Maximum ease and summer hosting |
| Flash Freeze | 1 hour 30 mins | Semi freddo / Ice cream like | Last minute guests or hot days |
| Traditional Oven Base | 4 hours 45 mins | Extra crispy "snap" base | Those who prefer a toasted nut flavor |
The secret to this Peanut Butter Chocolate Lasagna Dessert lies in the temperature of your ingredients. If your cream cheese is even slightly cold, you'll end up with tiny white lumps that ruin the "velvety" experience we're going for.
Honestly, don't even bother with low-fat versions here; we need the full fat content to ensure the layers don't slide apart like a tectonic plate shift.
Component Analysis and Ingredient Deep Dive
Before we start layering, let's look at the "how" behind our main players. This isn't just about throwing things in a bowl; it's about transforming simple pantry staples into a professional grade dessert.
For another decadent treat that uses similar flavor profiles, you might enjoy the Proper Job Chewy recipe for peanut butter cookies.
| Ingredient | Science Role | Pro Secret |
|---|---|---|
| Nutter Butters | Structural Foundation | Pulse until you have "pea sized" chunks left for a better crunch. |
| Cream Cheese | Emulsifying Agent | Must be "room temp soft" to bond with the peanut butter smoothly. |
| Instant Pudding | Moisture Absorber | Use whole milk ONLY; lower fat milks result in a runny middle. |
| Whipped Topping | Aeration | Fold gently to keep the air pockets intact for a light mouthfeel. |
If you're out of Nutter Butters, you can swap in Graham crackers, but you'll lose that signature saltiness that makes this Homemade Chocolate Peanut Butter Lasagna stand out. The 16 oz (450g) of Nutter Butters provides the perfect ratio of cookie to cream for the base.
Selecting the Elements for the Perfect Recipe
Creating the ultimate Chocolate Peanut Butter Lasagna requires a specific set of ingredients. We aren't cutting corners here because the texture depends on the specific fat and sugar ratios in these items.
- 16 oz Nutter Butter cookies (approx. 450g): These provide the base. Why this? The peanut butter filling inside the cookies adds extra binding power.
- 6 tbsp unsalted butter, melted (85g): This is our "glue" for the crust.
- 0.5 tsp sea salt: To balance the intense sweetness of the chocolate.
- 8 oz cream cheese, softened (225g): Provides the tang and the structure.
- 1 cup creamy peanut butter (250g): Stick to standard brands; natural oil on-top versions are too runny.
- 1 cup powdered sugar (120g): Sweetens while keeping the texture smooth.
- 1 tsp vanilla extract: Enhances the nutty notes.
- 16 oz whipped topping, thawed and divided (450g): Provides the airy lift.
- 7.8 oz instant chocolate pudding mix (220g): Specifically two 3.9 oz packages.
- 2.75 cups cold whole milk (650ml): The coldness is non negotiable for the setting process.
- 0.5 cup mini chocolate chips: For a "shatter" texture in every bite.
- 0.25 cup chopped Reese’s Peanut Butter Cups: The crowning glory.
| Original Ingredient | Substitute | Why It Works |
|---|---|---|
| Nutter Butters | Oreo Cookies | Similar crunch. Note: Sweeter result with no saltiness. |
| Whipped Topping | Stabilized Whipped Cream | Same volume. Note: Requires gelatin to prevent melting. |
| Whole Milk | Evaporated Milk | High fat content. Note: Creates a much richer, denser pudding. |
The Simple Tools Required for Transforming Cookies
You don't need a professional bakery to pull this off, but a few specific tools make the process much smoother. Using a stand mixer, such as a KitchenAid, will save your arms when whipping that peanut butter layer into submission.
- 9x13 inch (23x33 cm) Baking Dish: Glass or ceramic works best for even chilling.
- Food Processor: Essential for getting the Nutter Butters to a uniform crumb.
- Offset Spatula: This is the secret to those perfectly flat, professional layers.
- Large Mixing Bowls: You'll need at least three to keep the layers separate.
- Whisk and Silicone Spatula: For the pudding and the "folding" process.
Chef's Tip: Freeze your mixing bowl for 10 minutes before whipping the peanut butter and cream cheese together. This keeps the fats stable and prevents the mixture from becoming too soft during the assembly.
step-by-step Construction of the Ultimate No Bake Treat
This process is all about the "build." We are going to work in stages to ensure each layer has a moment to settle before the next one arrives. If you love the velvety texture of this dish, you'll find a similar satisfaction in my Amish Peanut Butter recipe.
1. Constructing the Foundation
Crush the 16 oz of Nutter Butter cookies in a processor until they resemble coarse sand. Stir in the 6 tbsp of melted butter and sea salt until combined. Press this mixture firmly into the bottom of your 9x13 dish. Note: Use the bottom of a flat measuring cup to pack it down tight.
2. Whipping the Peanut Butter Mousse
In a large bowl, beat the 8 oz cream cheese, 1 cup peanut butter, 1 cup powdered sugar, and vanilla until the mixture is silky and pale. Gently fold in half of the whipped topping (8 oz) using a "figure eight" motion.
3. Layering the Mousse
Spread the peanut butter mixture over the cookie crust until the edges are completely sealed. Note: Sealing the edges prevents the chocolate layer from leaking down to the crust.
4. Preparing the Chocolate Pudding Core
Whisk the 7.8 oz of chocolate pudding mix with 2.75 cups of cold whole milk until it starts to thicken (about 2 minutes). Let it sit for another 3 minutes to fully hydrate the starches.
5. Applying the Chocolate
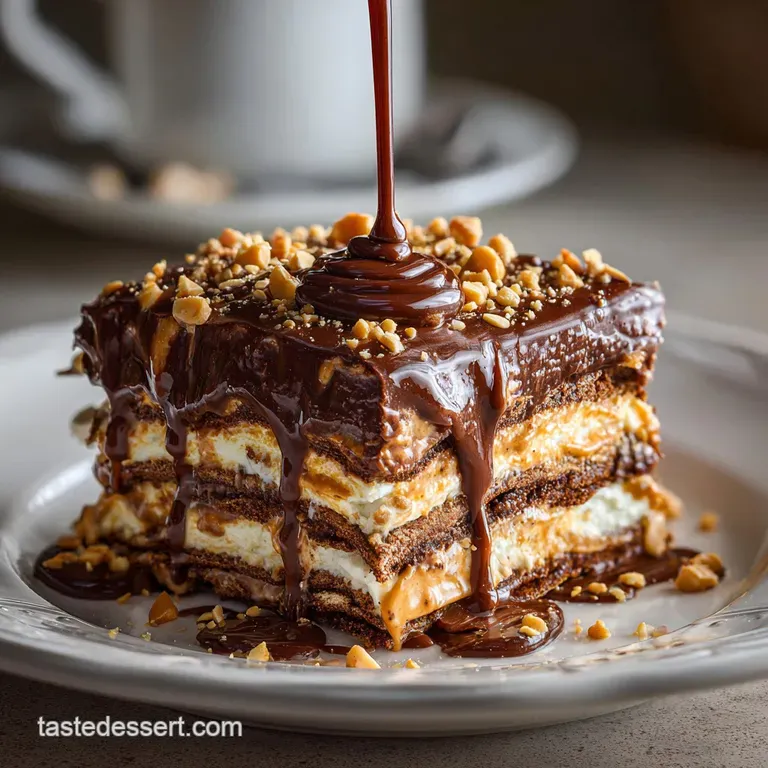
Pour the thickened pudding over the peanut butter layer until it forms a smooth, dark lake. Use your offset spatula to level it out without disturbing the layer beneath.
6. The Final Polish and Chill
Spread the remaining 8 oz of whipped topping over the pudding. Sprinkle the 0.5 cup mini chocolate chips and 0.25 cup chopped Reese's over the top.
7. The Crucial Wait
Refrigerate for at least 4 hours. Wait until the center feels firm to a light touch before slicing.
| Step | Goal | Visual Cue |
|---|---|---|
| Crust Prep | No loose crumbs | Should look like wet sand. |
| PB Layer | No white streaks | Should be a uniform light tan color. |
| Pudding Mix | No dry lumps | Should be glossy and thick enough to coat a spoon. |
Practical Solutions for Achieving Perfectly Defined Professional Layers
Sometimes things go sideways in the kitchen. Maybe your kitchen was too hot, or the milk wasn't cold enough. Don't panic; most "disasters" with this Chocolate Peanut Butter Lasagna Easy version are fixable.
Why Your Chocolate Layer Is Runny
The most common culprit is the milk to pudding ratio. If you used 2% or skim milk, the pudding won't have enough fat to "lock" into place. Also, if you didn't let the pudding sit for those crucial 3 minutes before pouring, it stays too liquid.
Solving the Soggy Crust Dilemma
If your crust is falling apart, the butter wasn't distributed evenly, or it wasn't pressed down hard enough. A "loose" crust absorbs moisture from the layers above, turning it into mush rather than a "shatter" texture.
| Problem | Root Cause | Solution |
|---|---|---|
| Layers are mixing | Bottom layer was too warm | Chill the PB layer for 15 mins before adding pudding. |
| Crumbly crust | Not enough butter/pressure | Use a flat bottomed glass to pack the crumbs harder. |
| Grainy PB layer | Cold cream cheese | Microwaved cream cheese for 10 seconds to soften. |
Common Mistakes Checklist
- ✓ Pat the crust down hard: Use significant pressure to ensure it doesn't crumble when sliced.
- ✓ Use "Instant" Pudding only: Cook and-serve pudding will melt your PB layer instantly.
- ✓ Check your milk temp: Use milk straight from the back of the fridge for the fastest set.
- ✓ Fold, don't stir: Stirring the whipped topping deflates the air, leading to a heavy, oily texture.
- ✓ Clean your knife: Wipe your knife with a warm, damp cloth between every single cut for those "insta worthy" layers.
Creative Ways to Customize Your Dessert
Once you've mastered the basic Chocolate Peanut Butter Lasagna Recipe, you can start playing with the components. The architecture remains the same, but the "flavor profile" can shift dramatically.
For a Salty Sweet Pretzel Twist
Swap out half of the Nutter Butter crumbs for crushed pretzels. This adds a massive hit of salt that cuts through the richness of the 7.8 oz of chocolate pudding. It’s a brilliant way to keep people coming back for "just one more bite."
For an Ultra Dark Profile
Use dark chocolate instant pudding instead of the standard milk chocolate. You can also add a tablespoon of espresso powder to the pudding mix. The Secret to this Chocolate Peanut Butter Lasagna variation is that the coffee doesn't make it taste like java; it just makes the chocolate taste ten times more "chocolatey."
- If you want it extra crunchy
- Add a layer of chopped salted peanuts between the PB and chocolate layers.
- If you want it lighter
- Use a 1:1 mix of Greek yogurt and whipped topping for the top layer.
- If you want a "Cake" feel
- Use a layer of chocolate sponge cake instead of the cookie crust.
Preserving the Texture and Freshness of Your Dessert
Because this is a dairy heavy dish, storage is key. You can't just leave this sitting on the counter during a party; it needs to be the last thing out of the fridge.
- Storage: Keep it in the fridge, tightly covered with plastic wrap or a lid, for up to 5 days. The crust will actually soften slightly by day 3, which some people actually prefer.
- Freezing: This recipe freezes beautifully! Wrap the entire dish in a double layer of foil. It will stay fresh for up to 2 months. Thaw in the fridge for 4 hours before serving.
- Zero Waste Tip: If you have leftover Nutter Butter crumbs, don't toss them. Store them in a jar in the freezer and use them as a "shatter" topping for vanilla ice cream or your morning oatmeal.
Presenting Your Homemade Creation for Maximum Visual Impact
Serving this No Bake Chocolate Peanut Butter Lasagna is all about the reveal. When you pull that first piece out, you want people to see the distinct strata of tan, dark brown, and white.
To Achieve Perfectly Defined Professional Layers
The trick is the "Freeze Set." Put the dish in the freezer for 20 minutes right before you plan to slice it. This firms up the fats just enough that the knife glides through without dragging the chocolate into the peanut butter.
Debunking Kitchen Myths
- Myth 1: "You must use a stand mixer." Total lie! You can do this with a hand mixer or even a sturdy whisk and some elbow grease. The stand mixer just makes it faster.
- Myth 2: "Natural peanut butter is better." In baking? Usually not. The lack of stabilizers in "natural" peanut butter causes the oil to separate in the fridge, leaving you with a greasy mess. Stick to the classic creamy stuff for this.
- Myth 3: "Heavy cream is a direct swap for whipped topping." Not in this specific structural build. Whipped topping contains stabilizers (like gums) that prevent the "lasagna" from collapsing under its own weight. If you use real cream, you must add a stabilizer like gelatin or mascarpone.
Right then, you're ready to tackle this! Trust me on the 4 hour chill time it's the difference between a "lasagna" and a "puddle." Let's crack on and get those cookies crushed! If you find yourself with extra chocolate chips, you could even throw them into a batch of the How to Make recipe for a warm cookie treat tomorrow. Enjoy the process, and definitely don't lick the spatula... okay, maybe just once.

Recipe FAQs
Can I substitute the Nutter Butter cookies?
Yes, graham crackers or Oreos can work. Graham crackers offer a milder crunch, while Oreos add more sweetness and a chocolatey note. You can explore variations in texture and flavor by referencing our The Quintessential Crosshatch Truly Classic Perfectly Chewy Peanut Butter Cookies for different cookie base concepts.
What's the best way to ensure clean slices?
Chill the lasagna thoroughly for at least 4 hours. For even cleaner cuts, briefly freeze the assembled dessert for 15-20 minutes before slicing and wipe your knife clean between each cut.
Why is my peanut butter layer lumpy?
Ensure your cream cheese is at room temperature. Cold cream cheese won't emulsify properly with the peanut butter and powdered sugar, leading to small lumps. Softened cream cheese is crucial for a smooth, velvety texture.
Can I use skim or low-fat milk for the pudding layer?
No, stick with whole milk for best results. Lower fat milks contain less fat, which is essential for the instant pudding to thicken properly and set to a firm consistency. Using anything less may result in a runny layer.
How long does Chocolate Peanut Butter Lasagna last in the refrigerator?
It typically lasts for up to 5 days. Ensure it is tightly covered to prevent it from drying out or absorbing other odors from the refrigerator. The texture may soften slightly over time.
Can I make this dessert ahead of time?
Yes, it's designed for make-ahead convenience. Assemble the lasagna completely up to 24 hours before serving to allow the flavors to meld and the layers to set perfectly. This makes it ideal for stress free entertaining.
Is it true that natural peanut butter can ruin the texture?
Yes, this is a common misconception regarding texture stability. Natural peanut butter, with its separated oils, can lead to a greasy layer in this no-bake dessert. Standard creamy peanut butter provides the necessary stability for the peanut butter mousse.
Chocolate Peanut Butter Lasagna

Ingredients:
Instructions:
Nutrition Facts:
| Calories | 607 kcal |
|---|---|
| Protein | 9.4 g |
| Fat | 36.3 g |
| Carbs | 64.2 g |
| Fiber | 2.1 g |
| Sugar | 44.8 g |
| Sodium | 458 mg |
