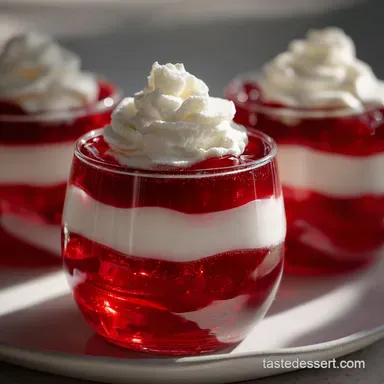
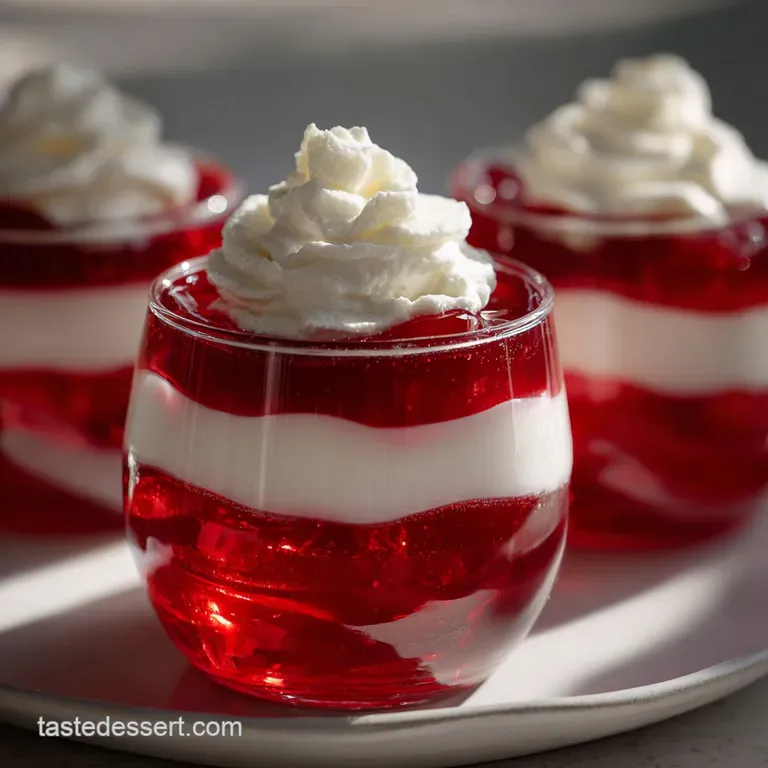
Homemade Jello Parfait: Creamy and Nostalgic
- Time:20 minutes active + 4 hours 20 mins chilling = Total 4 hours 20 mins
- Flavor/Texture Hook: Velvety vanilla cream atop a wobbly strawberry base
- Perfect for: Family gatherings, baby showers, or a simple retro dessert
Ever wonder why the old-fashioned desserts from our grandmothers' kitchens always looked so organized? That distinct, jiggly wobble of a strawberry layer topped with a cloud of cream is a core memory for me.
I remember the excitement of seeing those clear plastic cups lined up on the dining table at every single family reunion.
The beauty of this treat is in the contrast. You have the cool, fruit forward snap of the gelatin and then that silky, mellow vanilla that softens everything. It's not trying to be some high end pastry shop creation, and that's exactly why it works. It's honest, sweet, and feels like a hug from the past.
In this guide, we're making a homemade jello parfait that actually holds its shape. I've spent enough time watching layers bleed into each other to know exactly where people go wrong. We're going to focus on the timing and the fold to make sure yours looks like a professional spread but tastes like home.
Making the Classic Strawberry Jello Parfait
Right then, let's get into what makes this specific combination of gelatin and cream work. Most people just dump everything in and hope for the best, but if you want those crisp lines, you have to respect the set time.
The goal here is a jello fruit dessert that doesn't collapse the second you dig your spoon in. By combining the instant pudding with a bit of whipped topping, we change the density of the cream layer. Instead of a heavy pudding that might sink into the gelatin, we get a light mousse that sits proudly on top.
Trust me on this, the waiting is the hardest part, but it's the only way to get that velvety mouthfeel. If you try to rush the second layer, you'll end up with a pink swirl instead of a clean break. Let's crack on with the details.
The Secret to Layer Stability
I used to think any cold jello was "set," but there's a big difference between "not liquid" and "structurally sound." Here is what's actually happening in your cups.
- Temperature Barrier
- A fully chilled gelatin base creates a thermal wall, preventing the pudding's moisture from seeping downward.
- Air Incorporation
- Folding whipped topping into the pudding introduces tiny air bubbles, which reduces the overall weight of the top layer.
- Starch Binding
- The modified cornstarch in the instant pudding locks in the milk, preventing the "weeping" often seen in homemade custards.
- Gelatin Tension
- According to Serious Eats, the protein network in gelatin creates a semi solid matrix that holds the water in place.
| Method | Time | Texture | Best For |
|---|---|---|---|
| Fast (Single Pour) | 2 hours | Denser, blended | Quick weeknight treat |
| Classic (Layered) | 4 hours 20 mins | Airy, distinct | Party presentation |
Recipe Specifications
For those of you who like to plan your kitchen flow, this is a over low heat, high chill operation. You aren't spending hours at the stove, but you are managing the clock.
The active work is minimal, taking about 20 minutes, but the total time of 4 hours 20 mins is non negotiable. If you're hosting a party, I highly recommend doing the first layer the night before. It takes the pressure off and ensures the base is rock solid.
Chef's Note: If you're in a rush, you can use shallower glasses. The smaller the volume of the gelatin layer, the faster it reaches the core temperature needed to set.
Essential Ingredient Breakdown
Not all ingredients are created equal here. Using the right type of pudding or the wrong water temperature can ruin the whole vibe of your old fashioned jello parfait.
| Ingredient | Science Role | Pro Secret |
|---|---|---|
| Strawberry Jello | Structural Base | Use boiling water for full dissolution |
| Instant Pudding | Creamy Body | Whisk for a full 2 mins to activate thickeners |
| Cool Whip | Aeration | Keep frozen until the second you fold it in |
| Whole Milk | Fat Content | Don't use skim; it makes the pudding grainy |
Necessary Kitchen Tools
You don't need a fancy arsenal for this, but a few specific tools make the process much cleaner. I prefer using clear glass cups so you can actually see the colors.
I use a silicone spatula for the folding process. Using a whisk at the end can deflate all those lovely air bubbles we worked so hard to get into the pudding. Also, a fine mesh strainer can be handy if you're using a different jello brand that tends to leave clumps.
If you don't have individual cups, you can use a large trifle bowl, but you'll lose that "individual treat" feel. For an easy jello parfait, the individual portions are always a hit because they're so easy to grab and go.
Assembling the Layers
Let's get into the actual build. Remember, we are working in phases here to ensure the structure holds.
Phase 1: Setting the Foundation
- Pour the boiling water into a bowl and whisk in the jello mix until no granules remain. Note: Clumps here will create "soft spots" in your base.
- Stir in the cold water.
- Divide the mixture evenly among the 6 individual jello parfait cups.
- Refrigerate for at least 2 hours until the surface is firm to the touch.
Phase 2: Creating the Mousse Layer
- Combine the instant vanilla pudding mix and cold milk in a bowl and whisk vigorously for 2 minutes.
- Gently fold in 1/2 cup of whipped topping using a spatula to create a fluffy texture. Note: Fold in a "figure eight" motion to keep the air in.
- Carefully spoon the vanilla pudding mixture over the set jello, smoothing the top with the back of a spoon.
- Return the cups to the fridge for another 1 hour until the pudding layer is stable.
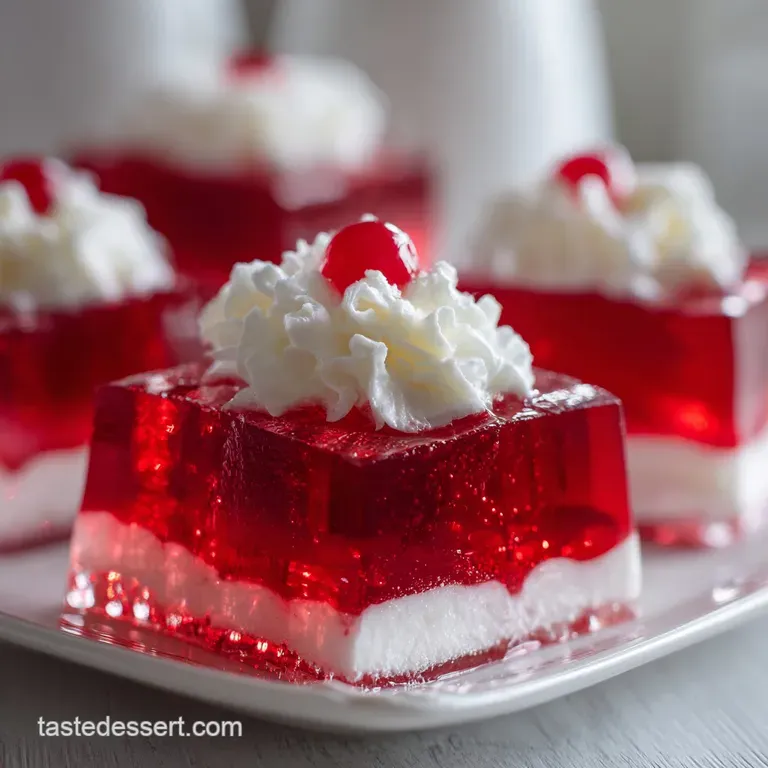
Phase 3: The Final Flourish
- Top each cup with a generous swirl of cool whip.
- Garnish each parfait with a strawberry slice and a mint leaf.
- Keep chilled until the moment of serving to maintain structural integrity.
Fixing Common Texture Issues
The most common complaint with jello parfait recipes is the "bleed," where the colors run together. This is almost always a timing issue. If your pudding is sinking, your jello wasn't cold enough.
Another issue is graininess in the pudding. This usually happens if the milk is too warm or if the pudding wasn't whisked long enough to fully hydrate the starches.
Why Your Layers Bleed
If the jello is still slightly warm in the center, the pudding will melt the top layer upon contact. This creates a murky transition instead of a sharp line.
Why Your Pudding is Lumpy
Lumps occur when the powder isn't fully incorporated. Whisking for the full two minutes is crucial to break down the clusters.
| Problem | Root Cause | Solution |
|---|---|---|
| Colors Mixing | Jello not fully set | Chill base for 2+ hours |
| Thin Pudding | Not enough whisking | Whisk vigorously for 2 mins |
| Topping Melting | Cups kept at room temp | Serve directly from fridge |
Success Checklist:
- ✓ Jello surface is cold and bounces back when touched.
- ✓ Pudding is whisked until completely smooth.
- ✓ Whipped topping was folded, not stirred.
- ✓ Cups are stored in the coldest part of the fridge (usually the back).
Flavor Swaps and Options
While strawberry and vanilla is the timeless choice, you can easily pivot. If you want something more visually striking, try a Red White Blue Jello approach by using different colored gelatin layers.
For a more tropical feel, swap the strawberry jello for lime and use a coconut flavored whipped topping. If you want a coffee house vibe, use a coffee flavored jello base with a chocolate pudding layer.
| Original Ingredient | Substitute | Why It Works |
|---|---|---|
| Strawberry Jello | Raspberry Jello | Similar set time. Note: Slightly tarter flavor |
| Whole Milk | Heavy Cream (diluted) | Richer taste. Note: Makes the pudding denser |
| Cool Whip | Stabilized Whipped Cream | More natural taste. Note: Needs more sugar to match |
If you're looking for something even fluffier, you might enjoy a Cranberry Fluff Salad, which uses a similar folding technique but with a fruitier profile.
Preservation and Waste Tips
These individual jello parfait cups stay fresh in the fridge for about 3 days. After that, the strawberries can start to release water, which might create a little puddle on top of your cream.
Avoid freezing these. Gelatin doesn't freeze well, and when it thaws, it often "syneresis" (which is just a fancy way of saying it leaks water and becomes spongy).
To keep things zero waste, if you have leftover jello mix that didn't make it into a cup, pour it into a small ramekin. You can cube it up and fold it into a fruit salad the next morning. If you have leftover pudding, it makes a great dip for fresh apple slices.
Best Ways to Serve
When you're putting out jello dessert cups for party guests, presentation is everything. I like to place the cups on a mirrored tray or a white platter to make the colors pop.
The mint leaf isn't just for looks, it adds a fresh, herbal note that cuts through the sugar of the vanilla pudding. If you want to get fancy, a tiny sprinkle of lemon zest over the top of the Cool Whip adds a bright, zesty contrast.
If you're serving these at a large event, keep them on a bed of ice if you don't have constant fridge access. This ensures that the jello parfait with vanilla pudding stays firm and doesn't soften before it hits the table.
Just make sure the ice doesn't touch the cups directly, or you'll get condensation streaks on the glass.
Recipe FAQs
What are the ingredients for this parfait?
Strawberry or raspberry jello mix, boiling and cold water, instant vanilla pudding mix, cold whole milk, whipped topping, and fresh strawberries with mint. These specific components create the signature layered texture and nostalgic flavor.
Is this jello parfait suitable for diabetics?
No, it is not recommended. The gelatin mix and instant pudding contain high amounts of sugar, which can cause significant spikes in blood glucose levels.
How to ensure the layers stay distinct and don't bleed?
Refrigerate the jello base for at least 2 hours. The surface must be completely firm to the touch before you spoon the pudding on top to maintain those crisp, professional lines.
How to get a cloud like texture in the pudding layer?
Gently fold 1/2 cup of whipped topping into the whisked pudding using a spatula. This incorporates air and prevents the mixture from becoming too dense. If you enjoy this light layering technique, see how we create a similar structure in our berry jello lasagna.
Is it true I can skip the final hour of chilling?
No, this is a common misconception. That last hour is critical for the pudding layer to set, ensuring the parfait maintains its structural integrity when served.
How to prepare the jello base correctly?
Whisk the jello mix into boiling water until no granules remain, then stir in the cold water. This ensures a smooth, consistent set without any undissolved powder at the bottom of the cup.
How to store these parfaits?
Keep them chilled in the refrigerator until the moment of serving. This prevents the cream layers from softening and keeps the fruit garnish fresh.
Homemade Jello Parfait