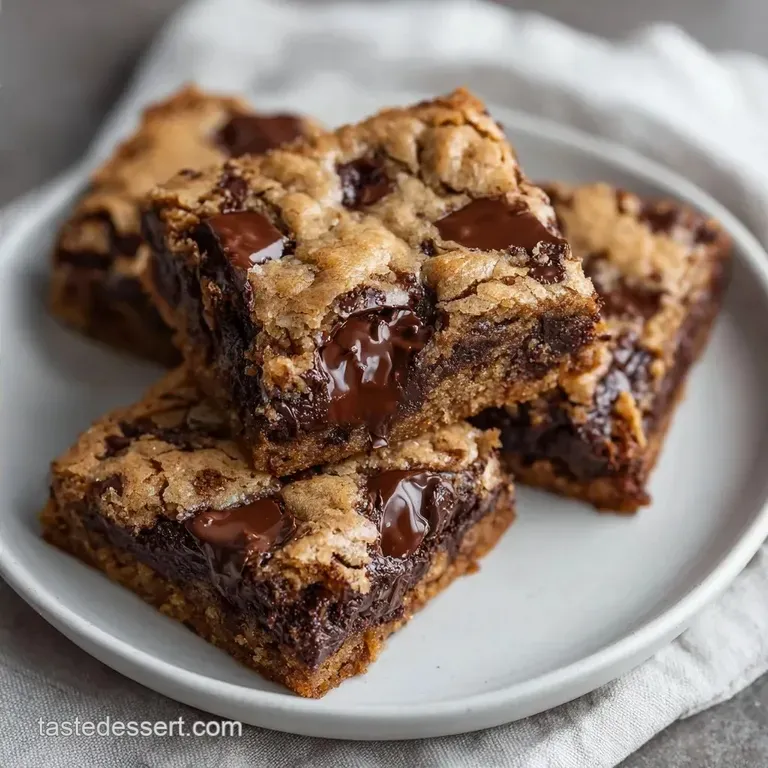
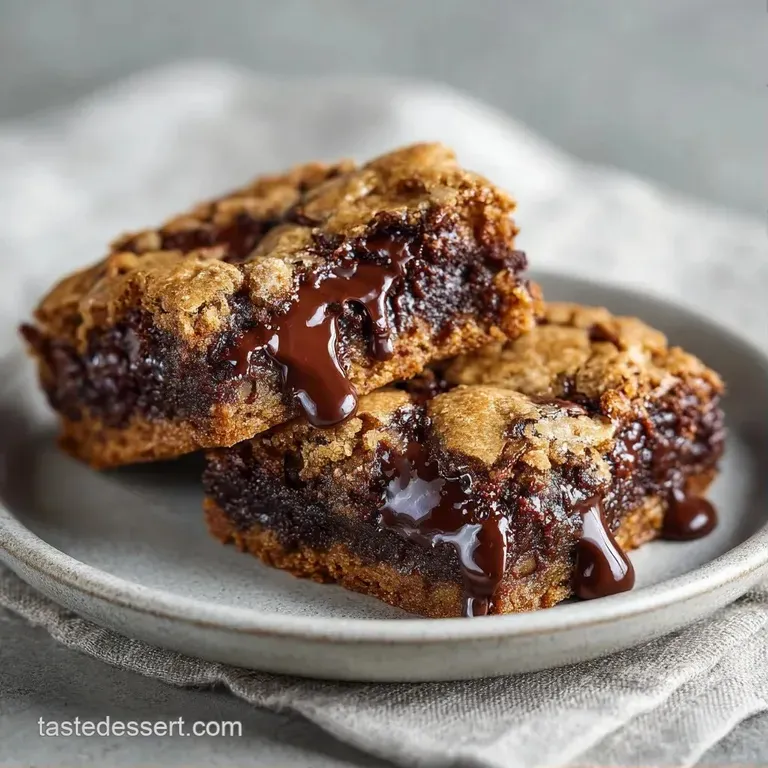
Brown Butter Chocolate Chip Cookie Bars: Large Batch
- Time: 15 min active + 1 hour chilling/setting
- Flavor/Texture Hook: Nutty, browned butter with a salty sweet chocolate shatter
- Perfect for: Potlucks, bake sales, or feeding a hungry family in one go
The smell of butter browning in a pan is something that always takes me back to my grandmother's kitchen. In the South, there was always a tradition of bringing one "big" dish to the Sunday gathering, something that could feed twenty people without the cook spending the whole day hovering over a stove.
These kinds of treats weren't just food, they were the social glue of the afternoon, sitting on a lace tablecloth while people caught up on the neighborhood gossip.
I remember the first time I tried to make a pan of these for a school fundraiser. I rushed the process and didn't let the pan cool, resulting in a pile of gooey crumbs rather than clean squares. It taught me that patience is just as important as the sugar you use.
When you're making Large Batch Dessert Bars, the magic happens in the resting phase, where the sugars settle and the structure firms up.
You can expect a treat that hits all the right notes: the deep, toasted flavor of brown butter, the crunch of toasted walnuts, and the richness of semi sweet chocolate. It's a straightforward process, but the results feel fancy.
We're aiming for a texture that's slightly crisp on the outside and almost fudgy in the center.
Why Brown Butter Makes These Better
Instead of just creaming butter and sugar, we're taking a slightly different route here. Browning the butter creates a depth of flavor that raw butter just can't touch.
- Milk Solid Toasting
- By heating the butter until it foams, the milk solids brown and create a nutty aroma that cuts through the sweetness.
- Sugar Dissolution
- Whisking sugars into hot butter helps them dissolve faster, which leads to a chewier, less grainy texture in the final bake.
- Air Incorporation
- Beating the egg into the warm butter mixture creates a glossy emulsion, ensuring the bars don't turn out oily.
- Controlled Spread
- Using a high ratio of brown sugar to white sugar keeps the bars moist and prevents them from becoming too cakey or dry.
| Method | Texture | Prep Time | Best For |
|---|---|---|---|
| Fresh Brown Butter | Chewy & Nutty | 20 mins | Special occasions |
| Melted Butter | Softer & Simpler | 5 mins | Quick weeknight treats |
| Creamed Butter | Cakey & Light | 15 mins | Tea time snacks |
Component Analysis
| Ingredient | Science Role | Pro Secret |
|---|---|---|
| Unsalted Butter | Flavor base & fat | Brown it until it smells like toasted hazelnuts |
| Brown Sugar | Moisture & Chew | Pack it tight to get the most molasses flavor |
| Baking Soda | Lift & Browning | Don't skip the salt, it balances the sweetness |
What You'll Need
When gathering your things, make sure your egg is at room temperature. If you drop a cold egg into hot butter, the butter will seize up and you'll spend ten minutes fighting to get the batter smooth again.
- 1 cup (225g) unsalted butter Why this? Provides the fat for a velvety crumb
- 3/4 cup (150g) packed light brown sugar Why this? Adds chewiness and a caramel note
- 1/2 cup (100g) granulated white sugar Why this? Helps the edges get crisp
- 1 large (50g) egg, room temperature Why this? Binds everything together
- 1 tsp (5ml) vanilla extract Why this? Rounds out the chocolate flavor
- 2 cups (250g) all purpose flour Why this? Standard structure for a sturdy bar
- 1 tsp (5g) baking soda Why this? Gives a slight lift so they aren't bricks
- 1/2 tsp (3g) sea salt Why this? Essential to stop it from being cloyingly sweet
- 2 cups (340g) semi sweet chocolate chips Why this? Melts into pockets of richness
- 1/2 cup (60g) chopped walnuts Why this? Adds a necessary earthy crunch
Quick Substitutions
| Original Ingredient | Substitute | Why It Works |
|---|---|---|
| Walnuts | Pecans | Similar fat content. Note: Adds a sweeter, more buttery flavor |
| Semi Sweet Chips | Dark Chocolate Chunks | Higher cocoa content. Note: Makes the bars more bitter/intense |
| All Purpose Flour | 1:1 gluten-free Blend | Mimics wheat structure. Note: May be slightly more fragile |
Right then, once you've got your ingredients measured out, make sure you have a 9x13-inch pan. Using a smaller pan will make these too thick and the middle will stay raw while the edges burn.
Essential Kitchen Tools
You don't need a professional kitchen to nail these Large Batch Dessert Bars, but a few specific tools make the process a lot smoother.
- 9x13-inch Baking Pan: The standard size for a crowd.
- Parchment Paper: This is non negotiable. Greasing the pan is okay, but parchment allows you to lift the whole block out for clean cuts.
- Small Saucepan: For browning the butter.
- Whisk: To get the sugars and butter fully combined.
- Rubber Spatula: Best for folding in the flour without overworking the dough.
Chef's Note: If you find your chocolate chips are sinking to the bottom, toss them in a tablespoon of flour before stirring them in. It gives them something to "grip" onto in the batter.
Step by step Instructions
Let's get into it. Follow these steps closely, especially the cooling part, or you'll end up with a delicious mess.
- Prepare the Oven. Preheat your oven to 350°F (175°C). Line a 9x13-inch baking pan with parchment paper, leaving an overhang on the sides for easy removal.
- Brown the Butter. Melt the butter in a saucepan over medium heat, whisking constantly. Watch for the foam to subside and the butter to turn a golden brown color with a nutty aroma. Remove from heat immediately and whisk in both light brown and white sugars until smooth.
- Emulsify the Batter. Beat in the room temperature egg and vanilla extract. Stir vigorously until the batter looks glossy and smooth.
- Combine Dry Ingredients. Gently fold in the all purpose flour, baking soda, and salt using a spatula. Stop the moment no flour streaks remain Note: overmixing makes the bars tough.
- Add the Texture. Stir in the semi sweet chocolate chips and chopped walnuts. Ensure they are evenly distributed so every bite of these Large Batch Dessert Bars has a bit of everything.
- Press into Pan. Spread the dough evenly into the prepared pan, pressing it into the corners with your spatula.
- The Bake. Bake for 25–30 minutes. Remove the pan when the edges are golden brown and the center still looks slightly under set.
- The Final Rest. Let cool completely in the pan for at least 1 hour. This is where the structure sets.
Fixing Common Baking Glitches
Most mistakes with these bars happen during the browning phase or the cutting phase. If your bars aren't looking right, it's usually a temperature or timing issue.
Troubleshooting Common Issues
| Issue | Solution |
|---|---|
| Why Your Bars Are Too Cakey | This usually happens if you use too much flour or over mix the batter. When you stir the flour in, use a folding motion rather than a beating motion. Once the white streaks are gone, stop. |
| Why the Middle is Raw | If the edges are burnt but the middle is a puddle, your oven might be running hot, or you used a pan that's too small. Ensure you're using a 9x13-inch pan. |
| Why the Bars Are Greasy | This is often caused by using a low quality butter with high water content or over browning the butter until the fats separate too much. |
Common Mistakes Checklist
- ✓ Did you let the egg reach room temperature?
- ✓ Did you stop stirring the moment the flour disappeared?
- ✓ Did you leave the overhang on the parchment paper?
- ✓ Did you wait a full hour before cutting?
Ways to Customize Your Batch
Once you've mastered the base, you can start playing with the mix ins. These Large Batch Dessert Bars are incredibly versatile. For a more sophisticated vibe, try adding a teaspoon of espresso powder to the butter. It doesn't make them taste like coffee, but it makes the chocolate taste "darker" and more intense.
If you're looking for something different, you could replace the walnuts with dried cranberries or white chocolate chips. For those who love a salty kick, a sprinkle of Maldon sea salt on top right after they come out of the oven is a total win.
If you find yourself craving something even more indulgent, you might like my Fudge Brownie Cupcakes, which use a similar rich chocolate profile but in a single serve format.
For a Nutty Crunch
Try toasting your walnuts in a dry pan for 3-5 minutes before adding them to the dough. This releases the oils and gives a much deeper, toasted flavor.
For a gluten-free Option
Use a high-quality 1:1 gluten-free baking flour. You may notice the bars are slightly denser, but the brown butter masks most of the difference.
Adjusting the Quantity
Making a huge batch is great, but sometimes you just want a small treat. Here is how to handle the math for these Large Batch Dessert Bars.
Scaling Down (Half Batch) Use an 8x8-inch pan. Reduce the baking time by about 20% (check them at 20 minutes). To get half an egg, crack it into a bowl, whisk it together, and then measure out 25g.
Scaling Up (Double Batch) If you're using two 9x13 pans, don't just double the salt and baking soda. Increase the salt and spices to only 1.5x the original amount to avoid an overwhelming taste. Work in batches if your mixer can't handle the volume of dough.
If you double the recipe in one giant deep pan (not recommended), lower the oven temp by 25°F and extend the bake time by 10-15 minutes to ensure the center cooks without burning the outside.
Storage and Zero Waste
These bars stay fresh surprisingly well because of the high fat and sugar content. To keep them from drying out, store them in an airtight container with a piece of parchment paper between layers.
Storage Guidelines
- Fridge: 5-7 days. They become more fudgy when cold.
- Room Temp: 3 days in a sealed container.
- Freezer: Up to 3 months. Wrap individual bars in foil and then place them in a freezer bag. Thaw for 20 minutes at room temperature or zap in the microwave for 10 seconds.
Zero Waste Tips Don't throw away the walnut shells if you're shelling your own they can be composted. If you have leftover bits of dough that didn't make it into the pan, scoop them into a muffin tin and bake them as "mini bars" for a quick snack. For a full dessert spread, these pair wonderfully with some Homemade Oreos and a cold glass of milk.
Perfect Pairings and Serving
Serving these is all about the contrast. Since the bars are rich and sweet, you want something to cut through that intensity. A strong, bitter coffee or a tart raspberry coulis works wonders here.
If you're serving these at a party, cut them into small 2 inch squares. This makes them easier to eat while standing and ensures everyone gets a bit of that golden brown edge. You can also dust them with a tiny bit of powdered sugar for a cleaner look.
Trust me on this: don't be tempted to serve them warm. While a warm chocolate chip treat is usually great, these specific bars need that cooling period to develop their signature chew. If you cut them too early, the chocolate will run and the bars will lose their shape.
Once they're set, they are a wonderful addition to any gathering.
Recipe FAQs
What is the best easy dessert to make for a party?
Large batch dessert bars. They are simple to scale, easy to transport, and serve a crowd without the need for individual plating.
What are some simple dessert recipes for a crowd?
Browned butter chocolate chip bars. Using a single 9x13-inch pan allows you to create 24 servings quickly with minimal cleanup.
How to prevent the bars from becoming too cakey?
Fold in the flour gently with a spatula. Stop stirring the moment flour streaks disappear to avoid overworking the gluten; if you enjoyed mastering this texture control, see how it applies to our cheesecake cookies.
Is it true that I can cut the bars immediately after baking?
No, this is a common misconception. You must let the bars cool completely in the pan for at least 1 hour so the structure sets and they don't crumble.
How to store these bars to keep them fresh?
Place them in an airtight container. Add pieces of parchment paper between layers to prevent sticking and maintain moisture for up to 3 days at room temperature.
Why is the middle of my dessert bar raw while the edges are brown?
Your oven may be running too hot or the pan is too small. Ensure you use a 9x13-inch pan and bake at 350°F to ensure even heat distribution.
Can I freeze these dessert bars for later?
Yes, for up to 3 months. Wrap individual bars in foil before placing them in a freezer bag to prevent freezer burn.
Large Batch Dessert Bars

