Nobake Peanut Butter Bars: Velvety and Rich
- Time: 10 min active + 2 hours 12 mins total (includes chilling)
- Flavor/Texture Hook: Velvety peanut butter base with a snappy chocolate shatter
- Perfect for: Last minute party platters, kid friendly treats, or midnight cravings
Best NoBake Peanut Butter Bars
That smell of roasted peanuts and melted butter hitting the air is an instant mood booster. I remember the first time I tried a version of this, and it was a disaster. The base was so soft it practically slid off the plate, and the chocolate top was grainy, almost like it had sand in it.
I'd followed a recipe that didn't emphasize the "press" in "press into the pan," and I'd overheated my chocolate in the microwave until it separated into an oily mess.
It's a frustrating feeling when a "simple" recipe fails. But after figuring out that the secret lies in the temperature of the butter and the patience of the chill, I've turned this into my go to treat.
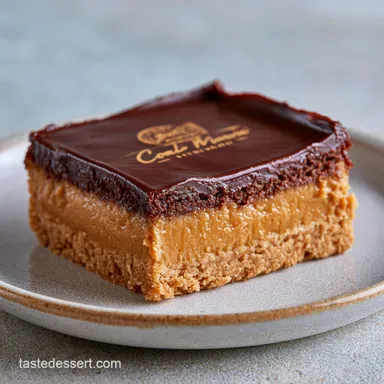
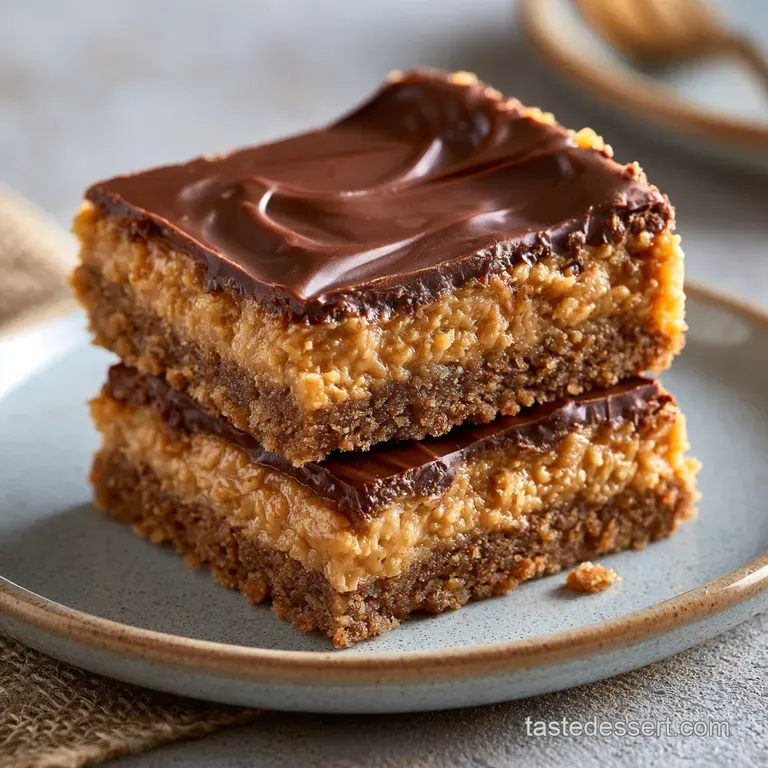
These NoBake Peanut Butter Bars don't just taste like a candy bar, they have a homemade richness that store-bought versions can't touch.
You're going to get a base that's dense and fudgy, topped with a glossy chocolate layer that snaps when you bite into it. No oven, no complicated tempering, just a few pantry staples and a couple of hours in the fridge. Let's get into it.
This Treat Hits Different
Fat Stabilization: The combination of melted butter and peanut butter creates a structure that hardens as it cools, locking the sugar in place.
Sugar Binding: Powdered sugar acts as a stabilizer, absorbing excess moisture from the butter to prevent a greasy texture.
Chocolate Crystallization: Adding a small amount of peanut butter to the chocolate chips prevents the topping from becoming too brittle, giving it a velvety melt.
Graham Compression: Pressing the crumbs firmly removes air pockets, which ensures the bars don't crumble when you slice them.
| Feature | Fresh Homemade | store-bought Shortcut |
|---|---|---|
| Texture | Dense and velvety | Often waxy or airy |
| Salt Level | Adjusted to your taste | Usually overly salty |
| Ingredients | Real butter and PB | Often uses palm oil/syrups |
Ingredient Component Breakdown
| Ingredient | Science Role | Pro Secret |
|---|---|---|
| Unsalted Butter | Primary binder | Use European style for higher fat content |
| Powdered Sugar | Texturizer | Sift it first to avoid tiny white lumps |
| Peanut Butter | Flavor and structure | Stir the jar thoroughly to incorporate oil |
| Chocolate Chips | Top seal | Use 60% cacao for a balanced sweetness |
Your Essential Tools
You don't need a fancy kitchen for this, but a few specific things make it way easier. I use a standard 8x8 inch baking pan, and I always, always line it with parchment paper. If you don't, you'll be fighting to get the bars out, and they'll likely crack.
A microwave safe glass bowl is a must for the topping. Glass holds heat more evenly than plastic, which helps the chocolate melt without scorching. Also, grab a sturdy spatula, since that peanut butter base can be surprisingly heavy to press down.
The step-by-step Process

Phase 1: Constructing the Dense Base
- Melt the 1 cup (225g) unsalted butter. Note: Melt it slowly so it doesn't boil.
- Stir in 2 cups (200g) graham cracker crumbs and 2 cups (250g) powdered sugar.
- Mix in 1 cup (256g) creamy peanut butter. Stir until the mixture transforms into a smooth, cohesive paste.
- Press the mixture firmly into a parchment lined 8x8 inch baking pan. Note: Use the bottom of a glass to pack the edges tight.
Phase 2: Creating the Velvet Topping
- Place 1.5 cups (255g) semi sweet chocolate chips and 0.25 cup (64g) creamy peanut butter in a glass bowl.
- Heat in the microwave for 20 second intervals. Stir after each burst until the mixture is glossy and streak free. Note: According to Serious Eats, avoiding overheating chocolate prevents it from seizing.
- Pour the chocolate over the peanut butter base.
- Spread evenly with a spatula until the edges are sealed.
Phase 3: The Setting Phase
- Place the pan in the refrigerator.
- Chill for at least 2 hours until the chocolate is firm and the base is set.
Fixes for Common Mistakes
Troubleshooting Common Issues
| Issue | Solution |
|---|---|
| Why Your Base Is Grainy | This usually happens if the powdered sugar isn't fully integrated or if the butter was too cold when the sugar was added. Ensure the butter is fully melted and stir the base for an extra minute until |
| Why Your Chocolate Separated | If you see oil pooling on top of your chocolate, you've overheated it. This happens when the cocoa solids separate from the fat. To fix this, stir in a teaspoon of peanut butter or a splash of milk qu |
| Why Your Bars Are Too Soft | If the bars don't hold their shape, you likely didn't press the base firmly enough or didn't chill them for the full 2 hours 12 mins. Return them to the fridge for another 30 minutes. |
Common Mistakes Checklist:
- ✓ Sifted the powdered sugar to remove lumps
- ✓ Used a parchment sling for easy removal
- ✓ Stirred chocolate every 20 seconds
- ✓ Pressed the base with significant force
- ✓ Chilled for the full required time
Smart Dietary Swaps
If you're looking to change things up, you can definitely tweak the ingredients. For a gluten-free version, just swap the graham crackers for a gluten-free brand or use almond flour. Almond flour makes a denser, nuttier base that feels a bit more substantial.
For those avoiding dairy, you can use coconut oil instead of butter and dairy-free chocolate chips. Just keep in mind that coconut oil melts faster, so these will need to stay in the fridge at all times. If you want something even quicker for the kids, my peanut butter energy bites are a great alternative that skips the chocolate topping.
| Original Ingredient | Substitute | Why It Works |
|---|---|---|
| Graham Crumbs (2 cups) | Almond Flour (2 cups) | Nutty base. Note: Denser crumb than graham |
| Butter (1 cup) | Coconut Oil (1 cup) | Similar fat. Note: Melts faster, keep refrigerated |
| Powdered Sugar (2 cups) | Maple Syrup (1 cup) | Natural sweetener. Note: Makes base softer/stickier |
If you're doubling the recipe, use a 9x13 pan. Don't just double the thickness in an 8x8 pan or the center will stay mushy. When scaling up, I only increase the salt by 1.5x to avoid it becoming overwhelming.
Storage and Waste
Keep these NoBake Peanut Butter Bars in an airtight container in the fridge for up to 10 days. They also freeze beautifully. I wrap individual bars in parchment paper and toss them in a freezer bag; they'll stay fresh for about 3 months.
When you're ready to eat one, let it thaw for 10 minutes for the best texture.
To avoid waste, if you have a little peanut butter base left in the bowl, don't toss it. Roll it into a small ball and dip it in the leftover chocolate. It's the perfect "chef's tax" for doing the work. Also, if you have leftover graham crumbs, mix them into your morning yogurt or oatmeal.
Best Serving Ways
For the cleanest slices, use a hot knife. Run your blade under hot water, wipe it dry, and then slice. This prevents the chocolate from shattering unevenly and gives you those professional looking sharp edges.
These are incredibly rich, so a bit goes a long way. I love serving them with a cup of strong black coffee to cut through the sweetness. If you're hosting a party, a glass of homemade peanut milk complements the richness of the chocolate.
Decision Shortcut:
- If you want a saltier profile, sprinkle flaky sea salt on the chocolate before chilling.
- If you want more crunch, stir in 1/4 cup of chopped roasted peanuts to the base.
- If you want a darker flavor, use 70% dark chocolate for the topping.
Common Misconceptions: Some people think you need to "temper" the chocolate for these to set. You don't. Because there's peanut butter mixed in, the topping becomes a ganache style layer that sets perfectly in the fridge without the fuss.
Another myth is that you can't use natural peanut butter. You can, but make sure it's stirred extremely well. If there's a layer of oil on top, your base might become too greasy and fail to set.
Recipe FAQs
Can I freeze these bars?
Yes, they freeze beautifully. Wrap individual bars in parchment paper and store them in a freezer bag for up to 3 months. Let each bar thaw for 10 minutes before serving for the best texture.
Why did my chocolate layer separate and look oily?
You overheated the chocolate. This happens when the cocoa solids separate from the fat. Stir in a small amount of peanut butter to help the mixture re-emulsify.
Why is my peanut butter base grainy?
The powdered sugar is likely not fully integrated. Ensure your butter is completely melted and stir the base for an extra minute until the paste is smooth and cohesive.
How to melt the chocolate topping without burning it?
Heat in 20-second intervals. Stir between each burst in the microwave until the chocolate is glossy and streak free.
Is it true I can slice the bars immediately after pouring the chocolate?
No, this is a common misconception. You must refrigerate the pan for at least 2 hours to allow the fats to stabilize and the chocolate to crystallize properly.
Why are my bars too soft to hold their shape?
They probably haven't chilled long enough. Ensure they stay in the refrigerator for the full 2 hours before attempting to cut them.
What are some good snack recipes using peanut butter?
Try a velvety pie or peanut butter clusters. If you enjoyed the creamy texture here, see how the same flavor profile works in our peanut butter no-bake pie.
Nobake Peanut Butter Bars