The Proper Pub Lunch Deeply Flavoured Threebean Chili Con Carne

- Why This Slow-Simmered Chili Redefines Comfort Food
- The Anatomy of Our Ultimate Pub-Style Chili
- Sourcing the Core Components for Richness
- The Spice Cabinet Arsenal for Maximum Impact
- The Searing and Sweating Sequence
- Achieving the Deep, Slow-Cooked Perfection
- Maximizing Flavor and Storage Longevity
- Customization Pathways for Your Perfect Pot
- Laying the Flavour Foundations: Aromatics and Spices for the Best Chili Recipe
- Choosing Your Protein for the Best Chili Recipe
- The Secret to Great Chili Texture (Beans or No Beans)
- Unleashing the Flavour Monster: Simmering Techniques for Deep Flavor
- Dressing Up Your "Proper Pub Lunch" Chili: Topping Bar Heaven
- Frequently Asked Questions
- 📝 Recipe Card
Right then, let’s get this recipe shipshape! You know those days when it’s absolutely tipping it down outside? The sort of weather where you could wear your wellies to the shop? That’s when only one thing will do: a proper, steaming bowl of Chili .
It smells like heaven is simmering on your hob. Forget those tins we relied on as students; this is the real deal, a hearty, deeply flavoured hug in a bowl.
Why This Slow Simmered Chili Redefines Comfort Food
Honestly, I’ve tried the quick methods the ones promising results in 30 minutes. They’re fine for a Tuesday, I suppose. But if you want a truly amazing chili, you need time. We aren’t just cooking ingredients; we’re building layers.
That rich, dark colour you see in the pub? That doesn't happen in half an hour. This Homemade Chili Recipe is designed to cure any lingering winter sniffle and make your kitchen smell like a proper feast.
Escaping the Bland Bowl: Our Flavor Philosophy
Too many recipes rely on just shaking in a huge load of generic chili powder and calling it a day. That's how you get a bland bowl, mate. Our flavour philosophy centres on building complexity. We start by brutally searing the beef until it’s dark brown no pale, grey mince allowed!
Then we dedicate precious minutes to 'blooming' the spices in the tomato paste. It sounds fussy, but honestly, toasting cumin and paprika for just sixty seconds changes everything. It’s the difference between microwave chips and proper oven chips.
Setting the Stage for Winter Warmth
When you’re aiming for a true comfort dish, you need robust ingredients. This Hearty Chili Recipe uses good quality beef I prefer an 85/15 blend for a bit of fat to carry the flavour. We are looking for that deep, satisfying warmth.
It’s not just about heat; it’s about the smoky paprika and the sneaky teaspoon of unsweetened cocoa powder. Trust me on the cocoa; it deepens the colour and complexity without making it taste like dessert.
This sets the stage perfectly for those colder evenings when you just want to settle in front of the telly.
The Anatomy of Our Ultimate Pub-Style Chili
When people ask me how to make chili like a pro, they are usually asking about texture and richness. This is where the slow simmer pays off. We are aiming for a consistency where the sauce clings to the meat, not just swimming in liquid.
This recipe uses a classic American approach a rich Red Chili Recipe base but tweaked for that satisfying, pub-grub thickness.
A Deep Dive into the Three Bean Blend
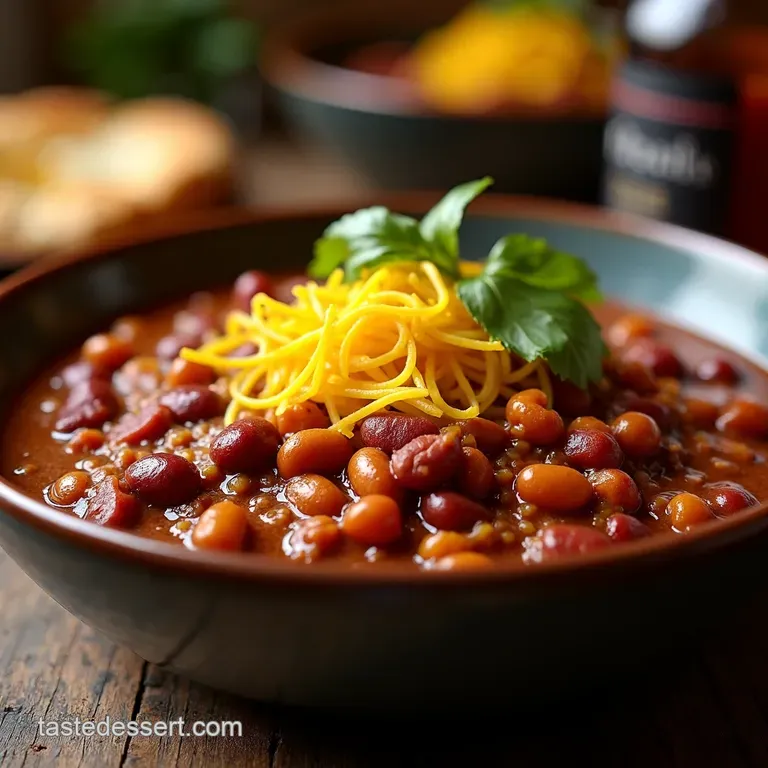
People get passionate about beans in chili, I know! Some purists say no beans, some say only kidney. For this recipe, we’re going for maximum texture and fibre, so we use three types: kidney, black, and pinto. Crucially, we add them near the end.
If you chuck them in at the start, they break down into mush during the long simmer. We want them intact, holding their shape, providing contrast to the tender beef. This ensures our Chili Recipe remains interesting to eat right up until the last spoonful.
I learned that lesson the hard way, adding everything at once and ending up with beef sludge. Now, I treat the beans as the finishing touch. Remember, patience is your main spice here. Don't rush it, let it bubble away gently for at least two hours.
This is the Best Chili Recipe because it respects the process. Once it’s done, you’ll have leftovers too and believe me, this tastes even better the next day!
Related Recipes Worth Trying
- Chipotle Chili Powder in My Weeknight Chicken Sweet Potato Chili — Jazz up chili night with chipotle chili powder This Chicken Sweet Potato Chili is smoky slightly sweet and SO easy A perfect weeknight dinner Get the recipe
- Banger Chili MashUp A Unique Sausage Chili Recipe — Looking for a chili recipe unique My Banger Chili MashUp combines British sausage with ale and Southwestern spice for a comfort food explosion Get the...
- Chilis Chicken Enchilada Soup Recipe Creamy Easy — Craving Chilis Chicken Enchilada Soup This creamy homemade recipe is even better Easy flavorful and ready in under an hour Get the recipe now
Right then, let's talk about getting this Best Chili Recipe absolutely spot on. Making a proper, hearty batch of Chili isn't rocket science, but you need to treat your ingredients right. We’re aiming for that deep, slow cooked flavour that sticks to your ribs.
Think less 'quick weeknight throw together' and more 'weekend project that smells amazing.' This is how we build the foundation for the Amazing Chili you deserve.
Sourcing the Core Components for Richness
This is where the real work starts. If you skimp here, the whole pot will taste a bit weak, won’t it? We need quality elements that can stand up to a long simmer. Getting your base right makes this the Hearty Chili Recipe we’re aiming for.
Selecting the Ideal Ground Beef Cut
I always insist on something with a bit of fat, say an 85/15 blend. That fat melts down and adds body, which is non-negotiable for a great Red Chili Recipe . You’ll need 2 lbs (about 900g).
If you’re feeling fancy, grab a nice chunk of chuck steak and dice it yourself it adds incredible texture, though it will need a longer cooking time. If you must substitute, use 90/10, but you might need an extra splash of oil at the start. The main thing is to brown it properly in batches.
Don't pile it all in at once, or you’ll end up with grey, sad meat instead of deep brown flavour bombs.
The Holy Trinity of Canned Goods
When it comes to canned goods, quality matters, especially with the tomatoes. Grab one big (28 oz / 794g) can of good quality crushed tomatoes. They break down beautifully during the long simmer.
Then, for the beans and yes, I use three kinds for texture we need one 15 oz (425g) can each of kidney, black, and pinto beans. Crucially, rinse them well! All that canned liquid makes the chili murky and adds an odd flavour. A sieve is your best friend here.
Aromatics and Building Blocks for Depth
Onions, peppers, and celery the classic Mirepoix base, though for chili we often swap carrots for celery. You want one large onion (diced), one large green pepper, and two celery stalks. Chop these fine. We soften these down first, giving the finished Chili a lovely sweetness.
Don’t rush this part; they need to sweat down for about 6- 8 minutes before anything else goes in.
The Spice Cabinet Arsenal for Maximum Impact
This is the fun bit! Buying cheap, old spices is a false economy; they just don’t pop. For this Homemade Chili Recipe , you want the aroma filling your kitchen that's how you know you’re doing it right.
The key to unlocking flavour is blooming. Before you add any liquid, you toast your spices briefly. For this, you'll need 3 Tbsp of good quality chili powder, 2 tsp of ground cumin, 1 tsp each of smoked paprika and dried oregano, and then my little secret: 1 tsp of unsweetened cocoa powder. Yes, cocoa!
It doesn't make it taste like chocolate, honestly; it just adds a mysterious, dark background note that makes people scratch their heads wondering what makes this Easy Chili Recipe so unique. If you want heat, add half a teaspoon of cayenne, but taste before you dump it all in!
For liquids, we use 4 cups (950 ml) of beef broth and 1 Tbsp of apple cider vinegar. The vinegar is vital, lifting all those heavy, earthy flavours right at the end. If you haven't got ACV, a teaspoon of sugar instead of the vinegar can balance things out, but the vinegar is better.
You'll need a big, heavy Dutch oven for this job, preferably one you can leave simmering away gently for two hours.
Right then, let's get this recipe shipshape! When we talk about "The Best Chili," we're usually talking about something hearty, deeply flavoured, and satisfying the sort of dish that cures the British winter blues, even if it’s technically American in origin.
Forget those watery, bland pots; we’re aiming for a rich, slow simmered masterpiece. This is my Proper Pub Lunch: Deeply Flavoured Three Bean Chili Con Carne . It’s robust, it’s rich, and it tastes like you’ve been nursing it all day even if you haven't.
This isn't your average weekday simmer; this is a true comfort classic. The secret to this Amazing Chili lies in layering those aromatic spices and allowing them to properly meld with quality beef. We’re aiming for that deeply satisfying texture only a long, slow cook can give you.
It requires a little patience, but trust me, the result is worth the elbow grease. This Hearty Chili Recipe is destined to become your go-to Red Chili Recipe .
The Searing and Sweating Sequence
This initial stage sets the foundation for everything that follows. If you rush this bit, your Chili Recipe will taste watery, believe you or not. We need texture and depth right from the off.
Browning the Beef for Unlocked Umami
First things first: the beef. We’re using 2 lbs of good stuff, 85/15 blend is perfect here. Heat 1 tablespoon of olive oil in your biggest, heaviest Dutch oven over medium high heat. Now, here’s the kicker: you must brown the beef in batches .
If you try to cram it all in, the temperature plummets, and you end up stewing the meat rather than searing it. We want dark, crusty bits sticking to the bottom of the pan that’s flavour gold, mate.
Sear each batch for about 5 to 7 minutes , turning until deeply browned. Drain off any massive pools of fat and set the meat aside. Don’t wipe the pot clean!
The Crucial Deglazing Technique
Once the beef is out, toss in your diced onion, bell pepper, and celery your standard mirepoix. Sweat these down in the remaining beef drippings and a tiny splash more oil until they are soft and sweet, about 6 to 8 minutes .
When they are nearly done, push them to one side. Add your 2 tablespoons of tomato paste right into that cleared spot and cook it for a solid 1 minute , stirring constantly. You’ll see it turn a deeper brick red colour. That slight caramelisation is key.
Now, pour in about a quarter cup of your beef broth and immediately get scraping. Use a wooden spoon to lift all those lovely dark brown bits stuck to the bottom. This process, known as deglazing, incorporates all that concentrated beefy flavour back into the pot.
It’s non-negotiable for the Best Chili Recipe .
Achieving the Deep, Slow Cooked Perfection
This is where the magic happens. We transition from cooking ingredients to developing a proper sauce. This is the difference between a quick weeknight meal and a proper, layered Homemade Chili Recipe .
Simmering Secrets: Timing is Everything
With the beef back in the pot, add the rest of your beef broth, the crushed tomatoes, that sneaky teaspoon of unsweetened cocoa powder (it adds depth, not chocolate flavour, promise!), oregano, cumin, chili powder, paprika, brown sugar, and cayenne. Stir it all together well.
Bring the whole pot up to a boil, then immediately drop the heat right down. We want a lazy, gentle simmer. Cover the pot, leaving the lid slightly ajar this allows some steam to escape, which concentrates the sauce. Let this simmer for at least 2 hours .
Seriously, minimum two hours. I’ve let mine go for three, and it’s always better. Stir it every half hour or so to stop the bottom catching. If it looks too thick during this time, add a splash more broth.
Finishing Touches Before Serving the Chili
After the long simmer, your beef should be incredibly tender. Now it’s time for the beans. Take your rinsed and drained kidney, black, and pinto beans and stir them in. They only need about 20 minutes in the hot chili to heat through properly and absorb some flavour without turning to mush.
Just before you switch the heat off, stir in that tablespoon of apple cider vinegar. It sounds odd, but that little bit of acid brightens everything up beautifully. Taste it now. Does it need more salt? A touch more heat? Adjust your seasoning until it sings.
This is what turns good chili into your Easy Chili Recipe champion.
If you're making this ahead and you absolutely should let it cool completely before storing it in an airtight container in the fridge. It’ll keep beautifully for four days. Reheating is best done gently on the stovetop.
You’ll find the flavours deepen overnight, making it a perfect dish for batch cooking. Serve this proper, Chili With Salsa on the side, perhaps with some cornbread, and watch everyone tuck in. You’ve made an Amazing Chili !
Right then, let's get this recipe shipshape! When we talk about "The Best Chili," we're usually talking about something hearty, deeply flavoured, and satisfying the sort of dish that cures the British winter blues, even if it’s technically American in origin.
Forget those watery, bland pots; we’re aiming for a rich, slow simmered masterpiece. This Best Chili Recipe is what I call "The Proper Pub Lunch" Hearty Beef & Bean Chili.
It takes a bit of time, mind you, but trust me, the payoff for this Homemade Chili Recipe is immense. We are layering up flavour like a proper Sunday roast!
This isn't your average weekday simmer; this is a true comfort classic. We’re building depth, one layer at a time, ensuring you get that robust, smoky character you want in a proper Red Chili Recipe .
Maximizing Flavor and Storage Longevity
Look, if you want an Amazing Chili , you can’t rush the process. We put a lot of effort into the searing and the spice bloom, right? That’s step one.
But the real magic, the secret sauce to making this the best you’ve ever made, happens after it’s finished cooking.
The Next Day Flavor Boost Phenomenon
If you have the willpower and believe me, it’s tough when your kitchen smells this good you absolutely must let this Hearty Chili Recipe sit overnight. Why? When the chili cools down slowly, all those oils, spices, and beef juices marry together properly.
It’s like letting a good bottle of wine breathe, but for savory food.
When you reheat it the next day, the heat activates all those complex compounds again. It's a completely different beast. My top tip here: When you reheat it, if it seems a bit thick (which it probably will be), add a small splash of hot beef broth or even some water just enough to get the consistency moving again.
If you’re planning ahead, this makes it the perfect Chili Recipe Crockpot candidate for a busy weekday. You cook it fully on Sunday, store it properly, and reheat on Tuesday. Brilliant.
Serving Suggestions Beyond the Standard Toppings
Of course, a mountain of sharp cheddar and a dollop of sour cream is non-negotiable for many, and I won’t judge! But if you fancy shaking things up, try these additions.
For texture, forget just crackers. Grab some tortilla chips and smash them slightly over the top for crunch. Or, if you're going for the 'pub lunch' vibe, serve this Chili alongside a thick slice of slightly charred sourdough bread. You need something sturdy to mop up the sauce!
I also love adding a little sharpness right before serving. A squeeze of fresh lime juice works wonders, lifting the heavy, slow cooked notes. If you want to add a bit of freshness that cuts through the richness, finely dice some raw white onion and sprinkle it on top it gives a lovely, sharp bite against the warm, deep meat.
Think of it as a homemade Chili With Salsa experience, but built right into your bowl.
Customization Pathways for Your Perfect Pot
This is an Easy Chili Recipe at heart, but its adaptability is where it shines. Once you’ve mastered the base technique (searing, blooming spices, slow simmer), you can start fiddling.
Nutritional Snapshot of This Hearty Dish
People always ask if this hearty stuff is terrible for you. Well, let’s keep it real. It’s beef and beans, so it’s packed with protein and fibre that’s the good stuff keeping you full until supper!
Based on my estimates for an average serving (about 1/8th of the batch), you are looking at roughly 450 calories, a solid 35g of protein, and a brilliant 10g of dietary fibre. That fibre is key, especially from using three different kinds of beans. It balances out the richness from the ground beef.
If you’re worried about fat, brown your beef well and drain off that excess fat before you add your vegetables. Every little bit helps keep this a satisfying, yet relatively sound, meal.
Troubleshooting the Texture
If you find, after the full two-hour simmer, that your Chili is still thinner than you’d like maybe you didn't use enough tomato paste, or you just used too much broth don't panic.
You absolutely do not need to thicken it with flour or cornstarch slurry (that tastes artificial).
Instead, take the lid off completely and let it simmer rapidly on medium heat for 10 to 15 minutes. The evaporation will concentrate the sauce beautifully. Alternatively, if you have a spare can of beans, mash half of them up with a fork and stir them back into the pot.
The natural starch from the mashed beans acts as a brilliant, invisible thickener. That’s a classic trick for any slow cooked stew, honestly.
So there you have it. Make this Chili , let it rest overnight, and prepare for compliments. It's proper cooking, done right.
Laying the Flavour Foundations: Aromatics and Spices for the Best Chili Recipe
Right then, let’s talk brass tacks. If you’re aiming for what I call "The Proper Pub Lunch" Hearty Beef & Bean Chili , you can’t just toss everything in a pot and hope for the best, can you? No chance.
The foundation of any genuinely brilliant Chili Recipe —the thing that stops people in their tracks and makes them ask, “What is in this?” is what happens before the long simmer. We’re building deep, resonant flavour here.
We need the good stuff, the backbone of our Homemade Chili Recipe .
This phase is where the magic starts. Forget those packets of seasoning you buy at the supermarket that smell vaguely of dust. We’re going to bloom our spices. Trust me on this one; it’s the difference between a nice stew and an absolutely Amazing Chili .
Sweating the Trinity: Onion, Pepper, and Celery
Before the fire meets the spice, we need our vegetable base, often called the soffritto or, for this context, our ‘aromatic trinity.’ I’m talking about onion, green bell pepper, and celery.
Now, some folks skip celery in chili, but I think it adds a subtle, earthy background note that stops the flavour profile from being too harsh or one-dimensional. Think of it as the quiet rhythm section in a great band.
Get your big, heavy pot your Dutch oven is your best mate here nice and hot over a medium flame. We want to sweat these veggies down slowly in a bit of olive oil until they are soft, almost translucent, but not browned. This usually takes about six to eight minutes.
You’re releasing their natural sweetness and moisture. This step is non-negotiable if you want that silky texture in your final Hearty Chili Recipe . Once they are soft, we make a little space in the middle of the pan.
The Scent of the Soil: Blooming the Spice Rack
This is my favourite bit, and the moment where you need to pay attention, or you’ll end up with gritty, slightly burnt spice dust in your mouth and nobody wants that!
First, push the softened vegetables to the side. Into that hot, clear patch, add your tomato paste. You’re looking to cook that paste, stirring it constantly, for about a minute until it deepens in colour from bright red to a rusty, almost brick like shade.
This cooks out the tinny flavour of the paste, concentrating that tomato essence.
Now , and I mean now , toss in all your dry heroes: the chili powder, cumin, oregano, smoked paprika, that secret weapon of unsweetened cocoa powder, and the cayenne for a bit of a kick. Stir them vigorously right into the hot paste and fat. You’ll notice the smell change instantly.
It will get heady, warm, and intoxicating. This short blast of dry heat we call it 'blooming' releases the oils in the spices, making them taste ten times stronger and more complex than if you just dumped them into the simmering broth later on.
I learned this lesson the hard way early on; a quick toast changes everything for your Red Chili Recipe .
Building Depth: Vinegar and Brown Sugar Balance
Once those spices smell absolutely bang-on, we return the beautiful, deeply browned beef to the pot. Then, pour in a small splash of your beef broth and immediately start scraping the bottom of the pan with a wooden spoon. See those dark, sticky brown bits? That’s fond .
That’s pure, concentrated flavour. We are deglazing the pot and bringing all that goodness back into the mix.
Then it’s the main event: the rest of the broth and the crushed tomatoes go in. But here’s where we finesse our Chili With Salsa vibe without actually adding salsa yet. We add just a teaspoon of brown sugar and a tablespoon of apple cider vinegar. Why? Simple.
The sugar balances the acidity from the tomatoes, and the vinegar brightens the whole heavy dish. It cuts through the richness like a little bit of sunshine. Don’t worry, it won’t taste sweet or vinegary; it just makes the beef and spices taste more like themselves.
It’s an essential technique for a top-tier Easy Chili Recipe . This careful layering of aromatics, bloom, and balance is what transforms this into a Chili Recipe Crockpot dream later, whether you’re using a slow cooker or the stovetop.
Get this right, and the rest is just waiting for time to do its work.
Choosing Your Protein for the Best Chili Recipe
Right then, let’s get this recipe shipshape! When we talk about "The Best Chili," we're usually talking about something hearty, deeply flavoured, and satisfying the sort of dish that cures the British winter blues, even if it’s technically American in origin.
Forget those watery, bland pots; we’re aiming for a rich, slow simmered masterpiece. This is where your protein choice really matters for your Homemade Chili Recipe.
I’ve based this particular version, which I affectionately call "The Proper Pub Lunch" Hearty Beef & Bean Chili , around classic ground beef. Why? Because it gives you that brilliant texture and fat content that carries the spice.
But listen, I know not everyone is a strict carnivore, so we need to cover the bases for Turkey and fully Vegetarian options too. Getting the foundation right is key to making an Amazing Chili .
The Beef: Classic Comfort and Flavour
For me, when making a proper Red Chili Recipe, nothing beats good quality beef. We are using 2lbs of it in the recipe outline, and I have one crucial piece of advice here: don't go too lean.
If you grab 95% lean beef, you are robbing yourself of flavour. Fat is a carrier for all those lovely smoky spices we are blooming later on. I always insist on an 85/15 blend. It renders down beautifully. Now, if you want to go fancy and you absolutely can use cubed chuck steak instead of ground beef.
You’ll just need to cook it for about 30 minutes longer at the simmer stage to ensure it’s fall apart tender. My lesson learned? Rushing the sear on the beef means your final dish tastes dull.
You must brown it hard, in batches, to get those lovely dark brown crusty bits at the bottom of the pot. That’s pure gold.
Turkey Talk: A Lighter Take on Chili
If you’re watching the fat intake, turkey is a solid runner-up. It takes flavour well, but it behaves differently in the pot. Turkey is much leaner than beef, which means it can dry out if you’re not careful, especially if you’re trying to adapt this for a Chili Recipe Crockpot session.
When using ground turkey I prefer dark meat if you can find it you absolutely must compensate for the lack of beef fat. I usually add an extra tablespoon of olive oil when sautéing the aromatics, and I sometimes sneak in a little extra smoked paprika just to give it back some of that deep, smoky weight that beef naturally brings.
It makes for a lovely, lighter chili, perfect for when you want that feel of chili without the heaviness. It won't be quite the same as the classic beef version, but it’s a fantastic Easy Chili Recipe substitute.
Going Green: Brilliant Vegetarian Chili
Now, let’s talk about making this spectacular without meat. A Vegetarian Chili needs texture and umami to stand up to the spices. My go-to method, as noted in the variations, is a mix of mushrooms and sometimes lentils or walnuts if I’m feeling ambitious.
For this recipe, I suggest replacing the beef with about 1.5 pounds of deeply flavourful mushrooms think cremini, maybe some portobello chopped quite roughly. You cook them down in the same way you would the beef, letting them release their water and then caramelize nicely.
You’ll use vegetable broth instead of beef broth, and you might want to boost the umami factor. A splash of soy sauce or a teaspoon of Marmite (yes, Marmite!) dissolved into the broth works wonders.
This method creates a wonderfully earthy, robust flavour that proves you don't need meat for a truly Hearty Chili Recipe. It really shines when served with plenty of fresh toppings, perhaps mixed with some of that Chili With Salsa you’ve prepared separately.
Either way you choose, the slow simmer is your best friend.
The Secret to Great Chili Texture (Beans or No Beans)
Right then, let's have a proper chinwag about texture. This is where the great divide happens in the world of Chili . You’ve got your purists, and you’ve got the rest of us who just want a hearty spoon of heaven.
When I set out to make what I call the Best Chili Recipe , texture is just as important as flavour we are after something thick, luxurious, and completely satisfying. Nobody wants a bowl of lukewarm beef soup!
The Great Divide: Beans or Go Home?
Look, I know the Texas chili people will be clutching their pearls right now, but hear me out. A true, traditional Red Chili Recipe —the kind born in the American Southwest often has no beans whatsoever.
It’s pure meat, spice, and maybe some ground-up dried chilies creating that thick sauce. That’s authentic, sure, but is it the Hearty Chili Recipe that sees you through a damp Tuesday evening here in the UK? Probably not.
For my Homemade Chili Recipe , which aims to be robust enough for a proper pub lunch feel, beans are absolutely welcome. They add body, structure, and absorb all those glorious spice notes we worked so hard to bloom earlier.
If you’re using a Chili Recipe Crockpot method, beans are a lifesaver because they stop the whole mixture from turning into one monolithic paste.
My personal verdict? Use beans, but treat them right. They should be soft, creamy, and integrated not like little hard pebbles bouncing around in the sauce. That’s why we wait until the last 20 minutes to introduce our trio of kidney, black, and pinto beans.
They just need warming up and a quick hug from the sauce. Adding them earlier is a recipe for mush!
Achieving That Proper, Thick Consistency
The biggest texture mistake folks make when attempting an Easy Chili Recipe is not allowing enough liquid evaporation. You need that simmer time, friends at least two hours. When I first started making this, I used to rush it.
Everything looked liquidy, and I panicked, thinking I needed more cornflour or something equally dreadful. Nope.
The thickening happens naturally. As the beef breaks down slightly, and as the tomato paste reduces, you get this velvety mouthfeel. The secret weapon I mentioned earlier that tiny bit of unsweetened cocoa powder doesn't just add depth of flavour; it helps slightly with the richness and texture too.
It acts as a subtle emulsifier, keeping things smooth.
If, after two hours, your Amazing Chili is still swimming a bit, don't reach for a slurry. Take the lid off completely, turn the heat up slightly (medium low), and let it bubble away gently for an extra 15 or 20 minutes.
You’ll be shocked how quickly that excess water cooks off, leaving you with that beautiful, thick consistency perfect for pairing with Chili With Salsa toppings.
The Final Flourish: Texture Contrast
Texture isn't just about the main body of the chili; it’s about what you put on top. This is crucial for making your Chili Recipe feel complete. If the whole dish is soft soft beef, soft beans, soft sauce it gets boring fast.
You need crunch and coolness . That’s why the finishing touches matter more than you think. A generous sprinkle of sharp, cold grated cheddar offers resistance.
A dollop of cool sour cream or Greek yogurt melts slowly, cutting the heat while providing a creamy counterpoint to the stewy richness. And if you can manage some fresh, crisp red onion or cilantro? Even better. These textural elements elevate a simple pot of meat and sauce into a truly memorable experience.
Trust me, nailing this texture balance is what separates a good Chili Recipe from the Best Chili Recipe you’ll ever make.
Unleashing the Flavour Monster: Simmering Techniques for Deep Flavor
Right then, let's get this recipe shipshape! When we talk about "The Best Chili," we're usually talking about something hearty, deeply flavoured, and satisfying the sort of dish that cures the British winter blues, even if it’s technically American in origin.
Forget those watery, bland pots; we’re aiming for a rich, slow simmered masterpiece.
This Hearty Chili Recipe , which I’ve christened "The Proper Pub Lunch" Three Bean Chili Con Carne , demands patience. It’s not a quick weeknight dash; it’s a weekend project where the reward is worth the time investment.
If you’re looking for an Easy Chili Recipe , this might take you slightly longer than you’d hope, but trust me, the depth of flavour you achieve from proper simmering is what separates the men from the boys, cooking wise.
The Art of the Low and Slow Bubble
Simmering is where the magic happens. It’s not boiling; it’s not even a proper rumble. We are looking for the barest suggestion of movement. Think gentle lapping waves, not a full-on tide.
If your Homemade Chili Recipe is boiling furiously, you’re losing moisture too fast, and the starches and proteins in the meat aren't breaking down gently.
The ideal temperature for that deep flavour penetration is barely above 200° F ( 93° C) . You want to see maybe one or two lazy bubbles break the surface every ten seconds.
This slow heat allows the collagen in the beef to melt into luscious gelatin, thickening your sauce naturally, and letting those layers of spice the cumin, the smoked paprika truly marry the tomato acidity.
This process is what turns good ingredients into the Amazing Chili you dream about.
Blooming the Aromatics: Waking Up the Spices
Before we even think about covering the pot, we have a vital step: "blooming" the spices. I learned this the hard way years ago. Just dumping the powders into the liquid? Rubbish. It results in a dull, dusty taste.
Instead, after you've softened your onions and garlic, you push them aside, drop your tomato paste into that hot spot, and cook it until it goes rusty brown about a minute. Then , you introduce all your dried spices the chili powder, oregano, cocoa right into that hot, caramelized paste.
Stir them rapidly for about 60 seconds . You’ll smell it instantly; it goes from smelling vaguely spicy to smelling intense . This brief burst of direct heat releases their essential oils.
If you skip this in your Red Chili Recipe , you’re leaving half the flavour on the table, mate.
The Simmer Timeline: When to Commit
For this specific Chili Recipe , I insist on a minimum of two hours simmering time once everything is combined and brought just up to that gentle bubble. If you're using a Chili Recipe Crockpot , fantastic set it low and forget it for six to eight hours.
My personal insight? The absolute best batch of this I ever made was one where I brought it to a simmer, cooked it for an hour and a half, turned the heat off completely, and let it sit for an hour while I ran errands. Popping it back on low for the final half hour made it taste like it had been cooking all day.
It truly needs time for those flavours to get acquainted, you see. This long development phase is what transforms a simple stew into the ultimate Hearty Chili Recipe —the kind of Chili With Salsa that silences the table when everyone takes that first, flavour packed mouthful.
Don't rush it; respect the simmer, and it will reward you tenfold.
Dressing Up Your "Proper Pub Lunch" Chili: Topping Bar Heaven
Right then, you’ve nailed the slow simmer. Your kitchen smells like the best kind of Sunday afternoon comfort, and you’ve got a pot of what I confidently call the Best Chili Recipe ever to grace your dinner table. But hold your horses!
You can’t just ladle out a bowl of this Hearty Chili Recipe naked; it needs dressing up. Serving is where you turn a great bowl of stew into an absolute event .
Trust me, I learned this the hard way early on skimping on the toppings is like buying a gorgeous Sunday roast and forgetting the gravy. Don't be that person!
When I first started making my Homemade Chili Recipe , I just threw some cheese on top and called it a day. Boring! Now, I treat the serving stage like building a little flavour tower.
Whether you’re planning a big game day spread or just sorting out an easy weeknight meal (perfect for the Chili Recipe Crockpot crowd!), a dedicated topping bar makes everyone feel like they’ve won the lottery.
Building the Ultimate Chili Topping Bar
This is where we move beyond basic garnishes. Think texture, think temperature, think contrast! You want cool creaminess against the hot, deep richness of the Red Chili Recipe . We’re talking about building layers of flavour. Lay everything out in small bowls, and let people go wild.
First up, the dairy element. Sour cream is traditional, of course, but I always put out a bowl of plain Greek yogurt too; it’s tangier and feels slightly less heavy. Grate your own cheese! Pre-shredded stuff is coated in anti caking agents that prevent it from melting nicely.
Use a sharp cheddar or a Monterey Jack blend. If you’re feeling fancy, even a sprinkle of crumbly Cotija cheese elevates things straight to a fancy Mexican restaurant level. This is crucial for balancing the heat in our Amazing Chili .
Next, we need crunch and acid. Diced white onion brings that sharp bite, but I often mix in some thinly sliced scallions for a milder flavour. Then, the game changer: something acidic. A good, chunky Chili With Salsa vibe works wonders.
I keep a small jar of fresh lime wedges handy a good squeeze cuts right through the fat and brightens everything up instantly.
Hot Sauces and The Heat Gradient
Not everyone has the same tolerance for spice. My other half likes his chili mild enough for a baby bird, whereas I need to feel like I’ve wrestled a jalapeño and won. This is why a "Heat Station" is essential.
Don’t just offer one bottle of generic hot sauce. Offer variety! A bottle of smoky chipotle sauce for depth, perhaps a vinegar heavy Louisiana style sauce for zing, and maybe if you're brave a small dish of very finely diced fresh habanero for the masochists among your guests.
Remember, these potent additions are best added after the initial serving; nobody wants a surprise firebomb in their first bite. This approach keeps our Easy Chili Recipe accessible to everyone while still satisfying the spice fiends.
Beyond the Bowl: Starch Companions
While a hearty bowl of this Chili Recipe can stand alone, the vehicle matters! If you’re serving this up, make sure you have something substantial for scooping. Forget plain white bread; we need something that can soak up that beautiful, thick sauce.
Cornbread is the absolute king here. It needs to be slightly sweet and crumbly. If you don't have time to bake, thick, crispy tortilla chips work wonders for dipping and crunch. For a true comfort food move, serve it over a bed of fluffy white rice, or even spoon it over baked potatoes loaded with butter.
These additions transform your great stew into a truly memorable meal. Honestly, experimenting with these little extras is what turns a good cook into a legendary one. Enjoy!
If you're craving more ideas, explore Proper Bangers Chili Dogs Ultimate Comfort Food , Kickin Cowboy Easy Homemade Chili Recipe and Chili Cheese Fries Bites PintSized Pub Grub Heaven .
Frequently Asked Questions
Why is my Chili looking a bit watery instead of thick like yours?
Ah, that's a common pitfall! Watery chili usually means the simmer wasn't long enough or you skipped searing the meat properly. Make sure you are simmering it partially covered for at least two hours to allow excess moisture to evaporate.
Browning the beef in batches first also helps create a richer base that thickens naturally.
I’m nervous about the spice level; how can I adjust the heat in this Chili recipe?
That's fair enough we want flavour, not just fire! The cayenne pepper is your main control lever. Start with just 1/4 tsp, taste after the two-hour simmer, and add more incrementally if you need a proper kick. If you want deep flavour without excessive heat, double down on the cumin and smoked paprika instead.
Can I make this Chili ahead of time, and how should I store leftovers?
Absolutely, in fact, I heartily recommend it! Like many slow cooked dishes, this Chili tastes even better the next day once the spices have fully married. Store it in an airtight container in the fridge for up to 4 days, or freeze individual portions for up to three months.
Just be sure to cool it completely before chilling or freezing.
What’s the deal with the cocoa powder? Is that a typo, or is it really necessary for good Chili?
Not a typo at all it's a secret weapon used by many serious cooks! Unsweetened cocoa powder doesn't make the Chili taste like chocolate; instead, it adds an incredible dark, earthy depth and richness that enhances the chili peppers and balances the tomato acidity.
It mimics the complexity you get from using dried chiles, so don't skip that sneaky little teaspoon!
I don't have beef; what’s the best substitute for this hearty Chili recipe?
You've got options! For meat eaters, ground turkey or pork works well, though you might need a splash more broth as they are leaner. If you’re going vegetarian, use a mixture of hearty vegetables like diced sweet potato and mushrooms, or bulk it up with lentils; just remember to add lentils earlier in the simmer so they have time to soften properly.
The Proper Pub Lunch Deeply Flavoured Threebean

