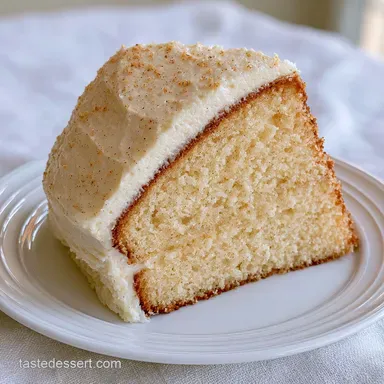
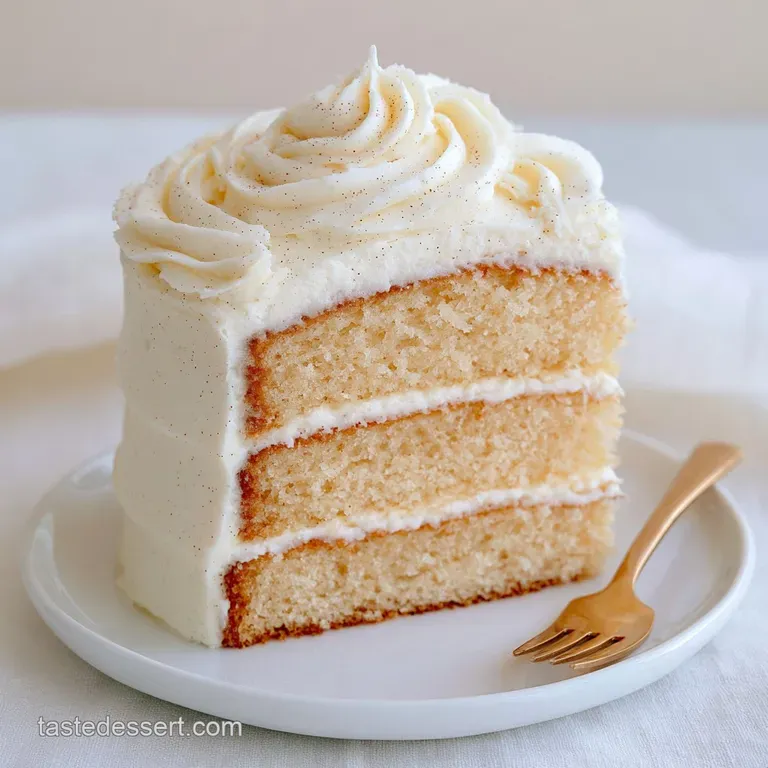
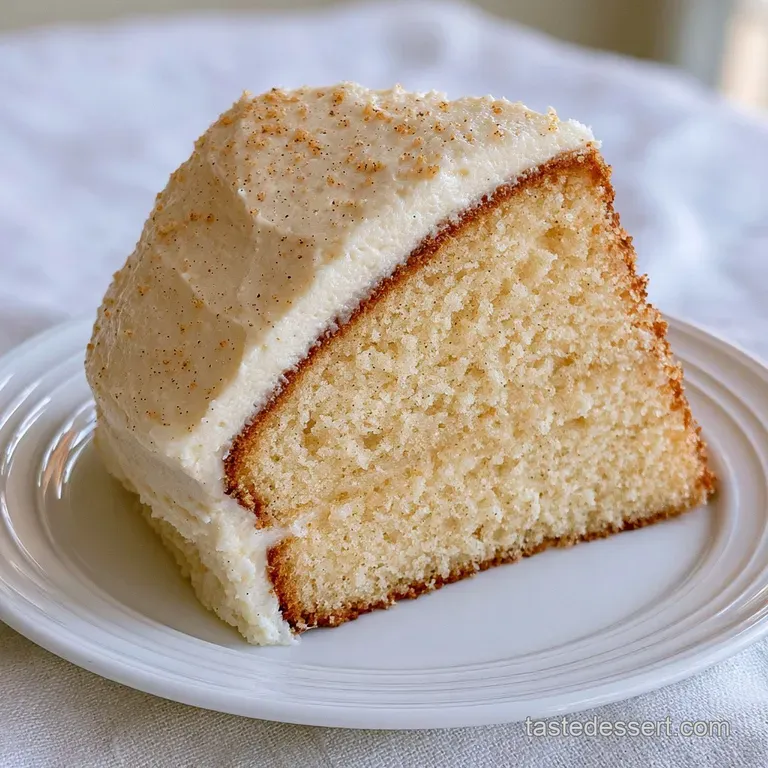
Ultimate Vanilla Bean Cake: Velvety and Moist
- Time:20 minutes active + 2 hours 15 mins baking and cooling = Total 2 hours 35 mins
- Flavor/Texture Hook: Velvety, fine grained crumb with intense, floral vanilla specks
- Perfect for: Birthday parties, anniversary celebrations, or a cherished family Sunday dinner
- Ultimate Vanilla Bean Cake
- The Secret to Better Crumbs
- Precise Recipe Specs
- Essential Cake Ingredients
- Tools for the Job
- Step-by-Step Baking Process
- Fixing Common Baking Mistakes
- Tasty Twists and Swaps
- Scaling the Recipe
- Baking Truths
- Keeping Cake Fresh
- Best Serving Pairings
- Recipe FAQs
- 📝 Recipe Card
That smell, right? When the vanilla hits the heat and the whole kitchen starts smelling like a nostalgic dream, you know you're on the right track. But let's be real, most vanilla cakes are a letdown.
You've probably dealt with that "sponge" texture that feels more like a piece of foam than a dessert, or worse, a cake that's so dry you need a gallon of milk just to swallow a single bite.
I used to struggle with this too. I'd follow the recipes exactly, but my cakes always came out with those huge, uneven holes or a crumb that felt coarse and clumpy. It was frustrating because vanilla should be the gold standard of baking, yet it's the hardest to get "right" without it tasting like plain sugar.
That's why this Ultimate Vanilla Bean Cake is different. We're ditching the traditional creaming method for something a bit more clever. By changing when the butter enters the party, we create a texture that's silky and consistent, solving that dryness problem once and for all.
Ultimate Vanilla Bean Cake
Right then, let's get into the grit of it. If you've ever wondered why professional bakery cakes have that specific, melt in-your mouth feel, it's usually because they aren't just beating butter and sugar together for five minutes. They use a technique that manages the gluten.
For this recipe, we're focusing on a timeless, nostalgic profile. No trendy additions here, just the best possible version of a classic. It's about the purity of the vanilla bean and the richness of the butter.
Trust me on this, once you try this version, you'll never go back to the boxed stuff or the overly airy sponge cakes.
This cake is built for those who love a denser, more luxurious experience. It's a sturdy cake that can hold up a lot of frosting, yet it remains tender. It's the kind of treat that reminds me of my grandmother's kitchen, but with a few smart tweaks to make sure it works every single time in a modern oven.
The Secret to Better Crumbs
Most home cooks start by creaming butter and sugar. That's fine for cookies, but for a high end cake, it can lead to too much air and a crumb that's too open. Instead, we're using "reverse creaming." According to the experts at Serious Eats, this method coats the flour in fat first, which physically blocks the gluten from forming.
Fat Barrier: Mixing butter directly into the flour prevents the proteins from bonding, resulting in a tighter, more velvety crumb.
Moisture Balance: Adding sour cream provides acidity that tenderizes the gluten and keeps the cake from drying out during the 45 minutes in the oven.
Air Control: By avoiding the heavy creaming phase, we don't get those giant air pockets that make a cake feel "holey" or unstable.
Flavor Depth: Vanilla bean paste contains the actual seeds, providing a concentrated, floral hit that liquid extract simply cannot match.
Before we jump into the ingredients, it's helpful to see how this classic approach differs from the "quick" methods you see on social media.
| Feature | Quick Method | Classic Reverse Creaming | Result |
|---|---|---|---|
| Butter Prep | Melted/Soft | Cubed and Mixed in | Tighter, professional crumb |
| Mixing Time | Very fast | Gradual incorporation | Less air, more stability |
| Texture | Spongy/Light | Velvety/Dense | More luxurious mouthfeel |
| Flavor | Simple Vanilla | Intense Bean Specks | Richer, nostalgic taste |
Precise Recipe Specs
When you're baking a cake this precise, the numbers matter. I've found that if you eyeball the measurements, you'll end up with a cake that either sinks in the middle or takes an hour to bake. Use a scale if you have one, but I've provided cups for those who prefer the old school way.
One thing to remember is the temperature of your ingredients. I can't stress this enough: room temperature eggs and sour cream are non negotiable. If you add cold eggs to your butter mixture, the fat will seize up and you'll get clumps of butter in your batter.
That's a mistake I made early on, and it's a headache you don't want.
Let's look at the core components that make this the Ultimate Vanilla Bean Cake.
| Ingredient | Science Role | Pro Secret |
|---|---|---|
| Cake Flour | Lower Protein | Use King Arthur Cake Flour for a softer bite |
| Sour Cream | Acid & Fat | Brings a slight tang that cuts through the sugar |
| Vanilla Paste | Flavor Base | Adds those beautiful black specks and deep aroma |
| Egg Whites | Structure | Creates the glossy, stable base for the buttercream |
Essential Cake Ingredients
Here is exactly what you'll need. I've kept this budget friendly by using standard pantry staples, but the vanilla bean paste is where I suggest you spend your money. It's the heart of the dish.
For the Cake:
- 3 cups (375g) cake flourWhy this? Less protein than AP flour for a tender crumb
- 1 ½ cups (300g) granulated sugar
- 1 tbsp (10g) baking powder
- ½ tsp (3g) fine sea salt
- 1 cup (225g) unsalted butter, room temperature and cubedWhy this? Cubes incorporate faster into flour
- 4 large (200g) eggs, room temperature
- 1 cup (240g) full fat sour cream, room temperatureWhy this? Adds essential moisture and richness
- 2 tbsp (30ml) vanilla bean paste
- ½ cup (120ml) whole milk, room temperature
For the Swiss Meringue Buttercream:
- 5 large (150g) egg whites
- 1 ½ cups (300g) granulated sugar
- 2 cups (450g) unsalted butter, softened and cubed
- 1 tbsp (15ml) vanilla bean paste
- ¼ tsp (1g) fine sea salt
If you don't have everything on hand, don't panic. You can still make a killer cake with a few swaps.
| Original Ingredient | Substitute | Why It Works |
|---|---|---|
| Cake Flour | AP Flour (-2 tbsp) + 2 tbsp Cornstarch | Mimics the lower protein content of cake flour |
| Sour Cream | Full fat Greek Yogurt | Similar acidity and fat, though slightly tangier |
| Vanilla Bean Paste | Pure Vanilla Extract | Same flavor profile, but loses the visible seeds |
| Whole Milk | Buttermilk | Adds more tang and tenderizes the crumb further |
Make sure you have a few minutes to let your substitutes settle into the batter. For example, if you use Greek yogurt, let it sit at room temperature for an hour so it doesn't chill the butter.
Tools for the Job
You don't need a professional kitchen, but a few specific tools make this much easier. A stand mixer is my go to for this recipe because the reverse creaming method requires a steady, low speed mix that's hard to maintain by hand.
If you're using a hand mixer, just be careful not to overwork the batter once the liquids are in.
I also highly recommend using parchment paper. I've had too many cakes stick to the pan because I thought "greasing is enough." Parchment is your insurance policy. It ensures the cake slides out without losing a chunk of the side.
Finally, a digital thermometer is crucial for the frosting. The Swiss meringue needs to hit a specific temperature to ensure the sugar dissolves and the eggs are safe.
Step-by-step Baking Process
Let's crack on with the actual baking. I've broken this down into phases so you can organize your prep.
Phase 1: Preparing the Base
Preheat your oven to 350°F (175°C). Grease two 8 inch round cake pans and line the bottoms with parchment paper. This is the most important prep step to avoid a cake disaster.
Sift together the cake flour, sugar, baking powder, and salt in your stand mixer bowl. Mix on low for 30 seconds. Sifting isn't just about lumps; it aerates the flour, which helps the cake rise evenly.
Phase 2: The Reverse Creaming Assembly
Add your cubed, room temperature butter to the dry ingredients. Mix on low speed until the texture resembles coarse sand. You want the butter to be broken down into tiny pebbles, not fully creamed.
In a separate jug, whisk together the eggs, sour cream, vanilla bean paste, and milk. Make sure the mixture is smooth before it touches the flour.
Gradually pour the wet ingredients into the flour butter mixture. Mix on medium low until the batter is smooth and glossy. Be careful not to overmix here, or you'll develop too much gluten and lose that velvety texture.
Phase 3: The Bake and Cool
Divide the batter evenly between your two pans. Bake for 30–35 minutes until a toothpick comes out with a few moist crumbs. Don't overbake; if the toothpick is bone dry, you've gone too far.
Cool the cakes in their pans for 10 minutes. This lets the structure set. Then, invert them onto a wire rack to cool completely. If you frost a warm cake, your buttercream will melt into a puddle.
Phase 4: The Silky Frosting Finish
Whisk the egg whites and sugar over a double boiler. Heat until the sugar dissolves and the mixture reaches 160°F (71°C). If the sugar stays grainy, your frosting will feel like sand.
Whip the mixture on high speed until stiff, glossy peaks form and the bowl feels cool to the touch. This usually takes about 7-10 minutes.
On medium speed, add your softened butter one cube at a time. This gradual addition is the key to a stable emulsion. Mix in the vanilla bean paste and salt until the frosting is velvety and smooth.
Chef's Note: If your buttercream looks curdled, don't throw it out! It's usually just a temperature issue. Use a hairdryer on the outside of the bowl for 30 seconds while mixing, and it will come back together.
Fixing Common Baking Mistakes
Even with a great recipe, things can go sideways. The Ultimate Vanilla Bean Cake is forgiving, but there are a few pitfalls that can ruin your day.
Sunken Cake Center
If your cake rises and then collapses, it's usually due to underbaking or opening the oven door too early. The sudden drop in temperature can cause the structure to fail before it's set.
Dry or Crumbly Texture
This happens when you overbake the cake or use too much flour. Always measure by weight if possible, as a "cup" of flour can vary wildly depending on how you scoop it.
Grainy Buttercream
Graininess in Swiss Meringue Buttercream usually means the sugar didn't fully dissolve during the heating phase or the butter was too cold when added.
| Problem | Root Cause | Solution |
|---|---|---|
| Cake sticks to pan | Insufficient greasing | Use parchment paper bottoms |
| Frosting separates | Temperature mismatch | Warm the bowl with a hairdryer |
| Dense, heavy cake | Overmixing wet ingredients | Mix only until smooth and glossy |
Common Mistakes Checklist
- ✓ Ingredients aren't actually room temperature (the #1 cause of clumps)
- ✓ Oven isn't preheated fully before the pans go in
- ✓ Measuring flour by volume without leveling the top
- ✓ Skipping the sifting process for the dry ingredients
Tasty Twists and Swaps
While I love the classic version, you can easily tweak this to fit the mood. If you're looking for something a bit more indulgent, try adding a pinch of cinnamon to the dry ingredients for a nostalgic, warm flavor.
For those who want a different kind of treat, this cake's structure is similar to the base of some of my other favorites. If you're in a mood for something completely different after this, you might love my Butterscotch Fudge for a salty sweet contrast.
For a Richer Profile
Swap the whole milk for heavy cream. This increases the fat content and makes the cake feel even more like a high end bakery product. It's a simple change but makes a noticeable difference in the "weight" of the cake.
For a Zesty Contrast
Add the zest of one lemon to the batter. The acidity of the lemon brightens the vanilla and prevents the cake from feeling overly sweet. This is a great option for spring celebrations.
For a gluten-free Version
You can use a 1:1 gluten-free baking flour blend. However, keep in mind that GF flours absorb more moisture. I recommend adding an extra tablespoon of milk to ensure the batter doesn't become too thick.
If you're planning a full dessert spread, this cake pairs beautifully with something a bit more textural, like Chocolate Chip Cookie Dough Cheesecake Cookies on the side.
Scaling the Recipe
Adjusting the size of your cake is easy, but you can't just multiply everything and hope for the best. Baking is a bit like a chemistry experiment, and ratios matter.
Scaling Down (1/2 Batch): If you only have 6 inch pans, cut the recipe in half. For the eggs, beat one egg in a small bowl and use half of it. Reduce your baking time by about 20%, but start checking for doneness at the 20 minute mark.
Scaling Up (2x Batch): When doubling the Ultimate Vanilla Bean Cake, be careful with the leavening. I only increase the baking powder and salt to 1.5x the original amount to avoid a metallic taste or an over inflated cake that collapses.
For double batches, lower your oven temperature by 25°F (to 325°F) and extend the baking time. This ensures the center cooks through without the edges burning. Work in batches if your mixer can't handle the volume.
| Scale | Pan Size | Temp Change | Time Adjustment |
|---|---|---|---|
| 1/2 Batch | 6 inch | None | Reduce by 20% |
| Full Batch | 8 inch | None | Standard (30-35 min) |
| 2x Batch | 8 inch (x4) | -25°F | Increase by 10-15% |
Baking Truths
There are a few things people always say about baking that just aren't true. Let's set the record straight so you don't waste your time.
Myth: You must cream butter and sugar for 5 minutes for a fluffy cake. Truth: Over creaming can actually introduce too much air, causing the cake to rise too fast and then sink. The reverse creaming method used here is far more reliable for a professional, stable crumb.
Myth: Room temperature ingredients are just a suggestion. Truth: In this recipe, they are mandatory. Cold ingredients won't emulsify, leaving you with a broken batter and a greasy cake.
Myth: Using "expensive" vanilla extract makes the cake taste better. Truth: Extract is just a flavoring. To get that true, deep, nostalgic taste, you need vanilla bean paste or pods. The seeds provide a complex flavor that extract simply can't replicate.
Keeping Cake Fresh
Once your Ultimate Vanilla Bean Cake is assembled, you want it to stay moist. The sour cream in the batter helps, but storage is where the battle is won or lost.
Fridge Storage: Keep the cake in an airtight container or a cake dome in the fridge for up to 5 days. However, the butter in the frosting will harden. Always let the cake sit at room temperature for 30-60 minutes before serving so the buttercream becomes velvety again.
Freezer Storage: This cake freezes beautifully. I recommend freezing the layers individually, wrapped tightly in plastic wrap and then foil. They'll stay fresh for up to 3 months. Thaw them in the fridge overnight before frosting.
Zero Waste Tips: If you have leftover cake scraps from leveling the tops, don't toss them! Crumble them up and mix with a bit of the leftover buttercream to make cake pops. Alternatively, freeze the crumbs and use them as a topping for vanilla ice cream.
If you have leftover egg whites from the cake batter (since we use 4 whole eggs but more for the frosting), you can whip them into a quick meringue or add them to your next morning omelet for extra fluffiness.
Best Serving Pairings
To make the most of this cake, you need the right accompaniments. Because the vanilla is so pure and rich, it pairs best with things that offer a bit of acidity or a different temperature.
A bowl of fresh, tart raspberries or sliced strawberries is the classic choice. The brightness of the berries cuts through the richness of the Swiss meringue buttercream, making every bite feel balanced.
For a drink, I love a sharp Earl Grey tea. The bergamot notes in the tea complement the floral side of the vanilla bean paste. If you're serving this at a party, a glass of chilled Prosecco also works wonders, as the bubbles cleanse the palate between slices of this decadent cake.
Finally, if you want to go over the top, serve a slice slightly warmed in the microwave for 10 seconds with a dollop of cold whipped cream. It turns the cake into a molten, luxurious experience that feels like it came straight from a high end patisserie.
Recipe FAQs
What is the secret to keeping this vanilla cake moist?
The combination of cake flour and full fat sour cream. The sour cream adds acidity and fat that breaks down gluten, resulting in a tender, professional grade crumb.
Can I make this cake ahead of time?
Yes, you can bake the layers a day early. Wrap the cooled layers tightly in plastic wrap and store them in the fridge to lock in moisture before frosting.
How to prevent the batter from curdling when adding wet ingredients?
Ensure all ingredients are at room temperature. This allows the butter and eggs to emulsify smoothly without separating.
Is it true that vanilla extract provides the same flavor as vanilla bean paste?
No, this is a common misconception. Vanilla bean paste contains the actual seeds of the bean, providing a deeper flavor and those characteristic black specks.
How to tell when the cake is perfectly baked?
Insert a toothpick into the center. It should come out with a few moist crumbs clinging to it, rather than being completely dry or wet.
What should I do if the frosting doesn't reach stiff peaks?
Continue whipping on high speed. Ensure the mixture reached 160°F (71°C) over the double boiler before whipping to ensure the structure is stable.
What desserts pair well with this vanilla bean cake?
Fresh berries or creamy cheesecakes work best. The simple vanilla profile balances perfectly with the tartness of our strawberry cheesecake.
Ultimate Vanilla Bean Cake