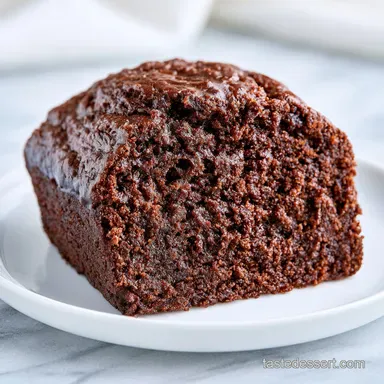
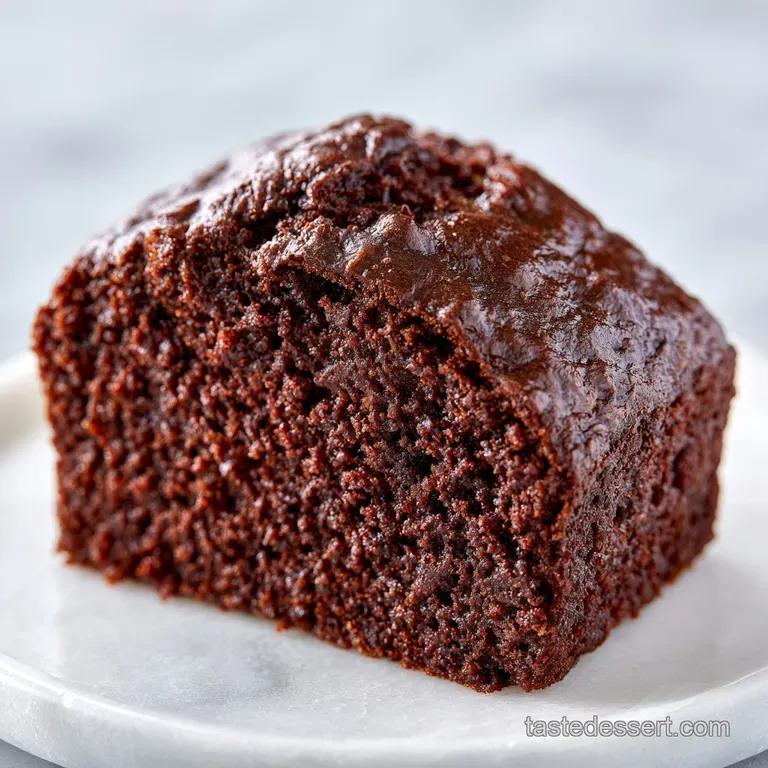
Chocolate Banana Bread: Moist and Fudgy
- Time:15 minutes active + 60 minutes baking = Total 75 minutes
- Flavor/Texture Hook: Deep cocoa richness with a moist, cake like interior
- Perfect for: Weekend brunch or a comforting treat for chocolate lovers
That smell of overripe bananas and cocoa hitting the oven air is honestly one of my favorite things in the world. It fills the whole house with this deep, chocolatey perfume that makes everyone wander into the kitchen asking what's happening.
For me, this is the ultimate "save the fruit" project, turning those blackened, spotted bananas into something truly decadent.
I remember a time I tried to be "too healthy" with a version of this, swapping butter for more banana and cutting the sugar. The result? A gummy, dense brick that felt like eating wet cake. I learned the hard way that you need a bit of fat and the right sugar to get that velvety structure.
Now, I stick to the basics, and this Chocolate Banana Bread is the result of those lessons.
You can expect a loaf that is rich, dark, and just sweet enough. It's not a light sponge cake, but a dense, comforting treat that feels like a hug in a pan. Trust me on this, using brown sugar instead of white makes a massive difference in the moisture and adds a subtle caramel note that plays so well with the cocoa.
Easy Moist Chocolate Banana Bread
Right then, let's get into the specifics of this Chocolate Banana Bread. The goal here is a crumb that is moist but doesn't collapse, with pockets of melted chocolate in every single bite.
It's a straightforward process, but there are a few little tricks to make sure it doesn't turn out too dry or, conversely, too soggy in the middle.
The magic happens when you combine the fruitiness of the bananas with the bitterness of the unsweetened cocoa. It creates a balance that keeps the loaf from being cloyingly sweet. If you've ever made standard banana bread and found it a bit boring, this version is the upgrade you've been looking for.
Let's crack on with the details. This is a one bowl kind of deal for the wet ingredients, which means less cleanup and more time eating. I've found that room temperature eggs are the secret to a cohesive batter, so don't just toss a cold egg in there.
Why This Loaf Actually Works
I've spent a lot of time wondering why some loaves stay moist for days while others dry out by morning. It comes down to how we handle the moisture and the lift.
- Moisture Lock: The potassium and natural sugars in overripe bananas act as a humectant, trapping water in the crumb to keep it velvety.
- Cocoa Balance: Cocoa powder is drying, so the extra fat from the melted butter offsets that bitterness and prevents a crumbly texture.
- The Lift: Baking soda reacts with the slight acidity of the cocoa and brown sugar, creating those tiny air bubbles that stop the loaf from being a brick.
- Sugar Depth: Brown sugar contains molasses, which not only adds color but helps the bread stay moist longer than white sugar would.
Since this is a bake, you have a couple of ways to approach the heat. While the oven is the gold standard, some people experiment with other methods.
| Method | Time | Texture | Best For |
|---|---|---|---|
| Oven | 60 mins | Even rise, crusty top | Traditional loaves |
| Stovetop (Dutch Oven) | 75 mins | Denser, steamed feel | When oven is occupied |
| Air Fryer | 40 mins | Very crusty, fast | Small batches/muffins |
The Ingredient Deep Dive
When it comes to this Chocolate Banana Bread, the quality of your cocoa and the state of your bananas are everything. I always suggest using a high-quality Dutch processed cocoa if you want a darker, more Oreo like color, though natural cocoa works just fine for a more classic taste.
According to King Arthur Baking, the type of cocoa you choose can shift the pH of your batter, which is why the baking soda is so critical for the rise. If you use a very acidic cocoa, you might notice a slightly different rise, but the flavor remains heavenly.
| Ingredient | Science Role | Pro Secret |
|---|---|---|
| Overripe Bananas | Moisture & Binding | The blacker the peel, the sweeter the loaf |
| Brown Sugar | Tenderizer & Flavor | Pack it tight into the cup for maximum molasses |
| Melted Butter | Fat & Texture | Don't let it boil; just melt it until liquid |
| Cocoa Powder | Structure & Taste | Sift it to avoid those annoying bitter clumps |
Essential Gear for Baking
You don't need a professional kitchen to nail this, but a few specific tools make the process much smoother. Honestly, don't even bother with a whisk for the final stage, as overmixing is the enemy of a tender loaf.
First, a 9x5 inch loaf pan is the standard. If you use a larger pan, your bread will be flatter and might overcook on the edges before the middle is set. A good non stick spray or a parchment paper sling is a lifesaver for getting the loaf out without it breaking.
For the mixing, a large bowl and a sturdy silicone spatula are your best friends. You want to be able to fold the dry ingredients into the wet ones gently. If you have a sifter, use it for the cocoa, otherwise, you'll be hunting for cocoa powder lumps in your finished slices.
Bringing the Loaf Together

Let's get this moving. The first thing you'll notice is the aroma of the mashed bananas, which is sweet and heavy. As you add the cocoa, that smell shifts into something deeper and more earthy.
Phase 1: Prepping the Base
Preheat your oven to 350°F (175°C) and grease your 9x5 inch pan. Mash 3 medium overripe bananas (340g) in a bowl. You want them mostly smooth, but leaving a few small lumps adds a bit of rustic texture to the final bite.
Whisk in 1/2 cup melted butter (115g), 3/4 cup packed brown sugar (150g), 1 large room temperature egg, and 1 tsp vanilla extract (5ml). Stir until the mixture is cohesive. You'll see the sugar start to dissolve into the butter, creating a glossy, caramel colored base.
Phase 2: Incorporating Dry Ingredients
Sift 1 cup all purpose flour (125g), 1/2 cup unsweetened cocoa powder (45g), 1 tsp baking soda (5g), and 1/2 tsp salt (3g) directly into the bowl. Now, this is the part where you have to be gentle. As Serious Eats often emphasizes, overworking the flour develops too much gluten, which makes the bread tough.
Using your spatula, fold the ingredients together just until the flour streaks disappear. Once it's combined, fold in 3/4 cup semi sweet chocolate chips (130g). The batter should be thick and velvety, with the chips evenly distributed.
Phase 3: The Bake and Cool
Pour the batter into your prepared pan and smooth the top. Slide it into the oven and bake for 55-65 minutes. Around the 40 minute mark, you'll start to smell that rich, buttery chocolate aroma filling the room.
Check for doneness by pressing the center lightly; it should spring back. Or, use a toothpick and make sure it comes out with a few moist crumbs but no raw batter. Let the loaf cool in the pan for 10 minutes before moving it to a wire rack.
Chef's Note: To get a really professional look, press a few extra chocolate chips into the top of the batter before baking. They'll melt into little pools of chocolate that look stunning.
Avoid These Common Pitfalls
The most common issue I see with Chocolate Banana Bread is the "sinking center." This usually happens because the oven door was opened too early or the baking soda was expired. If you peak too often, you let out the heat that's keeping the structure stable.
Why Your Loaf Stayed Gummy
If the center feels wet or gummy even after 60 minutes, it's usually due to too many bananas or underbaking. Bananas vary in size, so if your "medium" bananas were actually huge, you've added too much moisture.
| Problem | Root Cause | Solution |
|---|---|---|
| Gummy Center | Too much banana/Underbaked | Bake longer or use a kitchen scale |
| Dry Crumb | Overbaked/Too much flour | Check temp; use "spoon and level" method |
| Sunken Middle | Opened oven too early | Keep door closed until 45 mins in |
To Stop the Top from Burning
Sometimes the top gets dark too quickly because of the cocoa and sugar. If you notice the top is getting too dark but the center is still wobbly, just tent it with a piece of aluminum foil for the last 15 minutes. This shields the top while the heat continues to penetrate the middle.
The Banana Mash Secret
For the best texture, don't use a blender to mash your bananas. A fork or a potato masher is better because it leaves those tiny chunks that create little pockets of moisture throughout the loaf.
Common Mistakes Checklist:
- ✓ Using cold eggs (causes the butter to seize)
- ✓ Overmixing the batter (results in a tough, rubbery loaf)
- ✓ Using a pan that is too large (leads to a flat, overbaked bread)
- ✓ Skipping the sifting of cocoa (leaves bitter lumps in the bread)
- ✓ Not letting the loaf cool before slicing (causes the bread to tear)
Adjusting Your Batch Size
If you're just baking for yourself, you can easily scale this down. For a half batch, use 1.5 bananas and half of everything else. Since you can't easily half an egg, beat one egg in a cup and use about 2 tablespoons of it. Use a smaller loaf pan and reduce the bake time by about 20%.
If you're feeding a crowd, you can double the recipe. However, don't just double the salt and baking soda increase those to about 1.5x to avoid a metallic taste. I recommend baking two separate loaves rather than one giant one, as the middle will struggle to cook through.
If you're turning these into chocolate banana bread muffins, just grease a muffin tin and bake for 18-22 minutes. They're great for meal prep and much faster than the full loaf.
Busting Baking Tales
You'll often hear that you should use a specific brand of butter for the best taste. Honestly, don't even bother with the super expensive stuff unless you love the flavor; any unsalted butter works because the cocoa and banana are the real stars here.
Another myth is that adding more bananas always makes the bread moister. In reality, too many bananas can make the loaf too heavy to rise, leading to that dreaded gummy center we talked about earlier. Stick to the 340g weight for the best results.
Some people think you need to cream the butter and sugar for 5 minutes. For a quick bread like this, melting the butter is actually better. It creates a denser, fudgier texture that feels more like a brownie than a cake.
Storing and Zero Waste
Once your Chocolate Banana Bread has cooled completely, wrap it tightly in plastic wrap or store it in an airtight container. It stays lush and moist on the counter for about 2 days, but I prefer keeping mine in the fridge for up to 5 days to keep the chocolate chips from softening too much.
If you want to save it for later, this loaf freezes beautifully. Slice it first, then freeze the slices individually with parchment paper in between. When you want a piece, just pop it in the toaster or microwave for 20 seconds, and it tastes like it was just baked.
As for zero waste, don't throw away those banana peels if you're feeling adventurous. You can freeze them and add them to a compost bin, or even simmer them to make a banana peel tea, which some say helps with sleep. Also, if you have leftover cocoa powder, use it to dust the top of your morning yogurt.
The Best Pairing Ideas
Because this loaf is so rich, it pairs best with something that cuts through the sweetness. A sharp, cold glass of milk is the classic choice, but if you're looking for something a bit more grown up, a strong black coffee is a winner.
If you want a real treat, I highly recommend serving a toasted slice of this bread alongside a homemade mocha latte. The espresso in the coffee brings out the darker notes of the cocoa in the bread.
For those who love a variety of treats, these slices go great with a side of fresh raspberries or sliced strawberries. If you're in the mood for more baked goods, you might also love some spiced pumpkin muffins for a cozy autumn vibe.
Anyway, that's the secret to a decadent Chocolate Banana Bread. It's simple, honest, and tastes like a million bucks. Now, go find those old bananas on your counter and get baking!
Recipe FAQs
Which bananas are best for this recipe?
Use overripe bananas with brown spots. These are the sweetest and easiest to mash, providing the best flavor and moisture.
How to tell when the banana bread is fully baked?
Press the center lightly with your finger. The loaf is done when the center springs back and a toothpick inserted into the middle comes out clean.
Can I use milk chocolate instead of semi sweet chips?
Yes, milk chocolate is a great alternative. It results in a sweeter, creamier flavor profile. If you enjoy these rich chocolate combinations, you might also love our almond toffee.
Is it true that over mixing the batter always results in a failed loaf?
No, this is a common misconception. While over mixing can make the bread tougher, gently folding the ingredients until just combined ensures a tender crumb without ruining the loaf.
How to store the bread to keep it moist?
Wrap the cooled loaf tightly in plastic wrap. Store it in an airtight container for 2 days on the counter or up to 5 days in the fridge to keep the chocolate chips firm.
Can I freeze chocolate banana bread for later?
Yes, it freezes very well. Slice the loaf first and separate pieces with parchment paper so you can reheat individual slices in the toaster or microwave.
Why did my banana bread turn out too dense?
Avoid over mixing the batter once the flour is added. Use a spatula to gently fold the ingredients together until no streaks of flour remain to keep the texture light.
Chocolate Banana Bread