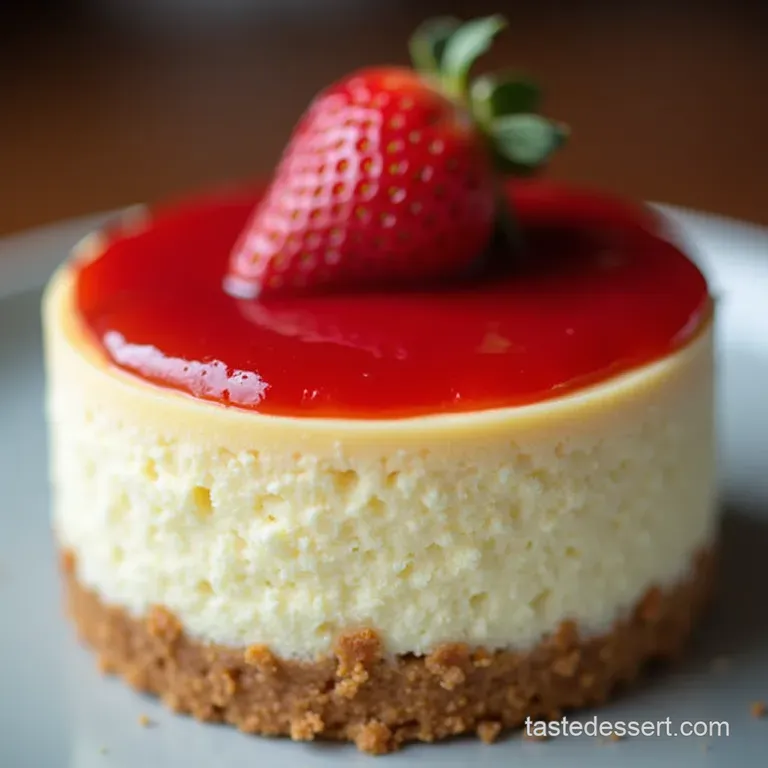
The Golden Crumb Classic New York Cheesecake with Silky Strawberry Topping
- Unveiling the Creamiest Showstopper: Why This Strawberry Cheesecake Reigns Supreme
- The Blueprint for Perfection: Achieving Classic New York Texture
- Assembling Your Arsenal: Essential Components for Superior Flavor
- Mapping Out the Components: Base, Filling, and Fruity Crown
- The Construction Phase: Step-by-Step Assembly of Your Strawberry Cheesecake with Strawberry Topping
- Baking Secrets: Techniques to Prevent Cracks and Ensure Creaminess
- Post-Bake Protocol: Perfecting the Chill and Setting Time
- Elevating Your Dessert: Serving Suggestions and Creative Twists
- Troubleshooting and Longevity for Your Masterpiece
- Recipe FAQs
- 📝 Recipe Card
Unveiling the Creamiest Showstopper: Why This Strawberry Cheesecake Reigns Supreme
There are desserts, and then there is the legendary cheesecake. When crafted correctly, it transcends simple sweet indulgence; it becomes an experience. Today, we are diving deep into the architecture of a truly spectacular bake: the Strawberry Cheesecake with Strawberry Topping .
Forget those flimsy, supermarket sponges; this recipe aims squarely for that classic, velvety New York style texture, harmoniously balanced by a vibrant, slightly tart homemade strawberry compote.
This isn't just another entry in the book of Yummy Cheesecake Recipes ; it’s the blueprint for a showstopper, perfect for any occasion where you need a dessert that genuinely impresses.
It’s rich, it’s complex, and when executed with care, it delivers a textural perfection that is simply unmatched.
The Blueprint for Perfection: Achieving Classic New York Texture
Crafting a Delicious Cheesecake involves respecting a few non-negotiable rules, primarily concerning temperature and mixing technique. This specific Recipe Cheesecake is classed as medium difficulty, not because the ingredients are hard to source, but because the final bake requires patience.
We are aiming for a dense, smooth interior the hallmark of a great bake rather than a light, airy cake. The preparation time is manageable, requiring about 45 minutes of active work before the crucial chilling time begins, yielding 12 generous slices ready to dazzle your guests.
Beyond the Ordinary: Defining Our Signature Richness
What sets this apart from standard recipes is the dual approach to richness and brightness. The filling relies heavily on full fat cream cheese a non-negotiable for that signature density but we balance this weight with the inclusion of either full fat crème fraîche or sour cream.
This dairy addition introduces a gentle acidity that prevents the final product from tasting flat or overly sweet. On top of that,, the subtle addition of lemon zest acts as a high note, lifting the entire flavour profile, ensuring that every bite of this Cheesecake With Strawberries feels both decadent and fresh.
Setting the Stage: Essential Prep Before You Begin Baking
Success begins before the oven is even on. It is absolutely vital that your 900g of cream cheese, four large eggs, and the cup of sour cream are brought fully up to room temperature. Cold ingredients simply refuse to emulsify smoothly, leading to lumps that are nearly impossible to remove later.
Have your 9 inch springform pan ready, and gather the heavy duty aluminium foil required for the water bath a technique that cannot be skipped if you wish to avoid fissures on the surface.
Flavor Profile Deep Dive: The Zest and Sweet Balance
The overarching flavour goal here is harmony. The filling achieves deep sweetness from 1 ½ cups of granulated sugar, which is then critically cut by the one teaspoon of fresh lemon zest and the tang from the sour cream.
This foundation is designed to cradle the star: the Strawberry Cheesecake Strawberry Topping Recipe . The topping itself is intentionally slightly tart, utilizing just ½ cup of sugar for 450g of strawberries, ensuring that when layered over the creamy base, the resulting flavour explosion is balanced rich, sweet, and vividly fruity.
Assembling Your Arsenal: Essential Components for Superior Flavor
A master baker is only as good as their ingredients and tools. For this sublime experience, every component plays a specific structural or flavour role, from the base structure to the glossy finish of the fruit layer.
Mapping Out the Components: Base, Filling, and Fruity Crown
The three structural pillars of this dessert are the crust, the velvety body of the cake, and the vibrant sauce poured over the top. Understanding the precise make-up of each allows you to troubleshoot or even substitute wisely should you need to adapt this recipe.
The Foundation: Perfect Ratios for the Crisp Digestive Crust
We start with a crisp foundation using 200g of finely crushed digestive biscuits (or graham crackers if you prefer the American standard). These are mixed simply with 100g of melted unsalted butter and 2 tablespoons of sugar.
This ratio ensures the crust binds tightly, offering the necessary structural integrity to support the heavy filling. We pre-bake this base for a brief 10 minutes at 350° F ( 175° C) to set the fats and toast the crumbs, providing that satisfying snap against the creamy interior.
Cream Cheese Mastery: Selecting Dairy for Unmatched Smoothness
When sourcing your dairy for the filling, reject anything labelled "low-fat." True New York style density demands full fat cream cheese 900g in total. The incorporation process must be gentle; beat the cheese until silken smooth before adding any sugar.
Once the sugar is in, follow with the sour cream, vanilla, and lemon zest. The secret weapon for structure here is the 2 tablespoons of all-purpose flour folded in last; it acts as a stabilizer, minimizing the notorious tendency of cheesecake to crack.
The Topping Trio: Preparing Fresh Berries and Setting Agents
The Strawberry Topping is cooked down from 450g of fresh or frozen strawberries, ½ cup of sugar, and a little water. The key to transforming this mixture into a glossy sauce that sits perfectly atop the cake, rather than bleeding messily into it, lies in the cornflour slurry.
Mixing one tablespoon of cornflour with two tablespoons of cold water creates a precise thickening agent that achieves that desirable, luscious sheen when simmered with the fruit.
Crucial Tools: Equipment That Guarantees Success
While you can manage with basic bowls and whisks, achieving the perfect texture for this No Bake Strawberry Cheesecake with Strawberry Topping (though we are baking it) is significantly easier with the right gear. The 9 inch springform pan is essential for clean release.
However, the most critical piece of equipment is a large roasting pan to accommodate the water bath a barrier against excessive dry heat that protects the delicate custard filling.
Related Recipes Worth Trying
- Heirloom Tomato Salad with Whipped Feta Basil Vinaigrette — Ditch the dull salads This Heirloom Tomato Summer Salad uses creamy whipped feta and a bright basil dressing for an easy summer dinner upgrade
- Foolproof oven-roasted Beef Tenderloin with Mushroom Sauce — Tackle that beautiful beef tenderloin This recipe nails the perfect roast and pairs it with an easy rich mushroom sauceideal for any fancy Christmas menu...
- The Proper Job Classic Apple Crisp Recipe Buttery Oat Topping — The foolproof recipe for a truly classic Apple Crisp with oats Juicy spiced apples under a deeply satisfying buttery crumble topping Perfect comfort food
The Construction Phase: step-by-step Assembly of Your Strawberry Cheesecake with Strawberry Topping

Once all components are prepared, assembly is wonderfully straightforward. After the 10-minute pre-bake of the base, you must meticulously wrap the exterior of the springform pan with at least two heavy layers of aluminium foil. This protects the crust from the boiling water bath.
The filling is then gently poured over the cooled base. Remember, the goal is to introduce as little air as possible, so mixing on low speed once the eggs are added is paramount. Pour the batter into the prepared pan, place that pan inside the roasting tin, and only then proceed to the baking stage.
Baking Secrets: Techniques to Prevent Cracks and Ensure Creaminess
The baking process is where most beginners encounter issues, usually resulting in a sunken, cracked surface. We combat this with precise temperature management and the essential use of moist heat.
Crafting the Golden Crumb Base: Pressing and Pre-Baking
As mentioned, the base is pressed firmly into the base of your springform pan, ensuring an even layer. After its initial 10-minute bake at 350° F ( 175° C), allow it to cool slightly on a wire rack while you prepare the batter.
This cooling step prevents the hot crust from immediately cooking the bottom layer of your delicate filling once assembled.
Whipping the Velvety Filling: Gentle Mixing is Key
When combining your ingredients, especially after adding the four eggs and the extra yolk, your mixer speed should be kept low. Mix only until the batter is homogenous and streak free.
Any vigorous beating incorporates air bubbles; these bubbles expand during baking, leading to a rapid rise followed by an inevitable, disappointing collapse and crack upon cooling.
The Water Bath Whisper: Creating the Ideal Moist Baking Environment
This step is the secret to achieving that incredibly smooth, creamy texture characteristic of the best Strawberry Cheesecake with Strawberry Sauce . Pour boiling water into the larger roasting pan after it contains the foil wrapped cheesecake, filling it about halfway up the sides.
The steam generated insulates the sides of the cake, allowing it to bake slowly and evenly like a true custard, preventing the edges from setting faster than the centre.
Simmering the Sauce: Developing the Bright, Glossy Strawberry Finish
While the cake bakes, focus on your Strawberry Topping . Simmer the chopped berries, sugar, and water until the fruit softens about 10 minutes.
Incorporate the cornflour slurry gently; continue stirring until the mixture thickens noticeably and achieves a beautiful, high gloss finish. Remove this from the heat immediately, stir in the fresh lemon juice, and let it cool completely before deployment.
Post Bake Protocol: Perfecting the Chill and Setting Time
The cooling process after baking is arguably as important as the bake itself. Once the 60– 70 minutes are up and the centre wobbles just slightly, turn the oven off.
Prop the door open slightly using a wooden spoon works perfectly and allow the cheesecake to sit in the cooling oven for one full hour. This slow transition mitigates temperature shock.
After the oven cool, transfer the cheesecake (still in the water bath setup, initially) to the counter to reach room temperature. Only then should it move to the refrigerator for a minimum of six hours, though overnight chilling produces superior structure.
Elevating Your Dessert: Serving Suggestions and Creative Twists
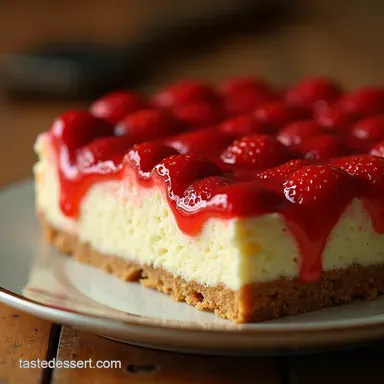
Once fully chilled and firm, you can confidently release the springform ring. Before serving this stunning Strawberry Cheesecake with Strawberry Topping , consider a final garnish: a light dusting of powdered sugar or a few perfectly sliced, fresh strawberries placed artfully around the edges.
For a pairing suggestion, a slightly sweet, sparkling Moscato d'Asti complements the richness wonderfully, or for a non-alcoholic option, strong, dark filter coffee provides a lovely counterpoint.
Troubleshooting and Longevity for Your Masterpiece
Even with the best intentions, things can occasionally go slightly awry. Knowing how to manage cooling and storage ensures your efforts result in long lasting enjoyment.
The Long Rest: Why Gradual Cooling Matters for Texture
The necessity of gradual cooling stems from physics: rapid temperature change causes the proteins and fats in the custard to contract too quickly, leading to shrinkage and cracks. By leaving it in the cooling oven, you allow the internal temperature to drop slowly, ensuring the structure sets uniformly and remains intact.
Variations on a Theme: Incorporating Other Summer Fruits
This template works beautifully for many summer berries. Feel free to swap out half the strawberries for raspberries or blueberries in the topping. For a stunning visual effect in the filling, try swirling in ½ cup of the strawberry sauce into the last cup of cheesecake batter before pouring it over the base; this creates a lovely pink swirl throughout the slice.
Maximizing Enjoyment: Optimal Storage Guidelines
Because this is such a rich dessert, proper storage is key to maintaining its integrity. Store leftovers tightly covered in the refrigerator. It keeps beautifully for up to five days.
If you wish to freeze portions, it is best to chill it completely first, slice it, and then freeze the individual slices wrapped tightly in plastic wrap followed by foil to prevent freezer burn and moisture loss.
Nutritional Snapshot: Understanding the Indulgence
Let's be honest; this is a treat. An estimated slice contains between 550 to 600 calories, reflecting the high concentration of full fat dairy and butter required for this classic texture. It is rich in fat (around 35g per slice) and contains approximately 55g of carbohydrates.
Enjoying this quintessential summer dessert is best done mindfully, savouring every creamy, fruity bite!

Recipe FAQs
My cheesecake always cracks! How can I stop my Strawberry Cheesecake with Strawberry Topping from looking like the Sahara Desert?
Ah, the dreaded crack a real baker's bugbear! The main culprit is rapid temperature change, so we need a gentle handover. Ensure all your dairy is room temperature, don't over mix the eggs (that adds air bubbles), and crucially, cool the cheesecake gradually inside the turned off oven with the door ajar.
Patience is key here!
Can I make the strawberry topping ahead of time, or does it have to be fresh?
You absolutely can prepare the silky strawberry topping in advance; in fact, it’s better if it’s chilled for a few hours so it sets nicely. It will keep perfectly well in an airtight container in the fridge for up to three days.
Just make sure it is completely cool before pouring it over your set cheesecake, or it’ll make the surface runny!
The recipe calls for a water bath (bain marie); is that really necessary for this bake?
Yes, if you want that famously creamy, New York style texture, the water bath is non-negotiable. It acts like a natural thermostat, surrounding the cheesecake with gentle, moist heat. This prevents the edges from setting too quickly before the centre, resulting in that even, velvety smooth finish we’re after.
How long does this Strawberry Cheesecake keep, and can it be frozen?
Stored properly in the fridge, the full cheesecake will be splendid for about 4 to 5 days. If you want to freeze it, do so without the strawberry topping slice it first, wrap each piece well in cling film and foil, and it’ll be good for up to two months.
Thaw overnight in the fridge, then add your topping just before serving.
My cream cheese felt a bit lumpy when mixing; will this affect the final result?
Lumps are the enemy of a flawless bake, old bean! If you catch them early, you can push the batter through a fine mesh sieve before adding the eggs. If you don't catch them, those lumps can sometimes turn grainy after baking, so always make sure that cream cheese is completely soft and fully beaten on its own first it's worth the extra minute!
Classic Strawberry Cheesecake
Ingredients:
Instructions:
Nutrition Facts:
| Calories | 554 kcal |
|---|---|
| Protein | 5.9 g |
| Fat | 14.1 g |
| Carbs | 56.4 g |
| Fiber | 2.6 g |
| Sodium | 88 mg |
