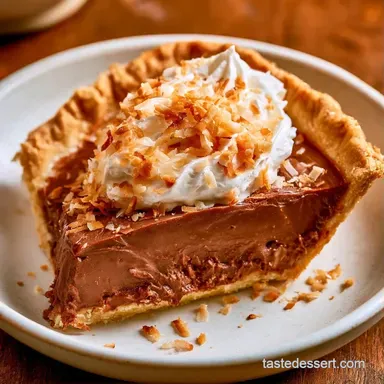
Coconut Chocolate Pie with Graham Cracker Crust

- Time: 30 min active + 20 min baking + 4 hours chilling
- Flavor & Texture: Decadent cocoa with a crisp, buttery crust
- Perfect for: Make-ahead dinner party desserts
You don't need a professional stabilizer or gelatin to get a clean slice, because the combination of cornstarch and coconut milk creates a natural, firm set when chilled. This eliminates the need for complex additives.
This coconut chocolate pie is a wonderful blend of textures. You get a shattering graham cracker base, a dense cocoa center, and a cloud of whipped cream.
It's a great option for anyone who wants a decadent result without spending hours at the stove. The prep is quick, and the fridge does most of the heavy lifting.
Coconut Chocolate Pie
Cornstarch Boil: Heating the mixture to a full boil activates the starch granules, which then thicken the liquid into a stable gel. Fat Ratios: The high fat content in full-fat coconut milk and semi-sweet chocolate creates a dense, fudge-like consistency.
| Crust Method | Time | Texture | Best For |
|---|---|---|---|
| Baked | 10 mins | Toasty and crisp | Maximum stability |
| No-Bake | 0 mins | Softer and buttery | Quick assembly |
Recipe Specs
Timing the cooling process is key. The filling needs to be fully set before you add the cream, otherwise the residual heat from the chocolate will melt your topping. If time allows, I recommend chilling it overnight.
The toasted coconut adds a welcome touch of nuttiness. It balances the deep chocolate flavors and gives the dessert a more authentic, homemade feel.
What You'll Need
The coconut milk provides the creamy structure, while the cocoa powder adds a deep, slightly bitter edge to balance the sugar. For the crust, the salt is important to keep the butter and sugar from tasting one-dimensional.
Crust
- 1½ cups graham cracker crumbs
- 6 tbsp unsalted butter, melted
- 2 tbsp granulated sugar
- ¼ tsp salt
Filling
- 2 cups full-fat coconut milk (canned) Why this? High fat content ensures a thick, stable set
- ½ cup unsweetened cocoa powder
- ¾ cup granulated sugar
- 3 tbsp cornstarch Why this? Essential for thickening the filling
- ¼ tsp salt
- 1 tsp vanilla extract
- 4 oz semi-sweet chocolate, finely chopped
Topping
- 1 cup heavy whipping cream, chilled
- 3 tbsp powdered sugar
- ½ tsp vanilla extract
- ½ cup unsweetened shredded coconut, toasted
| Original Ingredient | Substitute | Why It Works |
|---|---|---|
| Heavy Cream (1 cup) | Coconut Cream (1 cup) | Similar fat content. Note: Makes it vegan if you swap the butter too |
| Graham Crackers | Digestive Biscuits | Similar texture and saltiness |
Essential Kitchen Tools
You'll need a 9-inch pie dish for the base. A medium saucepan is necessary for the filling, and a whisk is the only way to keep the cocoa from clumping.
For the cream, use a hand mixer and a chilled metal bowl. Cold equipment helps the cream hold air better, which gives you those stiff peaks.
How to Make It
Pressing the Crust
Set your oven to 350°F (180°C). In a mixing bowl, stir together the graham cracker crumbs, melted butter, 2 tbsp granulated sugar, and ¼ tsp salt. Pack the mixture tightly across the base and along the edges of a 9-inch pie plate.
Bake for 8–10 minutes until it smells like toasted biscuits, then take it out and allow the crust to cool entirely.

Simmering the Chocolate Filling
Using a medium saucepan, whisk the cocoa powder, ¾ cup granulated sugar, cornstarch, and ¼ tsp salt. Slowly pour in the coconut milk, whisking the whole time to ensure there are no lumps.
Place the pan over medium heat, stirring constantly. Cook until the mixture thickens and reaches a boil, letting it bubble for about 1 minute. The consistency should resemble a glossy, thick pudding.
Take the pan off the burner. Blend in the vanilla extract and chopped semi-sweet chocolate until the filling is smooth. Pour this mixture into the cooled crust and level the top with a spatula.

Whipping the Topping
Let the pie set in the refrigerator for a minimum of 4 hours. Using a chilled bowl, beat the heavy whipping cream, powdered sugar, and ½ tsp vanilla extract with a hand mixer until stiff peaks form.
Carefully spread the whipped cream over the cooled chocolate filling. Finish by sprinkling toasted shredded coconut over the top before serving.

When It Does Not Turn Out
Fixing a Runny Filling
If the filling doesn't hold its shape, it likely didn't reach a full boil. The cornstarch needs that heat to activate. You can gently reheat the filling on the stove, whisking constantly, until it bubbles for one minute, then pour it back into the crust.
Preventing Grainy Chocolate
Graininess happens when the chocolate is added to a liquid that is too hot or not stirred enough. Remove the pan from the heat before adding the chopped chocolate. Stir slowly until the residual heat melts the pieces into a silky finish.
Avoiding Soggy Crusts
A soggy bottom usually comes from pouring hot filling into a warm crust. Let the crust cool completely after baking. Also, make sure you press the crumbs firmly into the pan to create a tight seal.
Customizing the Flavors

To make a Vegan coconut chocolate pie, substitute the butter in the crust with coconut oil and use a dairy-free whipped topping. Make sure the chocolate you choose is dairy-free as well. For a completely plant-based treat, replace the heavy whipping cream with a non-dairy version.
For a bolder cocoa taste, swap the semi-sweet chocolate for 70% dark chocolate, which offers a more sophisticated, less sugary profile. I find that stirring in a bit of espresso powder helps intensify the chocolate flavor.
Storing and Keeping Fresh
Store the pie in the refrigerator, covered with a pie dome or plastic wrap. It will stay fresh for up to 4 days. The whipped cream remains stable, although the crust might soften a bit.
For longer storage, freeze the unfrosted pie for up to 2 months. Let it defrost in the fridge overnight. Just before serving, add the toasted coconut and fresh whipped cream to ensure the best texture.
Perfect Complements
Because this treat is quite indulgent, I suggest pairing it with a bright flavor. A few fresh raspberries or a tangy passionfruit coulis balance the richness of the coconut cream perfectly.
For a group gathering, a cup of bold black coffee or an unsweetened espresso is the ideal choice. The coffee's bitterness highlights the chocolate notes without introducing more sugar to the dish.
Good to Know
Can this be made in an old-fashioned style?
Yes, this recipe follows a classic cream pie format. It combines a traditional baked crust with a cooked coconut-chocolate custard filling.
Is it simple for beginners to make?
Yes, it is accessible. Most of the process involves basic whisking and stirring the filling over medium heat.
Does the recipe use cocoa powder?
Yes, it does. Unsweetened cocoa powder is whisked with sugar and cornstarch to create the chocolate base.
Would using condensed milk work here?
No, stick to the listed ingredients. Using condensed milk would significantly alter the sweetness and thickness of the coconut milk filling.
Is a no-bake version possible?
Yes, but it changes the texture. A no-bake version would omit the baked crust and the cooked custard step, though this specific recipe requires baking and boiling for stability.
How to store the pie?
Store in the refrigerator under plastic wrap or a pie dome. It will keep for 4 days.
Why didn't the filling thicken properly?
It likely didn't reach a full boil. The mixture must bubble for about 1 minute to ensure the cornstarch activates and stabilizes the pie.
Could the crust be made ahead?
Yes, bake it in advance. Once the crust is cooled completely, it is ready for the filling.
Coconut Chocolate Pie with Coconut Milk