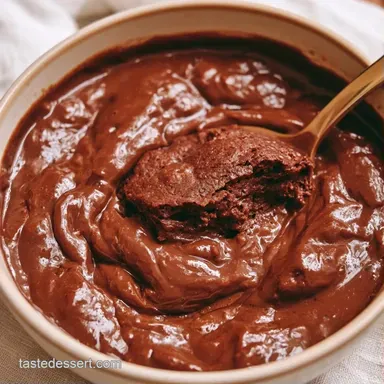
Self Saucing Chocolate Pudding Cake

- Time: 10 min active + 30 min baking + 5 min resting
- Flavor & Texture: Rich, spongy cake with a glossy, fudge-like sauce
- Perfect for: A cozy weeknight treat or a low-stress dinner party dessert
Imagine the smell of bubbling cocoa filling the room and the sound of a spoon cracking through a light sponge into a pool of warm fudge. It's the kind of dessert that feels fancy but actually happens almost entirely on its own in the oven.
Making this chocolate pudding is a great way to get a high-end result without spending hours in the kitchen. Every bite of this chocolate pudding gives you that contrast of a fluffy cake top and a rich, liquid bottom.
It's decadent, comforting, and doesn't require any complicated equipment. You just mix, pour, and wait for the magic to happen.
The Trick Behind the Texture
- Layering: Placing dry sugar and cocoa on top of the batter and adding boiling water forces the sauce to sink. This creates two distinct layers as the cake rises.
- Boiling Water: The heat blooms the cocoa powder instantly. This helps the sauce stay smooth and dissolve the sugar, which reduces grit.
| Method | Time | Texture | Best For |
|---|---|---|---|
| Oven-Baked | 45 mins | Spongy cake, deep sauce | Family dinner |
| Microwave | 5 mins | Dense, lava-cake style | Single serving |
Recipe Specs
I like this dish served warm in individual bowls with a cold scoop of vanilla bean ice cream to cut through the richness.
Ingredients and Swaps
| Ingredient | Purpose | Alternative |
|---|---|---|
| All-purpose flour | Structural base | Refer to substitution table |
| Unsweetened cocoa | Main flavor | Dutch-process cocoa |
| Baking powder | Leavening | Refer to substitution table |
| Boiling water | Sauce activator | Very hot tap water |
- 1 cup (125g) all-purpose flour
- 3/4 cup (150g) granulated sugar
- 3 tbsp (22g) cocoa powder, unsweetened
- 1 tsp (5g) baking powder
- 1/4 tsp (1.5g) salt
- 1/2 cup (115g) melted unsalted butter, cooled Why this? For a richer, more tender crumb
- 3/4 cup (180ml) whole milk
- 1 tsp (5ml) vanilla extract
- 1/2 cup (100g) packed light brown sugar
- 2 tbsp (14g) cocoa powder, unsweetened
- 1 1/4 cups (300ml) boiling water Why this? Dissolves the topping into a sauce
| Original Ingredient | Substitute | Why It Works |
|---|---|---|
| Whole Milk (3/4 cup) | Almond Milk (3/4 cup) | Similar liquid volume. Note: Less creamy result |
| Unsalted Butter (1/2 cup) | Coconut Oil (1/2 cup) | Comparable fat profile. Note: Adds a touch of coconut flavor |
| All-purpose Flour (1 cup) | gluten-free Blend (1 cup) | Works if the blend already contains xanthan gum. Note: May produce a denser crumb |
Equipment Needed
You only need a few basics for this. A large mixing bowl, a whisk, and an 8-inch (20cm) round baking dish. Using a ceramic or glass dish helps distribute the heat evenly.
Bringing It Together
Phase 1: Preparing the Batter
- Set the oven to 350°F (180°C) and lightly grease an 8-inch (20cm) round baking pan with butter.
- Combine 1 cup (125g) all-purpose flour, 3/4 cup (150g) granulated sugar, 3 tbsp (22g) unsweetened cocoa powder, 1 tsp (5g) baking powder, and 1/4 tsp (1.5g) salt in a mixing bowl, whisking until no clumps remain.
- Mix in 1/2 cup (115g) of melted and cooled unsalted butter, 3/4 cup (180ml) whole milk, and 1 tsp (5ml) vanilla extract. Stir until the batter is thick and smooth, taking care not to overmix. Note: Overmixing makes the cake tough

- Pour the batter into the greased pan and spread it evenly.
Phase 2: Creating the Sauce Layer
- In a small bowl, blend 1/2 cup (100g) light brown sugar with 2 tbsp (14g) unsweetened cocoa powder.
- Sprinkle this brown sugar and cocoa mixture evenly across the top of the uncooked batter, without stirring.

- Gently pour 1 1/4 cups (300ml) boiling water over the back of a spoon onto the sugar layer to avoid disturbing the batter below.
Phase 3: The Bake
- Bake for 30 minutes until the sponge on top springs back slightly and the edges are bubbling with sauce.

- Take the pan out of the oven and let it rest for 5 minutes to allow the sauce to thicken slightly before serving.
Pro Tips and Pitfalls
Fixing a Watery Sauce
This happens if the oven is too cool or you pulled the dish out too early. Let it rest for an extra 10 minutes, as the sauce thickens as it cools. If it's still too thin, ensure your oven is fully preheated next time.
Fixing a Dense Sponge
If the top is heavy or doesn't rise, you might have overmixed the batter. Stir only until the flour disappears. Also, check that your baking powder isn't expired, as that's the only thing providing the lift.
Fixing a Grainy Texture
Grainy sauce usually means the sugar didn't dissolve. Using boiling water is key here. If you're using a very coarse brown sugar, whisk it with the cocoa powder thoroughly before sprinkling.
| Add-in | Amount | Impact |
|---|---|---|
| Espresso Powder | 1 tsp | Deepens the chocolate flavor |
| Sea Salt | Pinch | Balances the sweetness |
| Dark Chocolate Chips | 1/4 cup | Adds pockets of melted chocolate |
Serving Suggestions

I enjoy topping this with a scoop of chilled whipped cream or some fresh raspberries. The fruit's acidity balances the sugar, while the cool cream offers a velvety contrast to the hot sauce.
Storing Leftovers
Keep leftover chocolate pudding in a sealed glass dish in the refrigerator for up to 3 days. Since this dish is best enjoyed warm, microwave individual portions for 30 to 60 seconds. The sauce will become fluid again once it hits the heat.
Creative Twists and Swaps
You can vary this recipe by adding a teaspoon of instant espresso powder to the batter, which makes the chocolate taste more intense. For a different kind of cozy dessert, you might like a sticky toffee pudding recipe, which uses dates for a deeper, caramel-like flavor.
If you want something lighter, try using 2% milk instead of whole milk. It won't change the structure, though the sauce will be slightly less rich. For a deeper color, use Dutch-processed cocoa, which provides a darker, more alkaline flavor profile.
Questions Readers Ask
What is self-saucing pudding?
It is a cake that creates its own sauce at the bottom during the baking process.
Tip: do not stir the topping into the batter or the sauce will not form.
Can this dessert be made in a microwave?
Yes, though it cooks much faster and results in a softer texture than oven-baked versions.
Tip: use microwave-safe mugs for individual portions.
Is it possible to bake these in individual cups?
Yes, this allows for single-serving portions and slightly faster cook times.
Tip: divide the batter and toppings proportionally across the cups.
How do I avoid mixing the water into the batter?
Pour the boiling water slowly over the back of a spoon.
Tip: this breaks the fall of the liquid to keep the layers separate.
Where do I store the leftovers?
Keep leftovers in a sealed glass dish in the refrigerator for a maximum of 3 days.
Tip: microwave portions for 30 to 60 seconds to liquefy the sauce.
Why is boiling water required for the sauce?
The heat helps dissolve the sugars and cocoa instantly to create a smooth syrup.
Tip: use a kettle to ensure the water is fully boiling before pouring.
Does this recipe offer a simple way to make self-saucing pudding?
Yes, it uses basic pantry ingredients and a simple pour-over method.
Tip: follow the order of layers exactly to ensure the sauce forms.
When is the pudding ready to come out of the oven?
Remove it when the top sponge springs back and the edges are bubbling.
Tip: let it stand for 5 minutes so the sauce can thicken slightly.
Self Saucing Chocolate Pudding