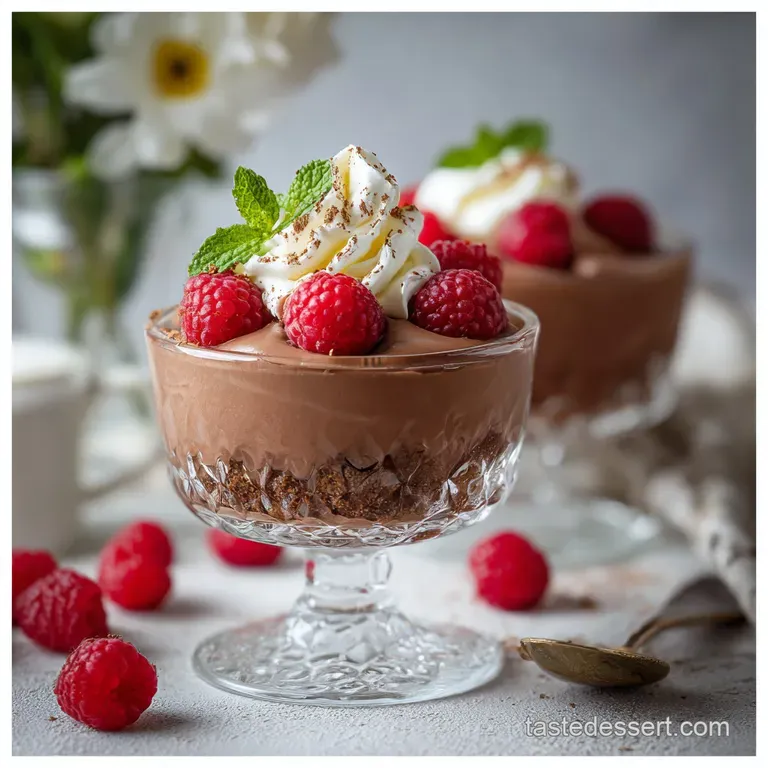
Chocolate Parfait: Espresso Whipped Dream
- Time: Active 15 minutes, Passive 1 hour, Total 1 hours 15 mins
- Flavor/Texture Hook: A shatter crisp cookie foundation topped with glossy, mahogany pudding and airy vanilla clouds.
- Perfect for: Last minute dinner parties or a high reward weeknight indulgence.
- Create a Truly Indulgent Chocolate Parfait for Your Next Gathering
- Breaking Down the Essential Time and Texture Requirements
- Selecting the Best Elements for Your Decadent Cocoa Layers
- Essential Kitchen Tools for Success Without Using Fancy Gadgets
- Bringing It All Together for the Ultimate Sweet Finish
- How to Avoid Mistakes and Fix Common Layering Issues
- Creative Ways to Customize Your Dessert for Any Occasion
- Debunking Common Kitchen Myths
- Smart Guidelines for Chilling and Storing Your Extra Servings
- Finding the Perfect Accompaniments for Your Rich Cocoa Dessert
- Recipe FAQs
- 📝 Recipe Card
Create a Truly Indulgent Chocolate Parfait for Your Next Gathering
The first time I made a Chocolate Parfait, it was a total fluke. I had a box of instant pudding, some leftover heavy cream, and a bag of Oreos that had seen better days. I remember the rhythmic "thwack thwack thwack" of the rolling pin hitting the cookies on my wooden cutting board.
I wasn't expecting much, but as I layered the glossy, mahogany cream over the buttery crumbs, something clicked. The kitchen smelled like a mix of dark cocoa and toasted butter, and I knew I was onto something far better than a basic pudding cup.
It is all about the contrast. You want that velvety, tongue coating chocolate to play against a crust that actually has some bite to it. Most people just toss crumbs in a glass, but we are going to use a pinch of sea salt and a touch of melted butter to turn those crumbs into a legitimate foundation.
It is the kind of dessert that makes people go quiet after the first bite because they are too busy enjoying the way the cold cream melts against the crunch.
We’ve all been there staring at a recipe that requires twelve bowls and a blowtorch. This isn't that. I’ve refined this method to use minimal tools so you can spend less time scrubbing and more time scraping the bottom of your glass.
We are taking the humble instant mix and giving it a professional glow up with a hit of espresso that makes the chocolate taste ten times darker than it actually is. Trust me, once you try this specific layering technique, you'll never go back to the store-bought plastic cups again.
Breaking Down the Essential Time and Texture Requirements
Fat Stable Aeration: Cold heavy cream allows fat globules to surround air bubbles, creating a structure that holds up the weight of the dense chocolate layers. When you fold this into the pudding, you're creating a stable mousse like suspension that won't weep or deflate for hours.
| Servings | Ingredient Adjustments | Glassware Size | Total Prep Time |
|---|---|---|---|
| 2 People | Use half quantities; beat 1/2 egg if needed | 6 oz Ramekins | 10 minutes |
| 4 People | Standard Schema quantities (listed below) | 8 oz Wine Glasses | 15 minutes |
| 8 People | Double everything; 1.5x on espresso/salt | 4 oz Mini Mason Jars | 25 minutes |
Choosing the right serving vessel is actually a functional decision, not just an aesthetic one. If you use a glass that is too wide, your layers will be thin and lose their visual impact.
A tall, narrow glass allows for multiple repetitions of the cookie pudding cream cycle, ensuring every spoonful has a bit of everything. If you are prepping this for a large crowd, mini jars are brilliant because they provide a built in "lid" for fridge storage.
Selecting the Best Elements for Your Decadent Cocoa Layers
The Science of the Velvety Fold
The secret lies in the temperature differential between the chilled milk and the ambient air. Using cold milk causes the starches in the instant mix to hydrate instantly, while the espresso powder provides a chemical bridge that enhances our perception of "roasted" notes in the cocoa.
| Ingredient | Science Role | Pro Secret |
|---|---|---|
| Whole Milk | Liquid Base | Use 2% in a pinch, but whole milk provides the necessary fat for a silky mouthfeel. |
| Espresso Powder | Flavor Catalyst | It doesn't make it taste like coffee; it intensifies the cacao’s natural fruitiness. |
| Heavy Cream | Structural Foam | Must be "Heavy" (36% fat) to achieve the stiff peaks required for distinct layering. |
| Sea Salt | Flavor Contrast | A tiny pinch suppresses bitterness and makes the sugar taste "rounder." |
When selecting your ingredients, don't skimp on the vanilla. A high-quality pure vanilla extract will provide a floral backnote that balances the intensity of the Oreo base. If you're looking to expand your chocolate repertoire, you might find the depth of flavor here is quite similar to the richness found in a Better Than Cadburys recipe.
Essential Kitchen Tools for Success Without Using Fancy Gadgets
- 2 Medium Mixing Bowls: One for the chocolate base and one for the whipped cream.
- Whisk or Hand Mixer: While a hand mixer is faster for the cream, a sturdy whisk works perfectly for the pudding.
- Plastic Zip top Bag: The easiest way to crush cookies without a food processor.
- Spatula: Essential for folding the cream without deflating it.
- Tall Glasses: 4 servings (8-10 oz each).
Ingredient List and Substitutions
- 2 cups cold whole milk: Why this? The fat content ensures the pudding sets with a creamy, non watery finish.
- Substitute: 2 cups of Oat milk (Full Fat version works best).
- 3.9 oz instant chocolate pudding mix: Why this? Provides the instant thickening power needed for a 15 minute dessert.
- Substitute: Homemade cornstarch based pudding (requires cooking and cooling).
- 0.5 tsp instant espresso powder: Why this? Acts as a flavor booster for the cocoa solids.
- Substitute: 1 tsp of very finely ground dark roast coffee.
- 1 cup heavy whipping cream, chilled: Why this? Creates the "cloud" layer that lightens the dense pudding.
- Substitute: high-quality frozen whipped topping (thawed).
- 2 tbsp powdered sugar: Why this? Dissolves instantly in cold cream without leaving a gritty texture.
- Substitute: 1.5 tbsp of granulated sugar (whisk longer to dissolve).
- 1 tsp pure vanilla extract: Why this? Rounds out the sweetness of the cream.
- Substitute: Vanilla bean paste for those beautiful black specks.
- 1 cup crushed Oreo cookies: Why this? The dark cocoa wafers provide a bitter sweet crunch.
- Substitute: Chocolate graham crackers or digestive biscuits.
- 2 tbsp unsalted butter, melted: Why this? Binds the crumbs and adds a rich, toasted flavor.
- Substitute: Melted coconut oil (adds a slight tropical note).
- 1 pinch sea salt: Why this? Essential for cutting through the sugar levels.
- Substitute: Table salt (use half the amount).
Bringing It All Together for the Ultimate Sweet Finish

- Prepare the cookie base. Place 1 cup of Oreos in a zip top bag and crush until they resemble coarse sand. Note: Leave a few pea sized chunks for extra texture.
- Bind the crumbs. Mix the crushed cookies with 2 tbsp of melted butter and a pinch of sea salt in a small bowl until the mixture looks like wet sand.
- Whisk the chocolate base. In a medium bowl, combine 2 cups cold milk, 3.9 oz pudding mix, and 0.5 tsp espresso powder. Whisk for 2 full minutes until the mixture thickens and looks glossy.
- Whip the cream. In a separate chilled bowl, beat 1 cup heavy cream, 2 tbsp powdered sugar, and 1 tsp vanilla until stiff peaks form.
- Test the peaks. Lift your whisk; the cream should stand straight up without drooping. Note: If it looks grainy, you've gone too far add a splash of liquid cream to fix it.
- Create the first layer. Divide half of the buttery cookie crumbs among the 4 glasses, pressing down lightly with a spoon.
- Add the chocolate layer. Spoon or pipe half of the chocolate pudding over the crumbs until the edges are sealed.
- Layer the cream. Add a generous dollop of the whipped cream over the pudding, smoothing it to the edges.
- Repeat the process. Add the remaining cookie crumbs, followed by the rest of the pudding.
- Final garnish. Top with the remaining whipped cream and a few reserved cookie crumbs until it looks like a professional café treat.
Chef's Tip: For the cleanest layers, put your pudding and whipped cream into gallon sized zip top bags and snip the corner. Piping the layers into the glass prevents smudges on the sides, giving you those sharp, distinct lines.
How to Avoid Mistakes and Fix Common Layering Issues
Why Your Layers are Merging
If your pudding and cream are blending into a muddy mess, your temperatures are likely off. If the pudding hasn't fully set before you add the cream, the weight of the cream will cause it to sink. Always ensure your milk is ice cold and give the pudding its full 2 minutes of whisking.
If it still feels soft, pop it in the fridge for 5 minutes before you start layering.
Rescuing Over Whipped Cream
It happens to the best of us one second it’s perfect, the next it looks like cottage cheese. This is the stage right before butter. To fix this, stop the mixer immediately. Pour in 1-2 tablespoons of fresh, un whipped heavy cream and gently fold it in with a spatula.
This will smooth out the graininess and bring back that velvety sheen.
| Problem | Root Cause | Solution |
|---|---|---|
| Gritty Cookie Base | Butter wasn't incorporated | Toss crumbs thoroughly until every piece is coated in melted butter. |
| Watery Pudding | Too much milk or low-fat milk | Reduce milk by 1/4 cup next time or use whole milk for better set. |
| Sinking Layers | Heavy cream was too soft | Whip cream to "stiff peaks" so it can support the weight of the pudding. |
The key to a visually striking dessert is patience during the layering process. Don't rush the spoons; let the layers settle naturally.
Common Mistakes Checklist:
- ✓ Using room temperature milk (pudding won't set firmly).
- ✓ Forgetting the salt in the cookie base (it will taste flat and overly sweet).
- ✓ Over crushing the cookies into a fine dust (you lose that satisfying "shatter" crunch).
- ✓ Using a bowl that is too small for whipping cream (it needs room to aerate properly).
- ✓ Skipping the espresso powder (the chocolate will lack complexity).
Creative Ways to Customize Your Dessert for Any Occasion
Scaling this recipe is incredibly straightforward because it relies on a standard box size. If you are cooking for a larger party (8-10 people), don't simply double the spices. For the espresso powder and salt, use about 1.5 times the original amount rather than a full 2x.
This prevents the bitter notes from becoming overpowering. When doubling the pudding, you may find it takes an extra minute of whisking to reach that mahogany glossiness.
If you are scaling down for a solo treat, it’s a bit tricky to use half a box of pudding mix. Instead, make the full batch of pudding but only whip half the cream. The pudding stays perfectly in the fridge for 3 days, so you can assemble a fresh parfait whenever the craving hits.
For the cookie base, simply crush 4-5 Oreos with a teaspoon of butter.
| Method | Time | Texture | Best For |
|---|---|---|---|
| Standard No Bake | 15 mins | Silky & Crunchy | Quick weeknight cravings |
| Baked Crust | 25 mins | Toasted & Firm | Dinner parties where you want a "tart like" base |
| Frozen Parfait | 4 hours | Ice cream like | Hot summer days |
If you enjoy the textural interplay of salt and chocolate found in this parfait, you should definitely try the technique used in The Classic Snap recipe for your next snack session.
Debunking Common Kitchen Myths
Some people believe that you must use a metal bowl to whip cream. While a chilled metal bowl does help keep the fat cold, you can achieve stiff peaks in glass or plastic as long as the cream itself is straight from the fridge. The "coldness" of the bowl is a secondary factor compared to the temperature of the dairy.
Another common myth is that instant pudding is "fake" or lower quality than cooked pudding. In a layered parfait, instant pudding is actually often superior because it maintains a more stable, gel like structure that resists moisture migration.
This means your cookie crumbs stay crunchy for longer compared to a warm, cooked custard that would immediately soften the base.
Smart Guidelines for Chilling and Storing Your Extra Servings
Storage: Keep your assembled parfaits in the fridge for up to 48 hours. Beyond that, the moisture from the pudding will start to soften the cookie base, changing it from a "shatter crisp" to a cake like texture.
If you store them, cover the tops with plastic wrap pressed directly onto the surface of the cream to prevent a "skin" from forming.
Freezing: You can actually freeze these! They turn into a wonderful semi frozen treat similar to a mocha torte. Wrap them tightly in foil and freeze for up to 1 month. Thaw in the fridge for 30 minutes before eating for the best consistency.
Zero Waste: If you have leftover cookie crumbs, toss them over morning yogurt or blend them into a milkshake. Leftover chocolate pudding can be frozen in popsicle molds for a quick "fudgsicle" treat. Even that last bit of whipped cream can be dolloped onto a morning coffee for a little luxury.
Finding the Perfect Accompaniments for Your Rich Cocoa Dessert
This Chocolate Parfait is quite rich, so pairing it with something tart or salty is the way to go. A side of fresh raspberries or sliced strawberries provides a bright acidity that cuts through the heavy cream.
If you want to lean into the decadence, serving these alongside a few salted nuts or even some pretzels creates a "sweet and salty" profile that is hard to beat.
For a drink pairing, a cold glass of milk is the classic choice, but a shot of hot espresso on the side creates a beautiful "affogato style" experience if you pour a little over the top. The warmth of the coffee slightly melts the cream, creating a new sauce like texture. If you’re looking for another project to satisfy your sweet tooth, you’ll love the simplicity of the Better Than Cadburys recipe for those chilly evenings.

Recipe FAQs
What's the difference between parfait and mousse?
Mousse is generally aerated and homogenous; parfait is layered. A mousse incorporates air (usually via whipped cream or egg whites) to create a single, light, airy texture throughout. A parfait relies on distinct layers of contrasting textures, like soft pudding, crunchy crumbs, and stable cream.
What is a parfait made up of?
A parfait is composed of alternating soft, creamy, and crunchy elements in a clear vessel. Typically, this involves a textural base (like crushed cookies), a rich component (like pudding or custard), and a lighter element (like stabilized whipped cream).
Why is parfait called parfait?
Yes, the name means "perfect" in French. The name was chosen because the early French versions aimed for textural and flavor perfection through their careful construction.
What are the layers of a parfait?
The typical structure involves a base, a set custard, and a light topping, often repeated. For this recipe, the layers are: Buttered Cookie Crumbs, Espresso Chocolate Pudding, and Vanilla Whipped Cream.
How to achieve distinct, non-bleeding layers in the glass?
Ensure the pudding layer is sufficiently chilled and thickened before adding the next layer. The weight of the cream will push down soft pudding, causing layers to merge; a firm pudding acts as a solid foundation for the next component.
Can I substitute the crushed cookies with cake crumbs?
No, you must use a dry, buttery crumb for structure. Cake crumbs are too moist and will immediately absorb the pudding, creating a soft, wet layer instead of the necessary crunchy contrast found in a traditional parfait.
Is it true that using instant pudding weakens the overall texture?
No, this is a common misconception in modern layered desserts. Instant pudding sets quickly due to modified starches, providing a stable gel structure perfect for supporting weight without extensive cooling time, unlike cooked custard which can weep.
Easy Chocolate Parfait Recipe
Ingredients:
Instructions:
Nutrition Facts:
| Calories | 590 kcal |
|---|---|
| Protein | 6.6 g |
| Fat | 37.3 g |
| Carbs | 57.1 g |
| Fiber | 1.3 g |
| Sugar | 42.5 g |
| Sodium | 452 mg |
