The Classic Snap Perfect Salted Chocolate Covered Pretzels

- Elevating the Salty-Sweet Sensation: Why Homemade Beats Store-Bought
- The Secret to Achieving That Restaurant-Quality Crunch
- Curating Your Caliber: Selecting the Finest Components
- Mastering the Melt: Techniques for Silky Smooth Chocolate
- The Art of the Dip: Achieving Uniform Coverage on Every Pretzel
- Setting the Final Finish: From Gooey to Gorgeous
- Troubleshooting Common Dipping Disasters
- Recipe FAQs
- 📝 Recipe Card
Elevating the Salty Sweet Sensation: Why Homemade Beats store-bought
There is a singular, undeniable joy that comes from biting into a perfectly crafted Chocolate Covered Pretzels . It’s the immediate, sharp crunch of the baked dough, immediately followed by the luxurious give of rich chocolate, culminating in that essential pinch of sea salt that makes your palate sing.
While the convenience of store-bought versions is tempting, they often fall short. They might feature thin, waxy coatings or use inferior chocolate that lacks depth. Crafting Homemade Chocolate Pretzels allows you to control every variable the quality of the chocolate, the thickness of the layer, and the precision of the seasoning.
We are not aiming for merely acceptable Pretzel Treats ; we are aiming for addictive, restaurant quality crunch right in your kitchen.
The Secret to Achieving That Restaurant Quality Crunch
The difference between a good dip and a spectacular dip hinges on texture and finish. To replicate that professional snap, we must focus intensely on the physical interaction between the pretzel and the melted coating. This requires attention to detail in three key areas: the experience, the temperature, and the tools.
Beyond Basic: Defining the Perfect Chocolate Covered Pretzels Experience
When designing your perfect batch, consider the ratio. We want a substantial blanket of chocolate enough to feel decadent, but not so much that it overwhelms the inherent saltiness of the base.
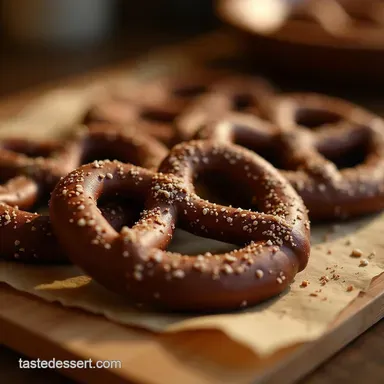
For this Chocolate Covered Pretzels Recipe , we are using medium rod pretzels because their consistent shape allows for an even dip, providing the ideal vehicle for the velvety coating. The goal is a beautiful, opaque finish that contrasts sharply with the savory undertones of the baked dough.
Why Temperature Control is Non-Negotiable for a Flawless Coating
The success of any coated confection relies heavily on temperature management, particularly when you aim for a hard, glossy finish. If the chocolate is too hot, it can cause the pretzels to steam slightly or become soggy where they meet the coating.
Conversely, if it’s too cool, the coating will be thick, clumpy, and uneven when you try to move the dipped item. Maintaining the chocolate in that perfect, viscous, flowing state is essential for achieving that signature smooth look across all your Chocolate Dipped Pretzels .
Setting the Stage: Tools Essential for Dip Perfection
Before you even think about melting, organize your workspace. Having everything ready ensures a smooth workflow once the chocolate is liquid. You will need at least two sturdy baking sheets lined with parchment paper or silicone baking mats; these prevent sticking and ensure easy removal once set.
You’ll also want a rubber spatula for stirring and an offset spatula or a couple of forks handy for lifting and moving the coated items without leaving fingerprints or messy pooling at the bottom. This preparation is key to easily making Easy Chocolate Covered Pretzels .
Curating Your Caliber: Selecting the Finest Components
Because this recipe has so few components, the quality of each ingredient shines through dramatically. You cannot hide mediocre chocolate behind a mountain of sprinkles; the flavour must stand on its own.
Choosing Your Chocolate Base: Milk, Dark, or White Mastery
Your choice of chocolate dictates the entire profile of the resulting Chocolate Pretzels . Dark chocolate (60% cacao or higher) offers the most intense flavour contrast, allowing the salt to truly pop. Milk chocolate yields a sweeter, more nostalgic result, perfect for classic comfort.
White chocolate, while inherently sweeter, provides a fantastic canvas for bright, colourful holiday toppings. Regardless of your selection, opt for high-quality baking chocolate couverture or good quality baking chips as they melt more smoothly than standard snacking chocolate, often requiring less added fat.
Pretzel Selection: Rods vs. Twists for Optimal Dipping
While the classic twisted shape is iconic, for maximum dipping efficiency and easier handling, many prefer the straight Chocolate Covered Pretzels Sticks (rods). Rods offer a larger, more uniform surface area, which simplifies achieving an even coat.
However, if you prefer the traditional look, standard twists work wonderfully, though they may require a slightly deeper plunge and more careful shaking to remove pooling chocolate from the crevices. Ensure whatever you choose is thoroughly dry before beginning the dipping process.
Beyond the Basics: Garnishes That Truly Pop
A perfectly coated pretzel is wonderful, but a garnished one is a masterpiece. The traditional finish involves a light dusting of flaky sea salt. However, consider other elements: finely chopped nuts, edible glitter, crushed peppermint for the holidays, or even a thin drizzle of contrasting chocolate colour after the base has partially set.
These additions transform your simple snack into show stopping Holiday Chocolate Pretzels or elegant party favours.
Related Recipes Worth Trying
- Foolproof Classic Christmas Almond Toffee with Dark Chocolate — Get that perfect snap with our trusted recipe for Classic Christmas Toffee This buttery rich Homemade Toffee Recipe is easier than you think
- Foolproof Homemade English Toffee Recipe with Dark Chocolate — Learn how to make genuine shatteringly crisp Homemade Toffee Bars at home This classic toffee recipe guarantees a perfect snap every time Get the secrets now
- Ultimate Kentucky Derby ChocolatePecan Pie Recipe Bourbon Kick — Make the best Kentucky Derby Pie a gooey bourbonlaced chocolate and pecan delight This reliable Derby Pie Recipe Kentucky is truly unforgettable
Mastering the Melt: Techniques for Silky Smooth Chocolate

Chocolate is notoriously temperamental, so understanding how to melt it properly is the most crucial step in creating superior Homemade Chocolate Pretzels .
Double Boiler vs. Microwave: Which Melting Method Reigns Supreme?
For maximum control and gloss, the double boiler method is generally preferred. This involves setting a heatproof bowl containing the chocolate over a saucepan containing about an inch of simmering, not boiling, water. The gentle, indirect heat melts the chocolate slowly and evenly.
If you opt for the microwave, use short bursts no more than 30 seconds at a time stirring vigorously between each burst. The key here is patience; overheating leads directly to seizing, rendering the chocolate unusable for dipping.
Tempering Simplified: Ensuring a Hard, Shiny Finish
For a professional finish that sets quickly, shines brilliantly, and offers that satisfying snap rather than a soft, smearable surface, some form of tempering is ideal. While true tempering can be complex, a simplified method works well for home bakers.
After melting your chocolate to about 115° F ( 46° C) using the double boiler, remove it from the heat and add a few high-quality, unmelted chocolate wafers (about one-third of your original amount).
Stir constantly until those wafers are mostly melted and the temperature drops to about 88– 90° F (31– 32° C). This shock of cooling re-establishes the correct crystal structure, resulting in a hard, glossy coat perfect for Chocolate Covered Pretzels Sticks .
The Art of the Dip: Achieving Uniform Coverage on Every Pretzel
Once your chocolate is perfectly melted and glossy, speed is of the essence before it starts to set up too much. Working in small batches is highly recommended. Grasp a pretzel firmly by one end. Submerge it into the bowl, twisting gently to ensure the chocolate flows evenly around the surface.
Lift the pretzel out and hold it horizontally over the bowl, tapping the side of the bowl lightly with the hand holding the pretzel to encourage excess chocolate to drip off cleanly. This controlled dripping prevents thick puddles from forming on the bottom of your finished treat.
Setting the Final Finish: From Gooey to Gorgeous
The setting stage is where the magic finalizes. Proper cooling ensures your efforts aren't ruined by smudges or condensation.
Drizzle Strategy: How to Apply Garnishes Before the Chocolate Sets
If you are using sprinkles or flaky salt, apply them immediately after dipping, while the chocolate is still liquid and tacky. For fine dusting, a light sprinkle works best. If you plan to add a contrasting drizzle (perhaps white chocolate over a dark base), allow the initial coat to set for about 5– 10 minutes at room temperature until it feels tacky but not completely firm.
Then, using a small spoon or a piping bag with a tiny snip, swiftly drizzle the contrasting colour across the semi set chocolate.
Cooling Protocols: Preventing Sweating and Smudging
Allow the pretzels to set initially at cool room temperature (around 68– 72° F or 20– 22° C) on the parchment lined sheets for at least 45 minutes.
This slow set allows any air bubbles to escape and creates the strongest finish if you’ve managed a simple temper. If you are in a hurry, chilling them in the refrigerator for 15– 20 minutes will speed things up, but avoid leaving them in the fridge for hours, as this can lead to condensation often called "sweating" when they return to room temperature, resulting in dull, sticky spots.
Troubleshooting Common Dipping Disasters
Even expert bakers run into issues. Knowing how to correct them saves your batch of Chocolate Dipped Pretzels .
Fixing Thin Coatings and Chocolate Seizing Issues
If your chocolate seizes (becomes thick, grainy, and unworkable) due to a tiny speck of water or overheating, you can often save it by stirring in a teaspoon of neutral oil (like refined coconut oil) or, if using dark or milk chocolate, a small amount of melted cocoa butter.
This loosens the cocoa solids and can restore some flow. If the coating feels too thin after dipping, simply wait for the first layer to set completely, then dip them again to build a thicker, more satisfying shell.
Seasonal Spectacles: Holiday Decorating Ideas
For festive Holiday Chocolate Pretzels , think colour palettes. For Christmas, use green and red nonpareils before the chocolate sets, or drizzle with white chocolate stripes mimicking a candy cane. For Easter, dip in white chocolate and roll in pastel sanding sugar.
These visually exciting variations make for wonderful, easy-to-transport gifts.
Enhancing Flavor Profiles with Extracts and Zests
To elevate the flavour beyond simple sweet and salty, incorporate extracts right into the melted chocolate before dipping. A tiny drop of peppermint extract in white chocolate creates a refreshing flavour, while a half teaspoon of pure vanilla or a splash of orange liqueur mixed into dark chocolate adds incredible complexity to your Chocolate Covered Pretzels .
Optimal Storage Conditions to Maintain Maximum Snap
Proper storage is vital to maintain that perfect snap. Store your finished Chocolate Covered Pretzels in an airtight container, layered with wax paper between layers to prevent sticking.
Keep them in a cool, dry pantry, ideally below 70° F ( 21° C). If your kitchen is very warm, the refrigerator is acceptable for short term storage (under a week), but always allow them to warm slightly before serving for the best flavour release.
Recipe FAQs
How do I stop the chocolate from going all gloopy when I melt it for my Chocolate Covered Pretzels?
That gloopy texture is usually what happens when chocolate overheats or gets a drop of water in it it 'seizes up' like a bad case of the jitters! For the smoothest results, use the double boiler method or microwave in short 30-second bursts, stirring thoroughly between each burst until it's just melted.
Remember, a little patience goes a long way here!
Can I use regular chocolate chips, or do I really need fancy couverture chocolate for this recipe?
While you absolutely can use good quality chips, using chocolate specifically meant for baking (like couverture or baking bars) usually gives you a superior, glossier coating that sets up nicely.
Chips often contain stabilizers which can make the melted chocolate thicker and slightly duller, but for a quick batch, they’ll certainly do the job!
How long will these homemade Chocolate Covered Pretzels keep fresh, and how should I store them?
These treats are best enjoyed within a week for optimal crunch, though they are usually fine for up to two weeks if stored correctly. Keep them in an airtight container at cool room temperature, away from direct sunlight or heat.
Avoid the fridge unless it’s a scorcher outside, as condensation can cause the chocolate to bloom (look white or spotty).
I want to jazz mine up! What are some good topping ideas besides just salt?
That’s the spirit let’s get creative! Once you’ve dipped them, go for a festive drizzle using a contrasting chocolate colour, or try rolling the wet base in crushed peppermint candies for Christmas time.
Finely chopped nuts like pistachios or even some colourful sprinkles make these look like the real McCoy.
My chocolate coating seems too thin; is there anything I can add to make it thicker?
If your coating is too runny, you may have added too much oil, or perhaps the chocolate quality is just naturally thin. The quickest fix is to stir in a couple more ounces of solid chocolate chips until they melt, which will thicken the mixture right up.
Alternatively, letting the melted chocolate sit for five minutes can sometimes allow it to cool slightly and thicken before you dip the next batch.
Perfect Chocolate Pretzels