Foolproof Homemade English Toffee the Golden Crunch
- Crafting Confectionery Excellence: Why This Homemade Toffee Reigns Supreme
- Demystifying the Sweet Science Behind Perfect Crunch
- Assembling Your Treasure Trove of Toffee Components
- Essential Gear for Candy Construction
- The Alchemical Transformation: Turning Simple Ingredients into Hard Candy
- Mastering the Crucial Temperature Milestones
- Troubleshooting and Triumph: Ensuring Consistency in Your Candy Making
- Elevating Your Sweet Creations: Flavor Twists and Presentation
- Recipe FAQs
- 📝 Recipe Card
Crafting Confectionery Excellence: Why This Homemade Toffee Reigns Supreme
Forget those sad, plasticky imitations you find at the supermarket! This recipe delivers genuine, shatteringly crisp English Toffee —rich with browned butter flavour and finished with a luxurious layer of dark chocolate.
It’s the perfect homemade gift or a magnificent end to Sunday lunch. We’ll demystify the candy making process, ensuring you hit that crucial temperature for that perfect "snap." While the ingredients are few, the result is complex, boasting a deep, caramelized taste that signifies true craftsmanship in homemade candies .
Achieving this perfection means moving beyond simple baking and stepping into the specialized world of sugar work, but don't let that intimidate you; this Homemade Toffee Recipe is structured to guide even novices to spectacular results.
Demystifying the Sweet Science Behind Perfect Crunch
Making truly exceptional toffee, the kind that breaks apart cleanly with an audible crack, is less about complicated methods and more about rigorous temperature control. This foundational understanding separates chewy caramel from brittle, satisfying toffee.
The Allure of Buttery, Breakable Gold
The flavour profile of supreme Classic Toffee hinges on high-quality dairy. We use a full cup of unsalted butter, which, when cooked correctly, doesn't just melt; it browns.
This browning process (the Maillard reaction taking place in the butter solids) infuses the entire sugar mixture with nutty, complex notes that standard candy makers miss. This deep, roasted flavour is what elevates our Homemade Toffee Candy from good to legendary.
Setting the Stage: What Makes This Recipe Truly Foolproof
While the difficulty level for this recipe leans toward medium, that classification is solely due to the need for precision. To ensure this Toffee Recipe works perfectly every time, we utilize a few critical stabilizers.
The addition of a small amount of light corn syrup is essential; it acts as an invert sugar, which prevents the granulated sugar from recrystallizing into an unappealing grainy texture.
On top of that,, lining your 8x8 inch pan thoroughly with parchment paper, ensuring a nice overhang, guarantees you can lift the entire slab out effortlessly later for clean breaking.
A Luxurious Finishing Touch: Dark Chocolate Integration
The contrast between the deep, warm, brittle base and the cool, smooth chocolate coating is what makes Homemade Toffee Bars so addictive. We opt for high-quality dark chocolate, specifically aiming for a minimum of 60% cocoa solids.
This slight bitterness provides the necessary counterpoint to the intense sweetness of the cooked sugar, resulting in a balanced confection. The chocolate layer not only adds decadence but also acts as a moisture barrier, helping to preserve that vital crunch during storage.
Assembling Your Treasure Trove of Toffee Components
Before the heat goes on, preparation is key in any sugar based venture. You are aiming for a quick, clean process once the mixture starts boiling, so having everything measured and ready is non-negotiable. We’ll be dividing our components into the foundational toffee base and the complementary chocolate topping.
For the base, you’ll need two full cups of granulated sugar and a generous cup (two sticks) of high-quality unsalted butter do not skimp here, as the butter is the primary flavour carrier.
To assist the sugar's dissolving process and ensure smooth cooking, we incorporate half a cup of water and a quarter cup of light corn syrup, along with half a teaspoon of fine sea salt to amplify the buttery richness.
Essential Gear for Candy Construction
Successfully creating Homemade Toffee Bits requires the right apparatus to handle high temperatures and ensure accuracy. Forget using thin pots; they create hot spots that burn the sugar unevenly.
Precision Measures: The Core Dairy and Sugar Base
The measurement of the core ingredients must be accurate. Two cups of sugar and two sticks of butter form the foundation of this batch, yielding approximately one pound of finished product.
These ingredients must be combined thoroughly in a heavy bottomed saucepan this type of cookware is crucial because it diffuses heat evenly across the base, minimizing the risk of scorching the milk solids in the butter before the sugar reaches its transformation point.
Selecting the Optimal Chocolate for Topping
For the final layer, you will require about 8 ounces of high-quality dark chocolate. Whether you choose finely chopped bars or high-quality chips, ensure they have a good cocoa percentage.
This topping is spread over the cooled toffee before it fully sets, so having it melted and ready in a separate, dry vessel is part of the final assembly workflow.
Non-Negotiable Tools: Thermometer Mastery
The single most important piece of equipment for this entire Homemade Toffee Recipe is a reliable candy thermometer. Without it, success is left entirely to chance.
You are aiming for the "hard crack" stage, a specific temperature achieved when the sugar mixture reaches 300° F ( 149° C). Guessing this stage results in either soft, chewy candy or scorched, bitter candy.
Therefore, invest in a reliable thermometer, clip it securely to the side of your heavy bottomed pot, and trust its reading implicitly.
Related Recipes Worth Trying
- Foolproof Japanese Curry on Rice Rich Homemade Kare Raisu — Ditch the blocks and learn to make a proper Japanese Curry Rice from scratch This recipe nails the rich savoury roux for authentic Asian curry with rice comfort
- Seriously Fruity Homemade Strawberry RollUps Recipe — Ditch the packet stuff These homemade strawberry fruit rollups use only real fruit for a chewy vibrant snack Easy fruit snacks recipe ready for lunchboxes
- The Ultimate Homemade Fruit Leather Recipe Chewy SugarFree — Forget storebought Make naturally sweet chewy homemade fruit leather using fresh or frozen berries This simple Fruit Leather Recipe is perfect for lunchboxes
The Alchemical Transformation: Turning Simple Ingredients into Hard Candy
The cooking phase is where the magic truly happens. Once all your base ingredients butter, sugar, water, corn syrup, and salt are combined in the saucepan, the transformation begins. Over medium heat, stir gently only until the butter has melted and the sugar has fully dissolved.
Once you see the mixture beginning to bubble robustly, the stirring must cease. This is critical because disturbing the boiling syrup invites crystallization. After washing down the sides of the pan with a damp pastry brush to remove stray crystals, the mixture is left entirely to its own devices to climb toward the target temperature.
Mastering the Crucial Temperature Milestones
The path from liquid sugar to brittle toffee is marked by distinct stages, each requiring patience and vigilance.
Phase One: Achieving the Perfect Browned Butter Aroma
As the sugar mixture heats, the butter solids begin to toast, releasing those wonderful nutty aromas. You will notice the colour deepening from pale yellow to a rich amber. While the mixture is coming up to heat, it’s essential to keep an eye on the thermometer, remembering that this initial phase of boiling is critical for dissolving every last grain of sugar.
The Slow Climb to Crack Stage ( 300° F)
This is the longest and most critical part of the cooking process, typically taking 15 to 20 minutes depending on your stovetop's intensity. You must resist the urge to increase the heat or stir vigorously.
Allow the mixture to bubble steadily until the thermometer definitively registers 300° F ( 149° C) . This temperature signals the 'hard crack' stage, where the sugar has expelled nearly all its moisture and will solidify into a brittle, snappy texture.
Applying the Chocolate Sheen: Don't Rush the Set
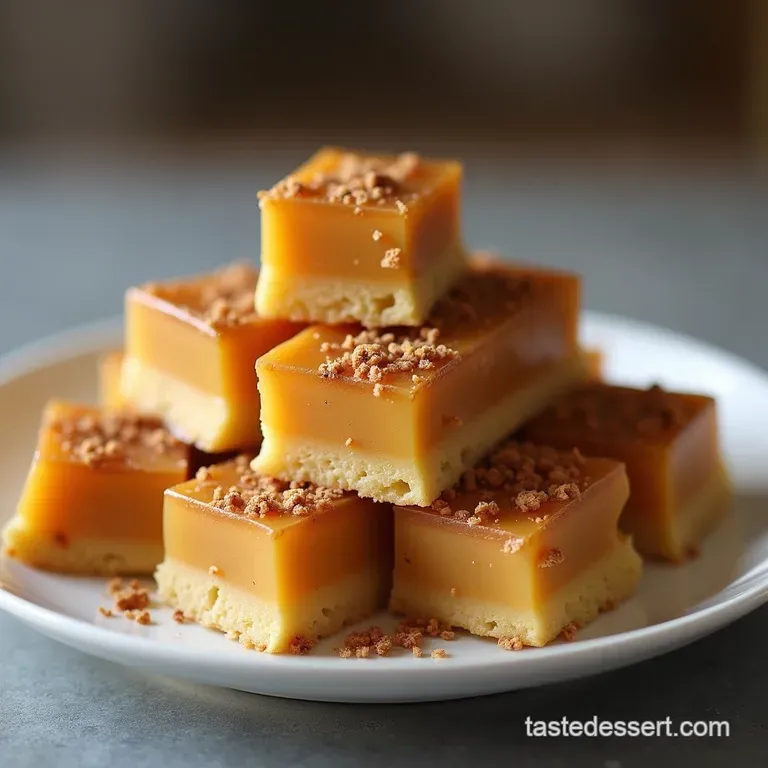
The moment the temperature hits the mark, immediately remove the pan from the heat and pour the molten toffee directly into your prepared 8x8 inch baking pan. Do not scrape the sides of the pot, as that residual sugar might affect the texture if it gets incorporated.
Let this slab cool completely at room temperature this usually takes about an hour until it is completely hard to the touch. Only once it is cool can you proceed to melt your dark chocolate topping, spread it evenly across the base, and optionally scatter toasted sliced almonds over the top for texture.
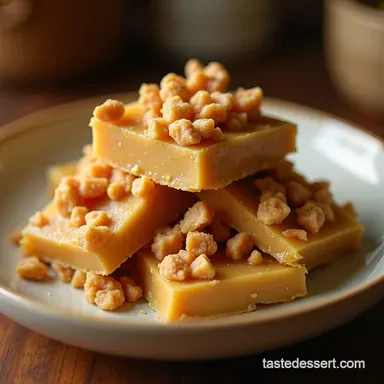
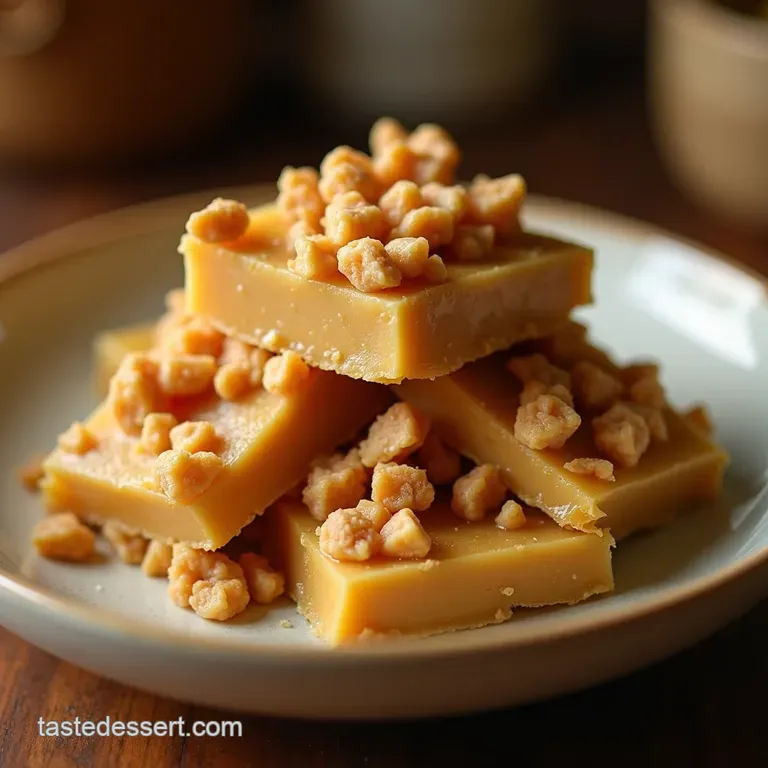
Scoring and Shattering Your Finished Batch of Homemade Toffee
Once the chocolate topping has fully set (refrigeration can hasten this by 30 minutes), you can achieve those beautiful, rustic pieces characteristic of high end Homemade Toffee . Lift the entire slab using the parchment overhang and place it on a cutting board.
A gentle, deliberate whack with the back of a rolling pin or a large knife will shatter the slab into irregular, glittering shards the true hallmark of superb Homemade Toffee Bits .
Troubleshooting and Triumph: Ensuring Consistency in Your Candy Making
Even with meticulous attention, sugar work can sometimes present challenges. If your toffee cools but remains soft or chewy rather than brittle, it almost certainly means the mixture did not reach the required 300° F.
In this case, you can sometimes save it: pour the soft slab back into the clean saucepan, reattach the thermometer, and cook it up the remaining 10 to 15 degrees. Conversely, if the mixture turns grainy during the boiling phase, it has crystallized.
This usually happens if you stir after it has started boiling or if a tiny seed crystal was introduced from the sides of the pan. Unfortunately, crystallized sugar cannot be fixed once it occurs, and you will need to start again, focusing on cleanliness.
Elevating Your Sweet Creations: Flavor Twists and Presentation
While the core recipe provides magnificent English Toffee , customization allows you to tailor this treat perfectly for any occasion or palate.
Humidity Hacks: Dealing with Sticky Situations
Sugar is hygroscopic, meaning it aggressively pulls moisture from the air. If you attempt to make toffee on a rainy or extremely humid day, you may find the final product slightly sticky, even if the temperature was perfect. If this happens, the best solution is a quick, cool set.
Once coated in chocolate, place the pan in the refrigerator for 30 minutes before breaking. The cold helps lock in the crispness momentarily.
Storage Secrets for Maximum Crunch Longevity
To preserve that exquisite snap, proper storage is paramount. Store your broken Homemade Toffee Bars in an airtight container at cool room temperature never the refrigerator long term, as temperature fluctuation can encourage condensation.
Separating layers with small squares of parchment paper prevents the chocolate from sticking together, ensuring every piece maintains its structural integrity until you are ready to enjoy it.
Beyond the Basics: Suggested Nut and Spice Infusions
To introduce novelty, consider integrating flavour agents directly into the hot toffee just before pouring. For a sophisticated profile, try incorporating a teaspoon of high-quality vanilla bean paste or a splash of dark rum (though the alcohol evaporates, the flavour compounds remain).
For those who enjoy Homemade Toffee for Cookies additions, finely crushed espresso beans added at the end create a mocha depth that pairs beautifully with the dark chocolate topping.
Gifting Glory: Packaging Your Homemade Toffee Masterpiece
This candy makes a stunning gift. For presentation, arrange the shattered pieces artfully in small, clear cellophane bags tied with rustic twine, or stack them inside small, reusable tins.
Labeling them clearly as "Artisan Homemade Toffee " sets expectations high, and trust me, the moment someone bites into that perfect, buttery snap, they will know they have received something truly special crafted with expert care.
Recipe FAQs
Why is my Homemade Toffee soft or chewy instead of snapping like it should?
Ah, that’s the age-old toffee trouble it sounds like you didn't quite reach the "hard crack" stage. For that perfect crunch, your mixture absolutely needs to hit 300°F (149°C) on the thermometer.
If you pull it off the heat even a few degrees early, it will remain sticky or chewy, which is fine for a softer chew, but not for a classic snap.
How should I store my Homemade Toffee to keep it fresh and crisp?
Toffee needs protection from humidity, so avoid the fridge if you can, as condensation makes it sticky. Store it in an airtight container at cool room temperature, perhaps layering the pieces between sheets of parchment paper to prevent sticking.
It should stay tip-top for a couple of weeks, provided your kitchen isn't terribly damp!
I'm worried about crystalizing the sugar; what’s the best way to avoid that grainy texture?
Crystallization is the bane of every candy maker's existence! The trick is absolute cleanliness: use corn syrup (which helps inhibit crystal growth), and crucially, wipe down the sides of your saucepan with a damp pastry brush while the mixture heats up.
Once the sugar dissolves and starts boiling hard, don't stir it again!
Can I make this toffee recipe without a candy thermometer? I don’t fancy buying one.
Honestly, for proper toffee, a thermometer is your best mate it’s non-negotiable for consistent results. If you absolutely must try without one, you’d have to use the 'cold water test,' dropping small amounts into ice water to see if it forms hard, brittle threads.
However, that method is notoriously tricky, and you risk ruining the batch.
I burnt the chocolate topping slightly when melting it. Can I still save my Homemade Toffee?
Oh dear, a bit of burnt chocolate can taste terribly bitter, ruining that lovely buttery toffee base. If it's only slightly over heated, try stirring in a teaspoon of neutral oil or a splash of unflavoured melted cocoa butter to smooth out the texture.
If it's genuinely scorched, sadly, it’s best to discard the chocolate and start that layer again gently!
Foolproof Homemade Toffee