Sunshine Strips Seriously Fruity Homemade Strawberry Rollups
- Bypassing the Bright Red Pretenders: Why Homemade Wins the Fruit Snack War
- The Magic of Simplicity: Unpacking This Nostalgic Strawberry Fruit RollUps Recipe
- Gathering the Arsenal: Essential Components for Perfect Fruit Leathers
- The Transformation Stage: From Fresh Fruit to Pliable Sheets
- Baking, Dehydrating, and Achieving the Perfect Chew Factor
- Elevating Your Snack Game: Variations and Pro Tips for Next Time
- Recipe FAQs
- 📝 Recipe Card
Bypassing the Bright Red Pretenders: Why Homemade Wins the Fruit Snack War
There’s a certain kind of nostalgia tied up in those brightly coloured, plastic wrapped fruit snacks we enjoyed as children. But let's be honest: those treats often bear more resemblance to coloured sugar than actual fruit.
If you’ve been searching for a way to recapture that chewy, satisfying texture without the artificial dyes and preservatives, you’ve landed in the right place. We are about to unlock the secrets to creating phenomenal Strawberry Fruit RollUps right in your own kitchen.
This recipe transforms simple, ripe berries into concentrated sunshine, offering a truly superior Homemade strawberry fruit roll ups experience. Forget imitation; prepare for the genuine article.
The Magic of Simplicity: Unpacking This Nostalgic Strawberry Fruit RollUps Recipe
Our mission today is to create a snack that is both deeply satisfying and wonderfully uncomplicated. This approach to Easy fruit snacks recipe creation focuses on high-quality ingredients and straightforward processes.
We are aiming for that perfect, pliable chew the texture that defines a truly great fruit snack using minimal intervention.
More Than Just Candy: Capturing Peak Summer Strawberry Essence
The core philosophy behind these Real strawberry fruit roll ups is to showcase the berry itself. We use fresh strawberries, carefully simmered just enough to reduce their water content while intensifying their natural sugars and tang.
This concentration process is crucial; it’s what separates a good homemade snack from a great one. When you use peak season fruit, the resulting flavour is bright, immediate, and intensely summery, proving that you don't need complex additives to achieve a show stopping flavour profile.
A Chewy Trip Down Memory Lane (Without the Artificial Dye)
That familiar chew factor is what we are actively recreating here. By simmering the puree and then drying it slowly, we develop the necessary pectin structure within the fruit itself to achieve that signature pliability.
This technique results in Healthy fruit strips recipe that are far more wholesome than their store-bought counterparts. They are perfect for satisfying that specific craving, whether you need a treat for yourself or easy-to-pack Toddler snacks on the go fruit options.
Setting the Stage: What Makes This Version Superior
Our blueprint for these Strawberry fruit rolls dehydrator style treats relies on precision in the drying phase, rather than complicated ingredient sourcing.
We are using just three main components strawberries, sugar, and lemon juice which ensures the final product is clean and vibrant. The difficulty level here is decidedly Easy , meaning that anyone, regardless of baking experience, can achieve a successful, perfectly chewy result.
We anticipate about 15 minutes of active preparation followed by a few hours of patient drying time, yielding about 10 to 12 medium roll ups per batch.
Gathering the Arsenal: Essential Components for Perfect Fruit Leathers

To achieve that perfect chew and deep flavour, selecting and preparing your components correctly is half the battle won. We need the right foundation before we even consider turning on the heat.
Our Curated List: Fresh Strawberries and Flavor Enhancers
The star, naturally, is the Fresh Strawberries . You’ll need about 2 cups, or roughly 1 pound, of ripe, hulled berries. Ripeness equals natural sweetness, which will minimize the need for added sugar.
To balance the flavour and aid in setting the final texture, we incorporate 1 tablespoon of fresh lemon juice. This acidity brightens the strawberry flavour beautifully. For those who prefer a slightly firmer, almost candy like snap, we include an optional teaspoon of unflavored gelatin powder, stirred in after the cooking phase.
The Secret Weapon: Understanding Your Sweetener Options
While the recipe calls for 1/4 cup of granulated sugar (or 50g), this is highly adaptable. The primary role of the sugar, besides taste, is to help draw out moisture during simmering and aid in the preservation of the colour. If your berries are incredibly sweet, feel free to reduce this amount.
For the purest version of Homemade clean snacks , omit the sugar entirely and trust the natural fructose in the fruit.
Prep Work Mastery: Preparing the Baking Surface for Zero Sticking
The absolute nemesis of any fruit leather project is sticking. If you try to peel your dried sheet off parchment paper that has been too heavily sprayed with oil, you’ll end up with torn sections. The superior choice here is a high-quality silicone baking mat.
This non-stick surface ensures your entire sheet peels away cleanly in one go, making the process far less frustrating.
Quantifying Success: Accurate Measurements for the Ideal Consistency
To ensure we achieve the right concentration, measurements matter, particularly when simmering. The goal is to reduce the volume of the initial puree by about one-third. Using about 300g of strawberries initially will give you a perfect amount to spread thinly across a standard 10x15 inch baking sheet.
Precision in this initial volume dictates how thinly you must spread the final mixture.
Related Recipes Worth Trying
- The Ultimate Homemade Fruit Leather Recipe Chewy SugarFree — Forget storebought Make naturally sweet chewy homemade fruit leather using fresh or frozen berries This simple Fruit Leather Recipe is perfect for lunchboxes
- Rollin in the Fruit Homemade Fruit Leaather Recipe Fun — Ditch storebought My homemade fruit leaather recipe is easy healthy and bursting with flavor Perfect for using up fruit A real treat the whole family will love
- Strawberry Protein Smoothie Quick Healthy Power Boost — Need a fast brekkie or postworkout treat This strawberry smoothie with protein powder is your answer Easy delicious and packed with goodness Get the recipe now
The Transformation Stage: From Fresh Fruit to Pliable Sheets
This is where the actual cooking begins, moving the ingredients from raw potential to concentrated flavour base. This stage requires attention, but no actual technical skill.
Puree Perfection: Achieving a Silky Smooth Strawberry Foundation
First, take your prepared strawberries, sugar, and lemon juice and pulse them vigorously in a blender or food processor. You are aiming for a completely smooth, uniform consistency. Any large chunks left behind will cook unevenly and create thicker spots in your final sheet.
Once fully liquidated, transfer this vibrant mixture to a medium saucepan.
The Oven Dance: Setting the Temperature for Optimal Reduction
Place the saucepan over medium heat and bring the mixture to a gentle, bubbling simmer, stirring constantly to prevent the sugars from scorching the bottom of the pan. Once simmering, reduce the heat significantly to low. Now, the reduction process begins in earnest.
You must continue to stir frequently for about 25 to 35 minutes. As the water evaporates, the mixture will visibly thicken, developing a glossy sheen reminiscent of a thick, bright strawberry jam.
If using the optional gelatin, remove the mixture from the heat before stirring it in until fully dissolved.
Testing for Tackiness: Knowing When Your Fruit Layer is Ready
The visual cue is that the mixture has visibly reduced by about a third and coats the back of a spoon thickly. For the baking stage, you need to preheat your oven to its absolute lowest setting ideally around 170° F ( 75° C).
Line your prepared tray, pour the thickened puree onto it, and use an offset spatula to spread it thinly and evenly. Aim for a thickness no more than 1/8 inch (3mm). Thin spreading is the secret to successful Strawberry fruit leather .
Baking, Dehydrating, and Achieving the Perfect Chew Factor
The drying process is largely hands off, but requires an environment where moisture can escape effectively, preventing the mixture from baking into a hard crisp.
The Oven Dance: Setting the Temperature for Optimal Reduction
Once spread, the tray goes into the low oven. Crucially, you must prop the oven door open slightly a wooden spoon handle works perfectly for this to allow the humid air to escape. If the humidity stays trapped, the fruit will steam rather than dry.
This low-and-slow bake usually takes between 4 to 6 hours, though sometimes overnight is required depending on your oven’s actual temperature consistency.
Testing for Tackiness: Knowing When Your Fruit Layer is Ready
The leather is done when you gently touch the surface and it is dry to the touch not tacky or wet at all. You should be able to lift a corner easily from the silicone mat without anything sticking behind. If it’s still tacky, continue drying it, checking every 30 minutes.
Over drying results in brittle strips; under drying results in sticky strips that cannot be stored well.
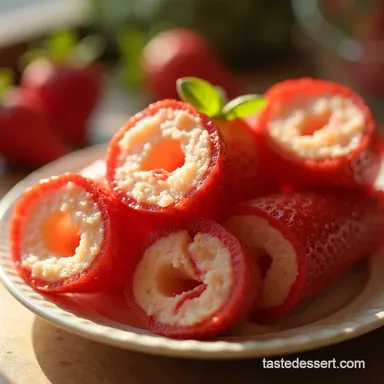
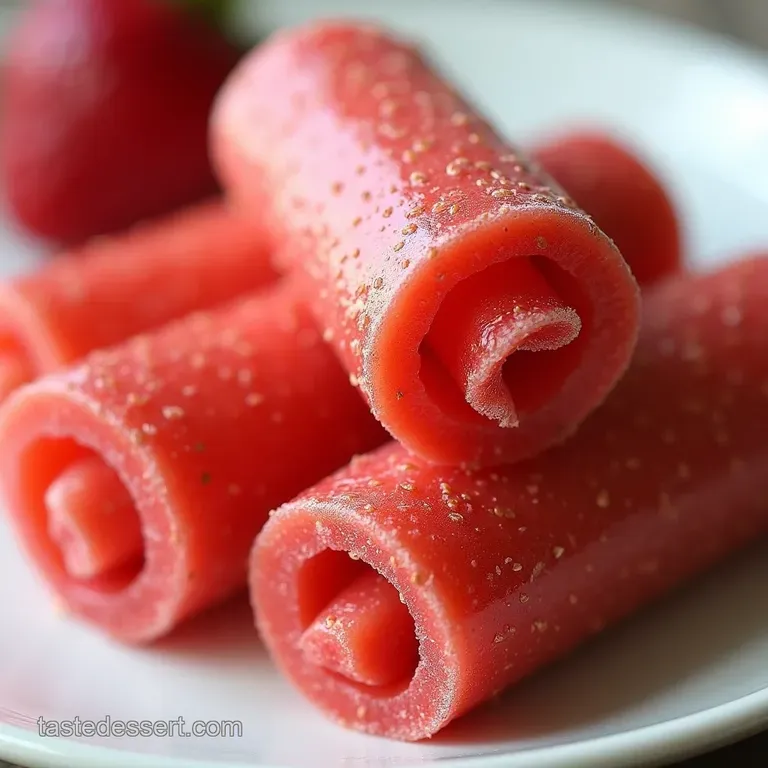
The Grand Finale: Slicing and Rolling Your Delicious Strawberry Fruit RollUps
Allow the entire sheet to cool completely on the tray. Once cool, carefully peel it off the mat. To prevent the finished Strawberry Fruit RollUps from sticking to themselves during storage, lightly dust the surface with a small amount of powdered sugar or cornstarch.
Using a sharp knife or pizza cutter, slice the sheet into strips about 1.5 inches wide. Roll each strip up tightly from one end, creating your perfect, chewy snack.
Elevating Your Snack Game: Variations and Pro Tips for Next Time
Once you have mastered the base recipe, experimenting is encouraged. These Homemade strawberry fruit roll ups are a fantastic canvas for creativity.
Flavor Remixes: Introducing Citrus Zest or Other Companion Fruits
To introduce complexity, consider adding a teaspoon of lime zest along with the lemon juice for an extra zing. Alternatively, during the blending stage, you can substitute a quarter of the strawberries with mango or even rhubarb for a tart counterpoint.
These subtle adjustments create exciting new options for your Homemade clean snacks .
Troubleshooting Thin Sheets: Fixing Under- or Over Dried Batches
If your batch is under dried (too sticky), simply return the sheet to the low oven, door propped open, for another hour or two. If you have accidentally over dried it and the pieces are brittle, you can try briefly steaming them by placing them in a closed container with a damp paper towel for about an hour; this moisture often reintroduces enough pliability.
Shelf Life Secrets: Best Practices for Extended Freshness
Because these contain only fruit and a small amount of sugar, proper storage is key to maintaining their chewiness. Once rolled, wrap each one individually in wax paper or plastic wrap. Store them in an airtight container at room temperature for up to three weeks, or in the refrigerator for even longer freshness.
Nutritional Snapshot: Understanding the Goodness in Your Homemade Treats
When you compare this recipe to commercial alternatives, the difference is clear. These Strawberry Fruit RollUps are naturally low in fat and free from artificial flavourings.
You are getting the natural fibre and vitamins from the fresh berries, with only a minimal addition of sugar to aid preservation and texture development. This makes them an excellent, guilt free choice for a satisfying bite any time of day.
Recipe FAQs
Why are my homemade Strawberry Fruit RollUps still sticky after hours in the oven?
That's a common baking bogey, often caused by spreading the mixture too thickly on the tray it's like trying to dry a puddle! Make sure the layer is no more than 1/8th of an inch deep, and that your oven door is propped slightly open to allow the moisture steam to escape.
If it’s still wet, give it another hour or two on the lowest setting.
Can I skip the sugar in this Strawberry Fruit RollUps recipe?
Absolutely, you can skip the added sugar, especially if your strawberries are wonderfully sweet think of it as an authentic taste of summer's bounty. Just be aware that the final product will be tarter, and it might dry slightly differently, as sugar aids in that chewy texture we all know and love.
Feel free to taste your puree before simmering to check if it needs a little nudge.
How should I store these fruit roll ups to keep them fresh and un-stuck?
Storage is crucial, otherwise, you'll end up with one giant, sticky brick! Once cooled and rolled, wrap each individual strip tightly in wax paper or cling film. Store them in an airtight container at room temperature for up to two weeks, or pop them in the fridge if your kitchen is particularly humid they don't fare well next to boiling kettles!
My roll ups are sticking badly to the parchment paper; is a silicone mat truly worth the investment?
Oh yes, if you plan on making these more than once, a silicone mat is your best mate! Parchment paper can sometimes fuse with the dried fruit, making peeling a nightmare, often tearing the fruit leather.
A silicone mat releases the dried sheets cleanly, making the whole process feel less like wrestling a stubborn bandage off a graze.
Can I use frozen strawberries instead of fresh ones for my roll-up mixture?
Yes, frozen strawberries work perfectly well, provided you let them thaw completely first. Be aware that thawed berries release more liquid, so you might need to simmer the puree for an extra 5 to 10 minutes to achieve that perfect, jam-like reduction before spreading.
They still deliver that lovely flavour, no worries there.
Fruity Homemade Strawberry Rollups