Sunkissed Fruit Strips the Ultimate Homemade Fruit Leather No Added Sugar Needed

- Ditching Store-Bought: Why Homemade Fruit Leather Reigns Supreme
- The Magic of Dehydration: Unlocking Intense Fruit Flavors
- Curating Your Fruit Base: What You Need for Supreme Flavor
- Step-by-Step Guide to Crafting Your Puree
- The Drying Process: Achieving Optimal Texture and Consistency
- Customizing Your Chewy Creations: Flavor Variations
- Storage Secrets for Long-Lasting Homemade Fruit Leather
- Recipe FAQs
- 📝 Recipe Card
Ditching store-bought: Why Homemade Fruit Leather Reigns Supreme
There’s a unique magic that happens when you transform vibrant, ripe fruit into a chewy, intensely flavoured strip. If you’ve ever reached for a package of commercially produced fruit snacks, you know that the texture is often rubbery and the flavour relies heavily on added sugars and artificial enhancers.
That’s why mastering the Homemade Fruit Leather Recipe is such a game changer. By taking control of the ingredients, you unlock the true, concentrated essence of the fruit itself.
This method allows you to create truly superior Homemade Fruit Roll Ups that are intensely satisfying, naturally sweet, and far healthier than anything you’ll find pre-packaged. It’s the ultimate way to capture sunshine in a chewable format.
The Magic of Dehydration: Unlocking Intense Fruit Flavors
The entire premise behind brilliant fruit leather rests on gentle, sustained drying. Dehydration isn't about cooking the fruit to death; it's about slowly coaxing the moisture out while concentrating the natural sugars and flavour compounds.
This slow evaporation process is what turns a watery puree into that satisfying, pliable chew we crave. When done correctly, the resulting product far surpasses anything achievable through quick baking methods.
Our Promise: Natural Sweetness, Perfect Chewiness
Our approach to this Fruit Leather Recipe focuses on maximizing natural flavour. For our core batch, we lean heavily on mixed berries strawberries provide body, while raspberries add a necessary tartness.
The goal is a texture that resists slightly when you bite into it, offering that signature, satisfying chew. We aim for a product that tastes exactly like the freshest fruit imaginable, just in a highly condensed form.
Perfectly Preserving Summer’s Bounty
One of the greatest advantages of making Homemade Fruit Leather with Frozen Fruit is its ability to combat food waste. Did you buy too many strawberries at the farmer's market? Are your raspberries on the verge of turning? Blend them!
This recipe is incredibly forgiving, allowing you to preserve peak season goodness long after the harvest has ended. This preservation technique means you can enjoy the taste of high summer even in the dead of winter.
Why This Technique Works Better Than Baking
While you certainly can use an oven, achieving true fruit leather texture requires low, consistent heat to wick moisture away without caramelizing the sugars too quickly.
A dedicated Fruit Leather Dehydrator Recipe often yields superior results because these machines are engineered for this exact, slow drying environment. If you must use your conventional oven, remember that you must prop the door open this allows the escaping steam to leave the oven cavity, preventing the leather from steaming itself instead of drying out.
Curating Your Fruit Base: What You Need for Supreme Flavor
Crafting the perfect base requires attention to balance. We are shooting for intensity, which means managing acidity and sweetness before the drying even begins. A simple combination of fruit, a brightener, and a flavour enhancer is all you need for stellar results, whether you are making a simple Strawberry Fruit Leather Recipe or a complex blend.
Selecting Fruits: Fresh Versus Frozen Considerations
When choosing your fruit, quality matters, but so does convenience. Fresh fruit is fantastic, but frozen fruit works beautifully for this process. If using frozen berries, you don't even need to fully thaw them; the blender will handle them quickly.
For stone fruits like peaches or plums, ensure they are very ripe for maximum natural sweetness. Avoid fruits that release a large amount of water, like melons, unless you plan to significantly increase the drying time.
The Purest Ingredients List (No Hidden Syrups!)
The core of our recipe relies on approximately four cups of mixed berries. To amplify the natural fruit flavour and cut through any overwhelming sweetness, we incorporate just one tablespoon of fresh lemon juice. This brightens the overall profile.
A crucial, often overlooked ingredient is a mere pinch of salt; this doesn't make the leather salty, but rather deepens and elevates the perceived fruit flavour. Only consider adding honey or maple syrup if your chosen fruit is exceptionally tart, and always taste before sweetening!
Preparing Your Trays for Effortless Release
The enemy of successful fruit leather is sticking. If the finished product adheres to the pan, peeling it off often results in tearing. The best defense is a high-quality silicone baking mat.
If you don't have these, good quality parchment paper works, but you must lightly grease it with a flavourless oil, applying just enough to create a sheen. This preparation is vital for the final, satisfying step of peeling up your Homemade Fruit Roll Ups .
Related Recipes Worth Trying
- The Real Deal Classic Southern Homemade Banana Pudding Recipe — Ditch the instant mixes This Homemade Banana Pudding recipe features a rich slowcooked vanilla custard and Nilla Wafers Find the secret to silky smooth...
- Proper Homemade Gravy Silky Smooth Ready in 20 Mins — Forget the lumps This easy homemade gravy recipe shows you how to make rich brown gravy from scratch that coats every roast potato beautifully Foolproof...
- The Best Sloppy Joe Recipe Easy Proper Homemade Sauce Cider Vinegar — Forget the tinned versionthis is the proper Homemade Sloppy Joe Our easy recipe uses cider vinegar for the perfect tangy sauce Ultimate weeknight comfort food
Step-by-step Guide to Crafting Your Puree

This is where the heavy lifting (all 20 minutes of it!) happens. The key takeaway here is texture uniformity; any lumps or thin spots will dry unevenly, resulting in brittle edges and gooey centres.
We begin by loading our chosen fruits in our case, a vibrant mix of berries into a high speed blender or food processor. Add the lemon juice, optional sweetener, and that tiny pinch of salt. Blend on high until the mixture is completely liquid and velvety smooth.
If you are using very seedy fruits like raspberries or blackberries, you might want to pass this liquid through a fine mesh sieve at this stage to remove the seeds for the silkiest final product. Once blended, taste it. Does it need a touch more tang? A drop more sweetness? Adjust now, as you cannot adjust it later.
The Drying Process: Achieving Optimal Texture and Consistency
With the puree ready, we move to the slow, transformative process of drying. Patience here is everything, as the total time can range from four to eight hours depending on your environment and equipment.
Achieving Silky Smoothness: Blending Techniques
If you are aiming for a professional grade, smooth result, ensure your blender runs long enough that all the small cell walls of the fruit have broken down entirely. A few seconds longer than you think necessary often makes the difference between a slightly grainy feel and a truly silky mouthfeel.
Spreading Thin: The Key to Even Drying
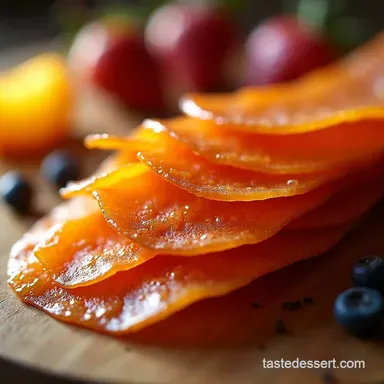
Pour your intensely flavoured puree onto your prepared baking sheets. You are aiming for an even thickness of approximately 1/8th of an inch (about 3mm). Use an offset spatula or the back of a spoon to smooth the mixture right to the edges of your mat or parchment.
Remember, if one area is thicker, it will stay wet and sticky while the rest of the sheet dries out.
Dehydrator Settings vs. Oven Low-and-Slow Method
If utilizing a Fruit Leather Dehydrator Recipe , set the temperature between 135° F and 145° F ( 57° C– 63° C).
If you are relying on the Homemade Fruit Leather Oven method, set your oven to its absolute lowest temperature setting ideally around 170° F ( 75° C).
Crucially, wedge your oven door open with a wooden spoon handle or silicone spatula. This small gap is vital; it allows the moisture laden air to escape, facilitating proper drying rather than stewing. Rotate trays halfway through the drying time to account for hot spots in your equipment.
Knowing When Your Leather Is Truly Done
This is the most critical checkpoint. Your fruit leather is ready when it pulls away from the mat without resistance and feels dry, but not brittle, to the touch. If you bend a piece, it should be pliable and slightly tacky, but no wet residue should come off on your finger.
If it cracks when bent, it has likely dried too far and is heading toward crispiness rather than chewiness.
Customizing Your Chewy Creations: Flavor Variations
While our base berry recipe is fantastic, the beauty of creating Homemade Fruit Leather lies in total customization. This base technique adapts beautifully to almost any fruit, opening up a world of flavour pairings perfect for the lunchbox or hiking pack.
Beyond Berries: Incorporating Citrus and Stone Fruits
You can substitute the berries entirely with soft stone fruits like peaches or apricots, though you may need a touch more lemon juice to balance the sweetness. For a bright, tropical twist, try substituting the berries with mango and pineapple, and consider adding a small amount of grated fresh ginger for a warming spice that complements the sweetness perfectly.
Even vegetable purees can work when paired smartly think apple mixed with a small amount of spinach for an iron rich boost.
Cutting and Rolling Techniques for Lunchbox Appeal
Once the leather has cooled completely (this is important, as warm leather tears easily), carefully peel it from the mat. Use a sharp knife or a pizza cutter to slice the large sheets into snack sized strips. The classic Fruit Roll Up Recipe Homemade style involves rolling them tightly.
To ensure they don't fuse together during storage, wrap each individual strip tightly in a small square of wax paper or parchment paper before placing them in their airtight container.
Troubleshooting: Fixing Leathery Strips That Are Too Sticky or Too Crisp
If your leather feels too sticky after the expected drying time, simply put it back in the dehydrator or oven for another hour or two. If, however, you accidentally dried them too long and they are brittle, don't panic!
You can often salvage them by briefly placing the brittle sheets in a sealed container with a few slightly under dried strips for 12- 24 hours. The moisture from the slightly softer pieces will redistribute, helping to restore some pliability.
Nutritional Snapshot: Healthy Snacking Made Easy
When you look at the final nutritional profile of your Homemade Fruit Leather , you’ll see the clear benefit. By eliminating commercial fillers, gums, and refined sugars, you are left with a powerhouse of dietary fiber and natural vitamins inherent to the fruit.
These snacks offer sustained energy without the sugar crash associated with highly processed treats, making them an intelligent choice for anyone seeking wholesome snacking options.
Storage Secrets for Long Lasting Homemade Fruit Leather
Proper Fruit Leather Storage ensures your hard work pays off over time. Because this is a low-moisture product, it is shelf stable, provided it is sealed correctly.
Cutting and Rolling Techniques for Lunchbox Appeal
As mentioned, the key to perfect roll ups is insulation. Whether you cut them into rectangles for rolling or small squares for stacking, make sure each piece is individually wrapped in wax paper. This prevents them from sticking to each other, maintaining that perfect, individual chewiness ready for lunchboxes.
Storage Secrets for Long Lasting Homemade Fruit Leather
Store the individually wrapped strips in a clean, airtight container. Kept in a cool, dark pantry, this homemade fruit leather can last for several weeks. For maximum longevity, especially if you live in a humid climate, storing the sealed container in the refrigerator is advisable.
While freezing isn't strictly necessary, it will extend the quality for several months if you’ve managed to make a truly massive batch!
Recipe FAQs
How do I stop my Homemade Fruit Leather from sticking to the baking paper?
Ah, the sticking nemesis! The best bet is to use a silicone baking mat; they release like a dream. If you must use parchment paper, lightly spray it with a neutral cooking spray or brush it very thinly with oil first.
Make sure the leather is completely cool before attempting to peel it off, as warmth makes it cling stubbornly.
My fruit leather is brittle and cracking, not chewy what did I do wrong?
That sounds like it’s been cooked too hot! Think 'low and slow,' like a proper Sunday roast. High heat dries the outside too fast, causing it to crack rather than cure into a chewy texture.
Try dropping your oven temperature right down ideally below 180°F (82°C) and ensure you prop the door open slightly so the moisture can escape properly.
Can I use different fruits for my Homemade Fruit Leather, or am I stuck with berries?
Absolutely not stuck, you can use whatever takes your fancy! Stone fruits like plums and peaches work brilliantly, as do tropical favourites like mango and pineapple. Just be mindful that very watery fruits might take longer, and less acidic fruits might benefit from an extra squeeze of lemon juice to balance the flavour.
How long does homemade fruit leather actually keep, and what’s the best way to store it?
If made correctly and stored properly, it keeps fantastically well at room temperature for several weeks, sometimes even longer. The trick is to wrap each strip individually in wax paper or parchment paper, then seal them tightly in an airtight container away from direct sunlight.
If you live somewhere very humid, the fridge is a safer bet.
Do I need to add sugar or sweetener to the fruit puree for good results?
Nine times out of ten, no the fruit has plenty of natural sweetness, especially if you’re using ripe berries or mangoes. Always taste your puree first! Only add honey or maple syrup if your fruit is particularly tart.
Remember, the flavour concentrates during drying, so start conservatively with any added sugar.
What should the consistency of the puree be before I spread it on the tray?
You’re aiming for something smooth, like a thin pancake batter, but slightly thicker. If you're worried about seeds, push it through a fine sieve first. The most crucial bit is spreading it evenly about 1/8th of an inch thick so the edges don't dry out hours before the middle does.
Even thickness is the key to that perfect chewy bite!
Chewy Homemade Fruit Leather