Fruit Leather Roll Ups: Homemade and Chewy
- Time: Active 15 minutes, Passive 6 hours, Total 375 mins
- Flavor/Texture Hook: Concentrated strawberry sweetness with a flexible, velvety chew
- Perfect for: Healthy school lunches, hiking snacks, or a nostalgic weekend project
- Create Vibrant and Chewy Fruit Leather Roll Ups
- Why This Recipe Works
- Essential Component Analysis
- What You'll Need
- Equipment for Success
- The Cooking Process
- Pro Tips & Pitfalls
- Mix It Up
- Make-Ahead and Leftover Tips
- What to Serve This With
- Debunking Fruit Dehydration Myths
- Recipe FAQs
- 📝 Recipe Card
Create Vibrant and Chewy Fruit Leather Roll Ups
Imagine walking into your kitchen and being hit with the concentrated, jammy scent of sun ripened strawberries. It is a smell that feels like a warm hug, reminding you of summer afternoons and sticky fingers.
That is the magic of making these at home; you are essentially distilling the very best parts of the fruit into a thin, bendable sheet of pure joy. I still remember the first time I successfully peeled a sheet of this ruby red leather off the silicone mat without it tearing or sticking it felt like a genuine kitchen victory.
The hero of this entire operation is the strawberry. I chose strawberries because they possess a natural balance of sweetness and acidity that intensifies beautifully during the long, slow drying process.
While you might be tempted to use whatever fruit is on sale, strawberries are uniquely suited for this because of their high pectin content and vibrant pigments. Substitutes like watery melons or very fibrous pineapples often result in a leather that is either too brittle or unpleasantly stringy, whereas strawberries create that sought after velvety texture every single time.
We are going to skip the store-bought versions that are often loaded with artificial dyes and corn syrup. Instead, we are focusing on how three simple ingredients can be transformed by the gentle heat of your oven.
This process is about patience rather than complex technique, but the reward is a snack that tastes exactly like the fruit it came from, only better. Trust me, once you see that beautiful translucent red glow when you hold a strip up to the light, you will never want to go back to the boxed stuff.
Why This Recipe Works
Making these treats is a fascinating exercise in controlled dehydration. By understanding a few simple principles, you can ensure your snacks come out perfectly chewy rather than crunchy or sticky.
- Low Temperature Evaporation: Using a temperature of 65°C to 75°C (150°F–170°F) allows water to escape slowly without "cooking" the fruit, which preserves the bright color and fresh flavor profile.
- Pectin Structural Support: Strawberries are naturally rich in pectin, which acts as a structural glue, giving the leather its characteristic "bend" and preventing it from shattering when rolled.
- Acid Sugar Synergy: The addition of lemon juice does more than just add tang; it prevents the fruit from oxidizing (turning brown) and helps the pectin set into a firm, cohesive sheet.
- Honey Humectancy: Honey acts as a natural humectant, meaning it holds onto just enough moisture to keep the leather flexible for weeks instead of becoming a fruit cracker.
| Method | Total Time | Final Texture | Best For |
|---|---|---|---|
| Oven (Low Temp) | 6 hours | Uniformly chewy | Most home cooks; consistent results |
| Stovetop Dehydration | 8+ hours | Slightly thicker/tackier | Smaller batches; requires constant watch |
| Dehydrator | 10+ hours | Very consistent/matte | Bulk processing; very energy efficient |
Choosing between the stovetop and the oven really comes down to how much control you want over the environment. While the stovetop method is a classic "old school" way of drying fruit, it is much harder to maintain the consistent low heat needed for a large sheet.
The oven acts like a giant, controlled box that surrounds the fruit puree with even warmth, making it the superior choice for achieving that professional, store quality finish in a reasonable timeframe.
Essential Component Analysis
Every ingredient in this list plays a specific role in the final texture and shelf stability of your snack.
| Ingredient | Science Role | Pro Secret |
|---|---|---|
| Fresh Strawberries | Base Structure/Pectin | Use the ripest ones possible for the highest natural sugar content. |
| Lemon Juice | Ph Regulator/Antioxidant | Freshly squeezed juice has more active enzymes to keep the red color "popping." |
| Honey | Flexible Humectant | Swap for agave if you want a more neutral sweetness that doesn't mask the berries. |
What You'll Need
To get started, you only need three basic ingredients. The simplicity here is what makes the quality of your produce so important.
- 4 cups fresh strawberries (approx. 600g): Hulled and cleaned. Why this? They provide the bulk and the essential pectin for the leather's structure.
- Substitute: 600g of frozen strawberries, thawed (drain the excess water first).
- 1 tbsp lemon juice (15ml): Freshly squeezed. Why this? It prevents browning and helps the fruit fibers "knit" together during drying.
- Substitute: 15ml of lime juice for a slightly more tropical, zesty kick.
- 1 tbsp honey (21g): high-quality liquid honey. Why this? It keeps the final product pliable and prevents it from becoming brittle.
- Substitute: 21g of maple syrup, though it will add a slight autumnal woodsy note.
Equipment for Success
Having the right tools makes the spreading and peeling process much less stressful. You do not need fancy gadgets, but a few specific items will guarantee success.
- High Speed Blender: Necessary to get that "velvety" consistency. If the puree is grainy, the leather will be too.
- 12x17 inch Rimmed Baking Sheet: This specific size ensures the 4 cups of fruit spread to the correct 1/8 inch thickness.
- Silicone Baking Mat (like Silpat): This is my preferred surface because it is completely non stick.
- Offset Spatula: This is the secret to getting the edges thicker than the center, which prevents the outer parts from burning.
- Fine Mesh Sieve: Optional, but essential if you want a "seedless" professional look.
The Cooking Process

Follow these steps carefully to ensure your puree transforms into a perfect sheet of fruit.
- Prep the fruit. Hull the strawberries and give them a quick rinse under cold water.
- Create the base. Combine the strawberries, 15ml lemon juice, and 21g honey in your blender. Note: Using a high speed ensures all fruit fibers are completely broken down.
- Refine the texture. Process until the mixture is velvety and completely smooth.
- Optional sieving. Pour the puree through a fine mesh sieve into a bowl to remove seeds. Expect a silky, vibrant red liquid.
- Prepare the tray. Line your 12x17 inch baking sheet with a silicone mat or high-quality parchment paper.
- Pour and spread. Pour the puree onto the center of the tray and use an offset spatula to spread it toward the edges.
- Adjust the thickness. Aim for 1/8 inch thickness overall, but leave the edges slightly thicker. Note: Edges dry faster, so the extra thickness prevents them from becoming crisp.
- Begin dehydration. Preheat your oven to its lowest setting (65°C–75°C / 150°F–170°F).
- The long wait. Bake for 6 hours. Wait until the center is no longer tacky and the leather peels away easily.
- Cooling and rolling. Let the sheet cool completely on the tray before attempting to peel or cut it into strips.
Pro Tips & Pitfalls
One of the biggest mistakes I made early on was spreading the puree too thin in the middle. It resulted in a sheet that had a hole in the center while the edges were still raw. Always use a light touch with your spatula and check your tray for levelness in the oven; if your oven racks are slanted, the puree will pool on one side!
The Color Balance Strategy
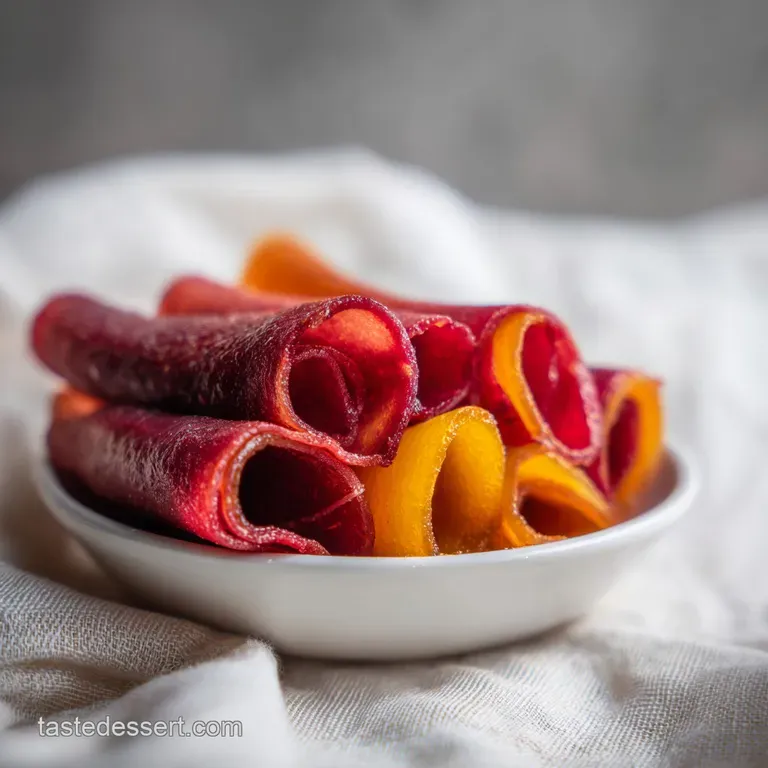
To make these look as delightful as they taste, I like to use a "three color garnish" strategy before I roll them up.
- Hibiscus Dust (Deep Red): Grind dried hibiscus flowers into a fine powder and lightly dust the wet puree before baking. It adds a tart punch and a stunning crimson depth.
- Fresh Mint sprigs (Green): Once the leather is dry and cooled, place tiny, thin leaves of mint along the strip before rolling. The green against the red is classic and beautiful.
- Lemon Zest ribbons (Yellow): Use a microplane to add tiny flecks of yellow zest to the surface right after it comes out of the oven. It provides a bright scent that hits you the moment you unwrap the roll.
Why Your Fruit Leather Is Brittle
If your snack is snapping like a cracker instead of bending like a ribbon, it usually comes down to one of two things: temperature or time.
| Problem | Root Cause | Solution |
|---|---|---|
| Brittle Edges | Edges spread too thin | Spread edges 1/4 thicker than the center next time. |
| Sticky Center | Uneven oven heat | Rotate the pan 180 degrees halfway through the 6 hours. |
| Tough/Dark Leather | Oven temp too high | Use an oven thermometer to ensure you aren't exceeding 75°C. |
Cooking these for exactly 6 hours is usually the sweet spot, but every oven is a little different. If you find the leather is still sticky to the touch after the time is up, give it another 30 minutes.
It should feel like the back of a sticky note tacky, but not leaving any residue on your finger.
Common Mistakes Checklist
- ✓ Never use wax paper; the wax will melt into your fruit and it will stick forever.
- ✓ Ensure your baking sheet is perfectly flat; warped pans cause uneven drying.
- ✓ Don't skip the lemon juice; without it, the strawberries will turn a muddy brown.
- ✓ Let the leather cool for at least 30 minutes before peeling to allow the structure to set.
- ✓ If using parchment paper, cut the strips with the paper still attached for easy rolling.
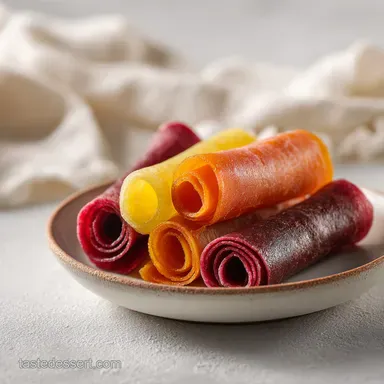
Mix It Up
Once you have mastered the basic strawberry version, the world of fruit combinations is your oyster. Just remember to keep your total fruit volume at 4 cups to ensure the drying times remain consistent.
Tropical Mango Lime
Swap the strawberries for 4 cups of fresh mango chunks. Keep the honey and lemon juice, but maybe add a pinch of chili powder for a "Mangonada" inspired snack. Mango is naturally very high in sugar and fiber, so it creates a very sturdy, almost "leathery" texture that is incredibly satisfying to chew.
The Budget Friendly Berry Blend
If fresh strawberries are out of season, I often use a mix of frozen blueberries, raspberries, and blackberries. For another fun snack idea, you might want to try this Simple strawberry fruit leather which uses a slightly different ratio. Mixing berries provides a complex, tart flavor profile that feels very sophisticated for a homemade snack.
make-ahead and Leftover Tips
Storage is key if you want these to stay chewy. If you leave them out on the counter, they will eventually absorb moisture from the air and get sticky, or dry out and get tough.
Storage: Keep your rolls in an airtight container or a heavy duty zip top bag. They will stay fresh at room temperature for up to 2 weeks. For longer storage, you can keep them in the fridge for 1 month or the freezer for up to 6 months.
Zero Waste: If you ended up with brittle edges that snapped off, do not throw them away! Grind those "fruit chips" in a blender to create a concentrated fruit powder. It is absolutely amazing sprinkled over vanilla ice cream or stirred into morning yogurt.
You can also use the strawberry tops (the green parts) to infuse cold water for a refreshing, zero waste "strawberry water" while you wait for your leather to dry.
What to Serve This With
While these are usually a stand alone snack, they can be part of a larger presentation. I love putting them on a dessert "charcuterie" board. Pair them with some dark chocolate squares, a handful of toasted almonds, and maybe some creamy brie cheese.
The tartness of the strawberry cuts through the fat of the cheese and chocolate beautifully.
For a nostalgic lunchbox feel, you can serve them alongside a small thermos of cold milk or even a dollop of Greek yogurt for dipping. If you're looking for more fun ways to prep fruit snacks, check out this Chewy homemade fruit leather guide. It's a great way to see how different fruit bases behave during the long drying process.
Debunking Fruit Dehydration Myths
There are a lot of misconceptions about making fruit snacks at home that can discourage people from trying. Let's clear some of those up.
"You need a dedicated dehydrator to make good fruit leather." This is simply not true. While a dehydrator is a great tool, a standard home oven set to its lowest temperature works perfectly well.
The key is air circulation, which you can mimic by slightly propping the oven door open with a wooden spoon if your oven doesn't have a convection fan.
"Homemade fruit leather is only 'healthy' if you don't add sugar." While strawberries have natural sugars, adding a small amount of honey or maple syrup is often necessary for texture. Without a humectant, the fruit fibers can become incredibly tough and unpleasant to eat once dried.
The goal is a balance of nutrition and enjoyment!
"The fruit must be cooked on the stovetop first." Many recipes suggest simmering the fruit to thicken it before drying. While this can speed up the oven time, it often "mutes" the fresh flavor of the berries.
Starting with a raw puree, as we do here, preserves those bright, floral notes of the fresh strawberry that make the final snack so special.
I hope you feel ready to tackle this project! It is a slow burn process, but the moment you peel that first strip of ruby red fruit and take a bite, you will realize why it is so much better than anything you can buy in a store. Happy drying!

Recipe FAQs
How to roll up homemade fruit leather?
Peel the dried fruit sheet from the silicone mat or parchment paper after cooling for at least 30 minutes. If you used parchment, cut the leather into strips while the paper is still attached, then roll the strips tightly into cylinders for neat, individual portions.
Can I use frozen fruit for fruit leather?
No, stick with fresh. Frozen berries release excess moisture during thawing, which thins the puree too much and interferes with the final texture. If you enjoyed the precise moisture management needed for this recipe, you can apply that same attention to fruit consistency when making our Blueberry Blackberry Pie.
What fruit makes the best fruit leather?
Fresh strawberries are ideal because they possess the perfect balance of natural pectin and sugar to create a pliable, chewy texture. Ensure you hull them well and sieve the puree to remove seeds for a professional, velvety finish.
Can I make fruit leather in the air fryer?
No, the air fryer is not suitable for this process as it cannot maintain the low, consistent temperature of 150°F 170°F required for long duration dehydration. Using an air fryer will likely cause the exterior to crisp or burn before the center of your puree has finished setting.
Is it true I must use wax paper to prevent sticking?
False, using wax paper is a common mistake. The heat from the oven causes the wax coating to melt directly into your fruit puree, ruining the final result and making it impossible to peel cleanly.
Why is my fruit leather still tacky in the center after 4 hours?
You likely spread the puree too thick or your oven temperature dropped below 150°F. If the center remains tacky, continue baking for up to 6 total hours until the surface is dry to the touch and peels away cleanly.
What happens if I skip the lemon juice?
The strawberries will turn a muddy, unappealing brown. The acidity in the lemon juice is essential for preserving the bright, vibrant color of the fruit while it undergoes the lengthy drying process.
Homemade Fruit Leather Roll Ups
Ingredients:
Instructions:
Nutrition Facts:
| Calories | 26 kcal |
|---|---|
| Protein | 0.4 g |
| Fat | 0.2 g |
| Carbs | 6.5 g |
| Fiber | 1.2 g |
| Sugar | 4.8 g |
| Sodium | 1 mg |
