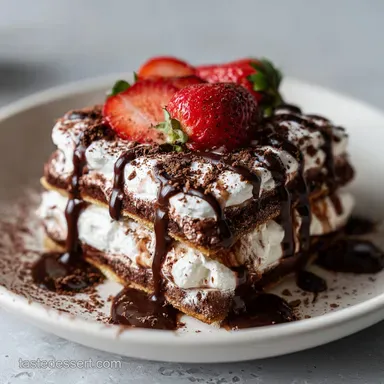
Hot Chocolate Lasagna: No-Bake Marvel

- Time: Active 25 minutes, Passive 4 hours, Total 4 hours 25 minutes
- Flavor/Texture Hook: Shattering chocolate crust meets airy cocoa clouds
- Perfect for: Holiday parties, potlucks, or low effort weekend treats
- Why This Hot Chocolate Lasagna Works
- Essential Recipe Specifications and Timing
- Components Needed for Your Grocery List
- Essential Tools for a Simple Build
- Step-by-Step Instructions for Layering
- Pro Techniques to Avoid Sogginess
- Flavor Twists and Easy Substitutions
- Myths About Layered Desserts
- Storage Methods and Food Waste Tips
- Perfect Pairings for This Dessert
- Recipe FAQs
- 📝 Recipe Card
Why This Hot Chocolate Lasagna Works
Have you ever had one of those days where you desperately crave the comfort of a steaming mug of cocoa, but the thermometer says it's way too humid for that? That's exactly how this recipe happened in my kitchen. I wanted those deep, malty notes of my favorite Hot Chocolate recipe but in a form that didn't involve standing over a stove.
The first time I made this, I underestimated the "cure" time. I was so impatient that I sliced into it after only an hour. It was a delicious mess, but it was still a mess. I've since learned that the magic happens in the silence of the refrigerator.
It's where the layers introduce themselves to each other and decide to stick together.
You're going to love how the salty sweet crust plays against the light as-air mousse. It isn't just a dessert; it's a structural feat of dairy and cocoa that looks like you spent all day on it, even though we both know you just used your hand mixer for ten minutes.
Let's get into what makes this particular version so much better than the ones you see on those generic recipe sites.
Cold Set Engineering: The saturated fats in the cream cheese and butter act as a mortar, solidifying at fridge temperatures to hold the heavy pudding layers without collapsing.
Starch Suspension: By using 710ml of milk instead of the usual amount for instant pudding, we create a denser, more stable "ganache style" layer that won't weep over time.
Cocoa Hydration: Mixing the dry hot chocolate powder directly into the cream cheese allows the fat to encapsulate the sugar particles, preventing a grainy texture.
Moisture Migration: A brief chill of the crust before adding the mousse creates a fat barrier, ensuring the Oreo base stays crispy rather than turning into a soggy sponge.
Decision Guide for Cocoa Lovers
| Priority | Method | Texture | Result |
|---|---|---|---|
| Speed | 15 min assembly | Soft and creamy | Ready to eat in 2 hours |
| Precision | Overnight set | Distinct, sharp layers | Best for clean party slices |
| Texture | Freeze the crust | Shattering crunch | Maximum contrast in every bite |
There's a massive difference between a "classic" layered dessert and the "fast" version we are making today. While a classic trifle might involve baking sponges or tempering eggs, our method relies on clever shortcuts that actually improve the stability of the dish in a high traffic party setting.
The Component Analysis
| Ingredient | Science Role | Pro Secret |
|---|---|---|
| Cream Cheese | Structural stabilizer | Use full fat bricks only for a firm set |
| Oreo Cookies | Hydrophobic base | Don't remove the filling; it helps bind the crust |
| Hot Cocoa Mix | Flavor emulsifier | Use a mix with milk solids for extra creaminess |
| Whipped Topping | Aeration agent | Fold gently to keep the air bubbles intact |
When you're looking for that deep, nostalgic flavor, I often reach for a batch of my Better Than Cadburys recipe to use as the cocoa base. It has that specific maltiness that store-bought packets sometimes lack, and it transforms the middle layer from "sweet" to "sophisticated."
Essential Recipe Specifications and Timing
Before we start grabbing bowls, let's look at the numbers. This recipe makes 15 generous servings, which is perfect because people always come back for seconds. You'll need a standard 9x13 inch (23x33 cm) baking dish.
If you try to squeeze this into a smaller pan, the layers will overflow, and you'll lose that beautiful striated look when you slice into it.
The timing is the only part you can't rush. While the active work is only about 25 minutes, the four hour chill is mandatory. I actually prefer making this a full 24 hours in advance.
The cookies in the crust soften just a tiny bit not enough to be soggy, but enough to make the whole thing feel like a cohesive cake rather than a pile of disparate parts.
If you are planning to serve this at an outdoor event, keep it in the cooler until the very last second. Because it relies on whipped topping and cream cheese for structure, it will start to "slump" if it sits in the sun for more than 20 minutes.
But honestly, it usually disappears way faster than that anyway.
Components Needed for Your Grocery List
- 36 standard Oreo cookies: Don't use Double Stuf here; the ratio of cookie to cream will be off, and the crust won't set firmly. Why this? Provides the dark cocoa base and necessary structural crunch.
- 85g unsalted butter: Melted and cooled slightly. Why this? Acts as the "glue" that turns cookie crumbs into a solid crust.
- 0.5g fine sea salt: Just a pinch. Why this? Sharpens the chocolate flavor and cuts through the heavy sugar.
- 225g brick style cream cheese: Must be softened to room temperature. Why this? The backbone of the mousse layer; provides tang and stability.
- 60g powdered sugar: Sifted if it's lumpy. Why this? Sweetens the cream cheese without adding a gritty texture.
- 60g instant hot cocoa mix: Your favorite brand or homemade mix. Why this? Infuses the middle layer with that specific "hot cocoa" nostalgia.
- 30ml whole milk: Just enough to loosen the mousse. Why this? Helps the cocoa mix incorporate into the cheese smoothly.
- 450g whipped topping: Divided into two equal portions. Why this? Creates the airy, cloud like texture in both the mousse and top layer.
- 220g instant chocolate pudding mix: Two standard packages. Why this? Provides a deep chocolate contrast and thickens the assembly.
- 710ml cold whole milk: Keep it icy cold. Why this? Reacts with the instant pudding starches for an immediate set.
- 125g mini marshmallows: For the classic topping. Why this? Visual cue for "hot chocolate" and adds a chewy texture.
- 85g semi sweet chocolate chips: Mini chips work best for even distribution. Why this? Adds a punch of real chocolate to the garnish.
| Original Ingredient | Substitute | Why It Works |
|---|---|---|
| Oreo Cookies | Graham Crackers | Adds a honey cinnamon note. Note: Result will be less "dark" in flavor. |
| Whipped Topping | Stabilized Whipped Cream | Uses real dairy. Note: May be less stable if sitting out at room temp. |
| Whole Milk | Oat Milk (Full Fat) | Similar viscosity. Note: Adds a slight nutty undertone to the pudding. |
Essential Tools for a Simple Build
We are keeping it simple today. You don't need a stand mixer, though you can use one if you want to feel fancy. A simple hand mixer is actually better here because it gives you more control over the volume of the whipped topping. You'll also need a food processor to pulverize the cookies.
If you don't have one, just put them in a heavy duty zip top bag and bash them with a rolling pin. It's surprisingly therapeutic.
Beyond that, grab a large mixing bowl for the pudding and a medium one for the mousse layer. An offset spatula is your best friend for getting those layers perfectly flat. If you don't have one, the back of a large spoon works, but the spatula makes you feel like a pro baker.
Chef's Tip: Place your mixing bowls in the freezer for 5 minutes before using them. Keeping the ingredients cold while you work prevents the fats from melting, which is the secret to those distinct, crisp layers you see in bakery windows.
step-by-step Instructions for Layering

1. Construct the Foundation
Pulse the 36 Oreo cookies in a food processor until they resemble fine, dark sand. Pour in the 85g of melted butter and 0.5g of salt, pulsing again until the mixture looks like wet soil. Press this firmly into the bottom of your 9x13 pan.
Note: Use the bottom of a flat measuring cup to pack it down tightly so it doesn't crumble when served.
2. Whip the Hot Cocoa Mousse
In a medium bowl, beat the 225g of softened cream cheese with the 60g of powdered sugar, 60g of hot cocoa mix, and 30ml of milk. Use your hand mixer on medium speed until the mixture is pale brown and completely smooth. Stop frequently to scrape down the sides of the bowl.
3. Build the First Layer
Gently fold 225g of the whipped topping into the cream cheese mixture using a rubber spatula. Do not use the mixer for this step! You want to keep all that incorporated air. Spread this velvety mousse over the chilled cookie crust until it reaches the very edges of the pan.
4. Create the Pudding Suspension
In a separate large bowl, whisk together the 220g of instant chocolate pudding mix and the 710ml of cold milk. Whisk vigorously for about 2 minutes until the whisk leaves faint tracks in the mixture. Let it sit for 3 minutes to thicken further before moving on.
5. The Final Cloud Cover
Carefully pour the thickened pudding over the mousse layer. Use your offset spatula to smooth it out into an even sheet. Then, spread the remaining 225g of whipped topping over the pudding. This is your "marshmallow fluff" layer, so it's okay if it looks a bit billowy and rustic.
6. The Mandatory Cold Cure
Scatter the 125g of mini marshmallows and 85g of semi sweet chocolate chips over the top. Cover the pan loosely with plastic wrap and slide it into the fridge. Let it chill for at least 4 hours.
If you try to cut it sooner, the pudding will slide right off the mousse, and we want beautiful, defined layers.
Pro Techniques to Avoid Sogginess
The biggest heartbreak with a dessert lasagna is a soggy crust. It usually happens because the moisture from the pudding seeps down through the mousse and hits the cookie crumbs. To prevent this, make sure your butter is completely incorporated into the crumbs. That fat acts as a waterproof seal.
Another common pitfall is using "tub" margarine instead of real butter for the crust. Margarine has a higher water content, which will definitely make your Oreos mushy. Stick to high-quality unsalted butter. It stays harder when cold, giving you that satisfying "snap" when your fork hits the bottom of the plate.
If you're finding that your pudding isn't setting quite right, it's often a temperature issue. Ensure your milk is coming straight from the back of the fridge. Warm milk won't trigger the starches in the instant pudding mix correctly, leaving you with a soup rather than a solid layer.
Quick Fix Table
| Problem | Root Cause | Solution |
|---|---|---|
| Runny Layers | Milk was too warm | Chill the entire dish in the freezer for 30 mins to jumpstart the set. |
| Crumbly Crust | Not enough butter/pressure | Press the crumbs harder with a flat bottomed glass next time. |
| Lumpy Mousse | Cold cream cheese | Ensure the cheese is truly room temp before adding the dry cocoa mix. |
Common Mistakes Checklist
- ✓ Using "Double Stuf" Oreos (too much cream makes the crust greasy).
- ✓ Using "Cook and Serve" pudding instead of Instant (it won't set without heat).
- ✓ Over mixing the whipped topping (this causes it to deflate and turn watery).
- ✓ Skipping the chill time (layers will bleed into each other).
- ✓ Forgetting to sift the powdered sugar (leads to white lumps in the brown mousse).
Flavor Twists and Easy Substitutions
If you're feeling adventurous, you can easily turn this into a Peppermint Mocha Lasagna. Just add half a teaspoon of peppermint extract to the cream cheese layer and crush some candy canes over the top instead of the chocolate chips. It’s a total game changer for Christmas parties.
For those who want something a bit more adult, try a Salted Caramel version. Drizzle a half cup of salted caramel sauce over the pudding layer before adding the final whipped topping. The salt cuts through the richness and makes it feel much more like something you'd find at a high end bistro.
To Achieve Professional Slices
- The Hot Knife: Dip your knife in a tall jar of hot water and wipe it dry between every single cut.
- The First Square: Accept that the first piece you pull out will likely be the "ugly" one. Use it as a taste test.
- Clean Transitions: If the pudding starts sticking to the knife, your lasagna isn't cold enough. Put it back in the fridge for 30 minutes.
If you want X, do Y
- If you want a deeper chocolate flavor, swap the milk chocolate pudding for Dark Chocolate or Dutch Processed cocoa mix.
- If you want a sturdier cake like texture, increase the cream cheese to 340g and reduce the milk in the pudding by 60ml.
- If you want a lower sugar version, use sugar-free pudding and sugar-free whipped topping (note: the texture will be slightly softer).
Myths About Layered Desserts
One common myth is that you can't use real whipped cream for this. You actually can, but you need to stabilize it. If you just whip heavy cream and sugar, it will weep and collapse within a few hours.
To use real cream, fold in a little bit of Greek yogurt or a stabilizer like "Whip It" to ensure it holds its shape as long as the whipped topping would.
Another misconception is that the crust needs to be baked to be "safe" or crunchy. Since Oreos are already a baked product, the butter is simply acting as a binder. Chilling the crust actually creates a more "fudgy" and dense base that complements the light layers above it much better than a dry, baked crust would.
Finally, people often think you can swap instant pudding for the "cook and serve" variety by just adding it cold. This will never work. The starches in cook and-serve pudding require thermal energy to gelatinize. If you use it cold, you will just have grainy, flavored milk sitting on top of your mousse.
Storage Methods and Food Waste Tips
This Hot Chocolate Lasagna actually keeps surprisingly well. You can store it in the refrigerator for up to 5 days, though the marshmallows on top will start to get a bit soft and "melty" after day three. I suggest keeping it covered tightly with plastic wrap or a lid to prevent it from picking up any "fridge smells."
You can also freeze this! It actually makes a fantastic frozen treat that tastes almost like an ice cream cake. Wrap the entire pan in a double layer of plastic wrap and then a layer of foil. It will stay fresh for up to 2 months.
To serve, just let it sit on the counter for about 15 minutes to take the edge off the frost before slicing.
Don't throw away the extra cookie crumbs or that last bit of whipped topping. I always save my leftover Oreo dust to sprinkle over vanilla ice cream or to stir into my morning yogurt. If you have extra pudding mix, you can whisk it with a little less milk to create a quick chocolate dip for strawberries.
Perfect Pairings for This Dessert
Because this dish is so rich and creamy, it needs something to cut through that intensity. A strong, bitter espresso is the classic choice. The heat of the coffee melting the cold cream in your mouth is a sensory experience that’s hard to beat.
If you're serving this to kids, a glass of cold milk with a dash of cinnamon is always a hit.
If you’re looking to build out a full dessert table, consider pairing this with something fruity and acidic. A side of fresh raspberries or a tart strawberry sauce provides the perfect bright contrast to the heavy chocolate. For something truly decadent, serve it alongside some The Oh My recipe truffles for a "Chocolate Overload" theme.
Finally,, don't forget the texture. Since this lasagna is mostly soft, serving it with some Foolproof Homemade English recipe toffee on the side adds a fantastic crunch that keeps the palate interested. It’s all about balancing those layers of flavor and feel to create a truly memorable dessert experience.

Recipe FAQs
Can I make Hot Chocolate Lasagna ahead of time?
Yes, absolutely. In fact, it's best made at least 4 hours in advance, and ideally a full 24 hours ahead. This allows the layers to meld together for the best texture and flavor.
Why is my crust soggy?
The crust can get soggy if there's too much moisture transfer. Ensure the butter is fully incorporated into the cookie crumbs to create a hydrophobic barrier, and always chill the crust before adding wet layers.
How do I get clean slices?
Dip your knife in hot water and wipe it dry between each cut. This simple trick helps the knife slice cleanly through the chilled layers without dragging, ensuring beautiful presentation.
What's the difference between instant and cook and-serve pudding mix?
Do not substitute cook and-serve pudding for instant. Instant pudding's starches gelatinize at cold temperatures, crucial for this no-bake dessert, while cook and-serve requires heat to thicken and won't set properly otherwise.
Can I use real whipped cream instead of whipped topping?
Yes, but you need to stabilize it first. Unstabilized whipped cream will weep and collapse; fold in a little Greek yogurt or use a commercial stabilizer to ensure it holds its shape like the processed topping.
What if my pudding layer isn't setting?
Ensure your milk is very cold. Warm milk won't properly activate the starches in instant pudding mix, leading to a thin, unset layer. This is similar to how temperature precision is key for proper emulsification in recipes like The Creamy Dream Authentic Classic Risotto Recipe.
How should I store leftovers?
Store covered tightly in the refrigerator for up to 5 days. For a longer shelf life, wrap the entire pan well and freeze for up to 2 months; it becomes a delicious frozen dessert.
Hot Chocolate Lasagna
Ingredients:
Instructions:
Nutrition Facts:
| Calories | 456 kcal |
|---|---|
| Protein | 7.4 g |
| Fat | 25.1 g |
| Carbs | 55.2 g |
| Fiber | 1.7 g |
| Sugar | 38.9 g |
| Sodium | 358 mg |
