Hot Fudge Pudding Cake: Old Fashioned
- Time:15 minutes active + 40 minutes baking = Total 55 minutes
- Flavor/Texture Hook: Velvety molten sauce with a light, spongy cake topper
- Perfect for: Cozy winter nights or an effortless "wow" dessert for guests
- The Best Hot Fudge Pudding Cake
- Why This Dessert Actually Works
- Essential Ingredient Breakdown
- Getting Your Gear Ready
- Step-by-Step Baking Guide
- Solving Common Baking Issues
- Fun Variations and Swaps
- Adjusting Your Batch Size
- Debunking Dessert Myths
- Keeping Leftovers Fresh
- What to Serve Alongside
- Recipe FAQs
- 📝 Recipe Card
The smell of bubbling cocoa and toasted butter is enough to make anyone run into the kitchen. I remember one rainy Tuesday when the house felt chilly and we all just wanted something that felt like a warm hug.
I pulled out my old baking dish, and as the boiling water hit that cocoa layer, the kitchen transformed into a chocolate shop.
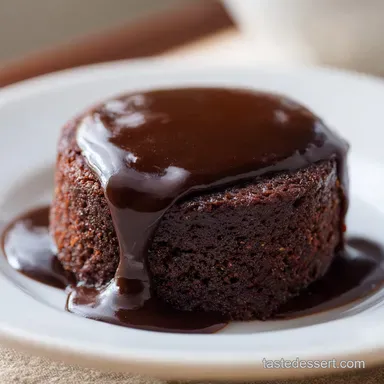
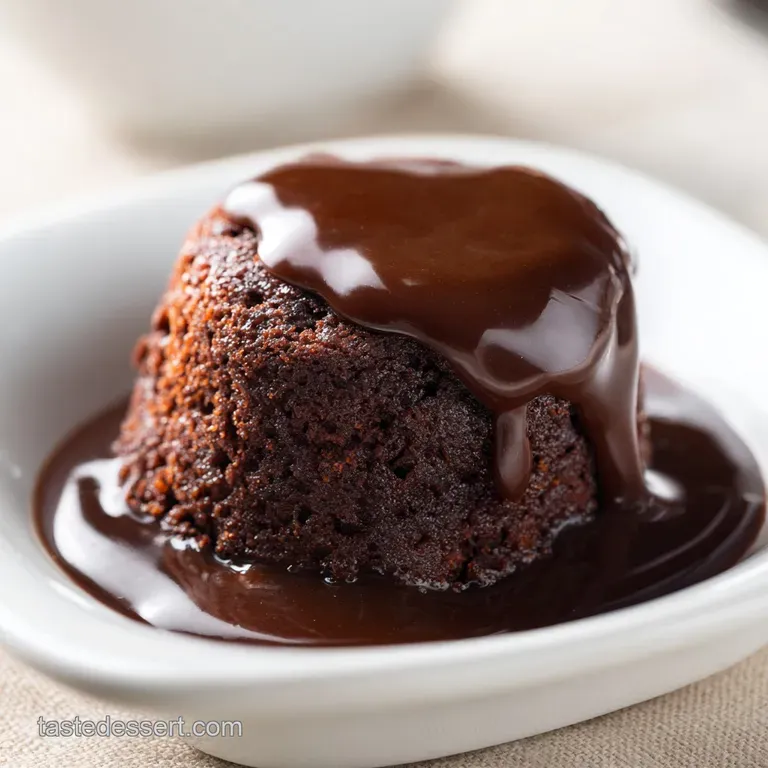
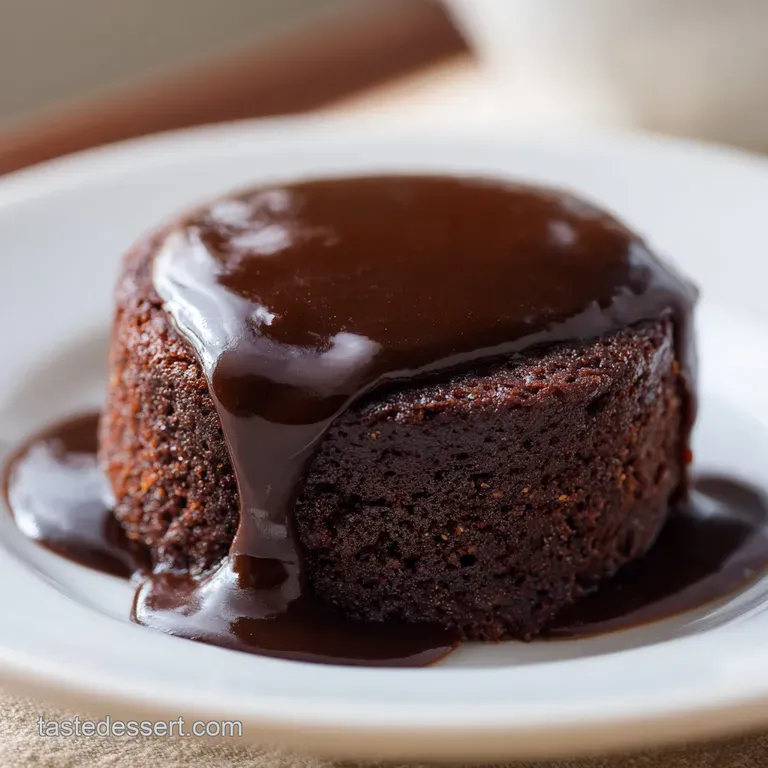
There's something so satisfying about watching the oven window as the edges set and the center stays slightly wobbly. It isn't about precision or fancy piping; it's about that messy, fudgy contrast. When you scoop it into a bowl while it's still steaming, the sauce clings to the cake in the most wonderful way.
You can expect a dessert that is decadent without being overly complicated. This Hot Fudge Pudding Cake is a bit of a magic trick, giving you a cake and a sauce at the same time. Trust me, once you see that molten pool at the bottom, you'll never go back to standard brownies.
The Best Hot Fudge Pudding Cake
When you're craving something rich, this is the gold standard. It's a one pan wonder that manages to be both a sponge cake and a rich fudge sauce. I've found that the key is not to overthink the mixing. You want a batter that is smooth but not overworked, which keeps the cake tender.
The contrast here is what makes it. You have the lightness of the cake competing with the heavy, velvety texture of the sauce. It's a wonderful experience to dig a spoon through the top layer and hit that thick, dark chocolate pool underneath.
If you're looking for something equally chocolatey but with a different vibe, you might like a Chocolate Souffle, which is a bit more formal. But for a casual family night, this pudding cake is the way to go.
Why This Dessert Actually Works
I used to wonder why the cake didn't just mix with the sauce. It turns out it's all about how the ingredients react to heat and water.
- Density Gap: The batter is thicker and contains leavening agents, causing it to float. The sugar and cocoa mix, once hit with water, becomes a heavy syrup that stays put.
- The Water Trigger: Boiling water dissolves the brown sugar and cocoa instantly, creating a thin liquid that seeps under the batter.
- Steam Lift: As the water heats up in the oven, it creates steam that helps the cake rise quickly, pushing it away from the sauce.
- Starch Gelatinization: According to Serious Eats, the flour in the cake absorbs the moisture from the milk and eggs, setting into a stable structure while the sauce remains liquid.
Since you're choosing a method, consider if you want the classic oven finish or a faster approach.
| Method | Time | Texture | Best For |
|---|---|---|---|
| Oven Bake | 55 mins | Spongy top, molten base | Classic family dessert |
| Stovetop (Steamed) | 60 mins | Extremely moist, fudgy | Ultra rich consistency |
| Microwave | 10 mins | More like a lava cake | Single servings/Quick cravings |
Let's look at what the individual parts are actually doing in the pan.
Component Analysis
| Ingredient | Science Role | Pro Secret |
|---|---|---|
| Boiling Water | Solubilizer | Use a kettle for a true rolling boil to melt cocoa fully |
| Baking Powder | Leavener | Fresh powder ensures the cake floats above the sauce |
| Brown Sugar | Humectant | Provides the molasses depth and keeps the sauce velvety |
| Whole Milk | Hydrator | Fat in the milk prevents the cake from becoming rubbery |
Essential Ingredient Breakdown
For the cake base, you'll need: - 1/2 cup (115g) unsalted butter, melted Why this? Adds richness and a velvety crumb - 3/4 cup (150g) granulated sugar Why this? Stabilizes the cake structure - 3 tbsp (21g) cocoa powder Why this?
Deep chocolate base color - 1 egg (50g) Why this? Binds the batter and adds lift - 1 tsp (5ml) vanilla extract Why this? Enhances the cocoa notes - 3/4 cup (180ml) whole milk Why this? Creates a tender, moist cake -
1 cup (125g) all purpose flour Why this? Provides the necessary structure - 1 tsp (4g) baking powder Why this? Essential for the "float" effect - 1/4 tsp (1.5g) salt Why this? Balances the sweetness
For the fudge topping: - 1/2 cup (100g) packed light brown sugar Why this? Creates the syrupy sauce - 1/4 cup (25g) cocoa powder Why this? Intensifies the fudge flavor - 1 cup (240ml) boiling water Why this? The catalyst for the
Sauce layer
Ingredient Swaps
| Original Ingredient | Substitute | Why It Works |
|---|---|---|
| Whole Milk (3/4 cup) | Almond Milk (3/4 cup) | Similar liquid ratio. Note: Slightly thinner cake |
| Granulated Sugar | Coconut Sugar | Similar sweetness. Note: Darker color and earthier taste |
| All Purpose Flour | gluten-free Blend | Works if it has xanthan gum. Note: Crumb may be slightly grainier |
| Unsalted Butter | Coconut Oil (Melted) | Same fat content. Note: Adds a subtle tropical hint |
Getting Your Gear Ready
You don't need much for this, but the right pan is non negotiable. I use a 9x9 inch square baking dish. If you use something too large, the sauce will spread too thin and might evaporate or burn.
A good whisk is your best friend here. You want to get the lumps out of the cocoa powder and flour. If you have a handheld mixer, that works too, but a whisk is usually enough.
Finally, have a kettle ready. The water needs to be boiling the moment you're ready to pour it. If it's just "hot," the cocoa and brown sugar won't dissolve properly, and you'll end up with clumps in your sauce.
Step-by-step Baking Guide
Right then, let's get into the process. Follow these steps closely, especially the part about not stirring.
- Preheat your oven to 350°F (175°C). Melt the butter and whisk in the granulated sugar and 3 tbsp of cocoa powder. Note: Use low heat to avoid burning the butter.
- Beat in the egg and vanilla extract until smooth.
- Gradually stir in the milk, then fold in the flour, baking powder, and salt until the batter is mahogany colored and free of large lumps.
- Pour the batter into a greased 9x9 inch baking dish.
- In a separate small bowl, combine the brown sugar and 1/4 cup of cocoa powder.
- Sprinkle this mixture evenly across the top of the raw batter without stirring. Note: Keep the cocoa layer on top; don't mix it in!
- Carefully pour the boiling water over the back of a spoon onto the cocoa layer to avoid disturbing the batter.
- Bake for 35–40 minutes until the edges are set and pulling slightly away from the sides, while the center remains slightly soft and the sauce is bubbling around the edges.
Chef's Tip: To get that deep, professional color, try adding a pinch of espresso powder to the cocoa mixture. It doesn't make the cake taste like coffee, but it makes the chocolate taste "more chocolatey."
Solving Common Baking Issues
The most common complaint with this recipe is the sauce not forming. Usually, this happens because the water wasn't hot enough or the cocoa layer was stirred into the batter.
Why Your Sauce Separated
If you see oily streaks in your sauce, it's usually because the butter in the batter didn't emulsify with the milk. Make sure your milk is at room temperature before adding it to the melted butter.
Why Your Cake Stayed Flat
If the cake didn't rise above the sauce, your baking powder might be expired. Check the date on the tin! Also, ensure you didn't over mix the flour, which can kill the air bubbles.
Fixing a Dry Cake
Over baking is the enemy here. If the center doesn't have a slight wobble, it's probably too dry. Next time, pull it out 2 minutes earlier.
| Problem | Root Cause | Solution |
|---|---|---|
| Clumpy Sauce | Water not boiling | Use a kettle for 212°F (100°C) water |
| Cake Sinks | Over mixing batter | Stir until just combined, don't over beat |
| Burnt Edges | Oven too hot | Check oven temp with a thermometer |
Common Mistakes Checklist:
- ✓ Did you grease the pan? (Prevents sauce from sticking)
- ✓ Is the water truly boiling? (Essential for dissolving cocoa)
- ✓ Did you avoid stirring the water into the batter? (Prevents a muddy mess)
- ✓ Did you check for "pulling" at the edges? (The sign of doneness)
Fun Variations and Swaps
If you want to change things up, there are plenty of ways to tweak this. For a date night, you can make a "hot fudge pudding cake for two" by using ramekins. Just halve the ingredients and reduce the bake time to about 20–25 minutes.
For those who like a bit of crunch, try adding 1/2 cup of chopped pecans or walnuts to the batter. The nuttiness cuts through the richness of the chocolate beautifully.
If you love the idea of a layered chocolate treat, you might also enjoy these Homemade Oreos for a crispier contrast to this soft cake.
Decision Shortcut
- If you want a richer sauce, use dark brown sugar instead of light.
- If you want a lighter cake, sift the flour and cocoa powder together first.
- If you're using a 9x13 pan, multiply the recipe by 1.5 and add 5–10 minutes to the bake time.
Adjusting Your Batch Size
Scaling this recipe requires a bit of care because the ratio of water to batter determines the sauce thickness.
Scaling Down (Half Batch): Use a 5x5 or 6x6 inch pan. Since you can't easily split one egg, beat the egg in a small bowl first and then use half of it (about 25g). Reduce the baking time by about 20%, but keep an eye on that center wobble.
Scaling Up (Double Batch): I recommend using two 9x9 pans rather than one giant one to ensure the center cooks through. If you must use a larger pan, lower the oven temp to 325°F and extend the bake time.
Don't double the salt or baking powder exactly; use 1.5x to avoid a metallic taste or an over inflated cake that collapses.
Debunking Dessert Myths
You might hear that you need to "bloom" your cocoa powder in the oven for a better flavor. While that's true for some cakes, here the boiling water does the blooming for you instantly, so don't bother with the extra step.
Another myth is that adding a splash of vinegar helps the rise. In this recipe, the baking powder and the steam from the water are doing all the heavy lifting. Vinegar would just mess with the flavor of the fudge.
Keeping Leftovers Fresh
Storage for this dish is a bit tricky because the texture changes.
Fridge: Store in an airtight container for up to 3 days. The sauce will thicken into a ganache like consistency in the cold.
Freezer: I don't recommend freezing the whole dish, but you can freeze individual slices. Wrap them tightly in foil and freeze for up to 2 months.
Reheating: This is the best part. Pop a slice in the microwave for 20 30 seconds. The sauce will melt back into a liquid state, making it taste just like it came out of the oven.
Zero Waste Tip: If you have leftover cocoa powder or melted butter, use them to make a quick chocolate glaze for some cookies or a simple fudge.
What to Serve Alongside
To balance the intensity of the chocolate, I love serving this with a scoop of cold vanilla bean ice cream. The way the ice cream melts into the hot sauce is just wonderful.
Fresh raspberries or sliced strawberries add a tartness that cuts through the sugar. A dollop of unsweetened whipped cream is another great option if you want something a bit lighter.
If you're planning a full dessert spread, pairing this with some Butterscotch Fudge offers a great contrast in flavor profiles, moving from deep cocoa to salty sweet butterscotch.
Recipe FAQs
Is it true that I should stir the boiling water into the batter?
No, this is a common misconception. Stirring will blend the layers and prevent the distinct fudge sauce from forming at the bottom of the pan.
How to ensure the fudge sauce forms properly?
Sprinkle the brown sugar and cocoa mixture evenly over the raw batter. Pour the boiling water gently over the back of a spoon to avoid disturbing the cake layer.
Why is the center of my cake still soft after 40 minutes?
This is the intended texture. While the edges should be set and pulling away from the sides, a slightly soft center creates the signature pudding consistency.
Can I use an 8x8 inch pan instead of a 9x9?
Yes, but increase the baking time. A smaller pan creates a deeper cake, so you may need to bake it for slightly longer than the standard 35-40 minutes.
How to store and reheat leftovers?
Keep in an airtight container in the refrigerator for up to three days. Microwave individual portions for 20-30 seconds to return the sauce to a liquid state.
Is it true that I must use a double boiler to melt the butter?
No, this is a common misconception. Melting the butter on low heat in a saucepan or in the microwave is perfectly sufficient for this recipe.
Can I substitute the whole milk for a non-dairy alternative?
Yes, unsweetened almond or soy milk works well. If you enjoyed the moisture balance here, apply the same principle to our cookie dough cups.
Hot Fudge Pudding Cake