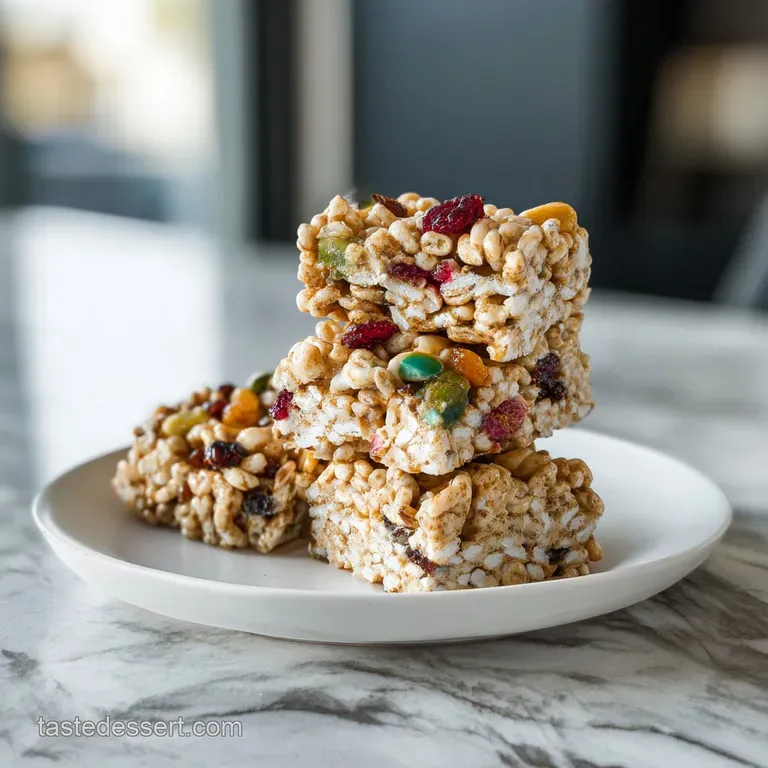
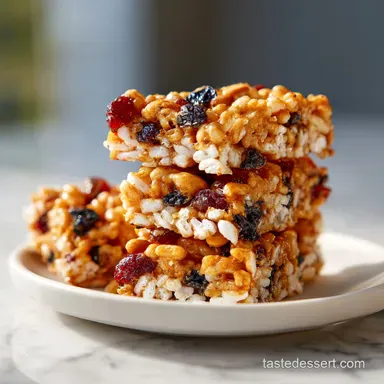
Chewy Rice Krispies Trail Mix Bars
- Time: Active 15 minutes, Passive 5 minutes, Total 20 minutes
- Flavor/Texture Hook: A velvety marshmallow pull with a salty, nutty shatter
- Perfect for: Hiking trips, school bake sales, or meal prep snacks
Mastering homemade rice krispies trail mix bars
I still remember the first time I tried to get creative with cereal treats. I was packing for a weekend camping trip and decided to throw every leftover nut and seed from my pantry into the pot. The result? A rock hard brick that nearly chipped a tooth.
I realized then that you can't just "add stuff" to marshmallows and hope for the best. You have to understand the balance between the sticky binder and the chunky add ins to keep that classic, airy crunch we all crave.
The smell of butter browning in a heavy pot is my favorite kitchen alarm clock. When you toss in those mini marshmallows and watch them deflate into a glossy, cloud like swirl, it is pure magic.
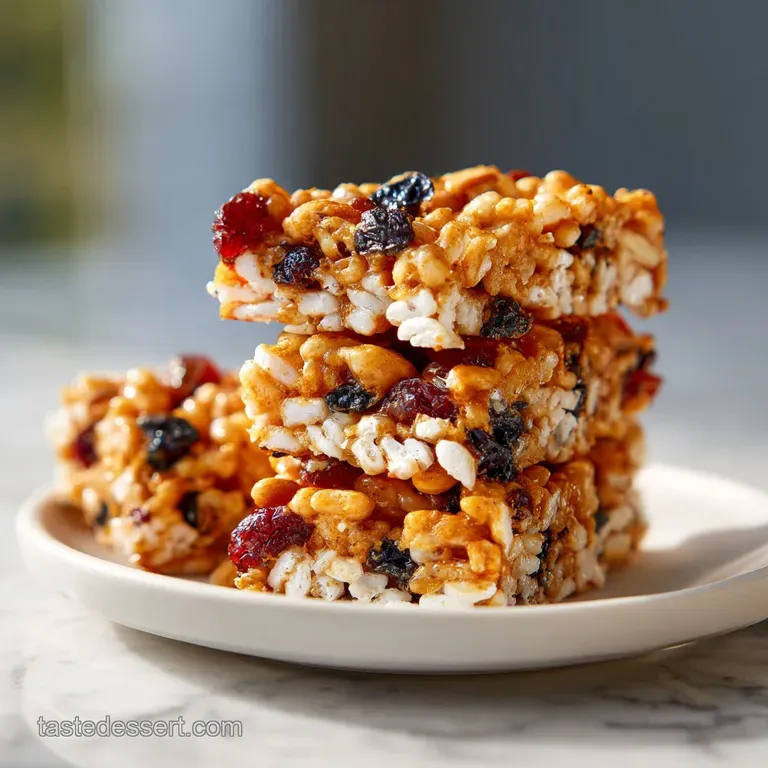
For these rice krispies trail mix bars, the secret isn't just the marshmallows it's the addition of creamy almond butter and a pinch of flaky salt. This combination creates a rich, "delightful" caramel like flavor that makes the bars feel like a gourmet treat rather than a childhood afterthought.
We've all been there: staring at a pan of treats that are either too gooey to hold or so dry they crumble the moment you touch them. I’ve spent months tweaking this ratio so you don't have to.
We are aiming for a bar that stretches when you pull it apart but has enough structural integrity to survive a backpack ride. Trust me, once you taste the combination of toasted pumpkin seeds and tart cranberries cloaked in that vanilla scented marshmallow, you’ll never go back to the blue boxed version again.
The Physics of the Pull
Fat Interface Stability: The addition of almond butter introduces extra lipids that coat the cereal, preventing the moisture in the marshmallows from making the rice "soggy."
Sucrose Recrystallization Control: Melting the marshmallows over low heat, rather than high, prevents the sugar from reaching a "hard crack" stage, ensuring the bars stay chewy instead of brittle.
Suspension Mechanics: Incorporating dense mix ins like almonds and pumpkin seeds requires a thicker binder, which is achieved through the grass fed butter emulsion.
Recipe Efficiency Comparison
| Feature | Fast Method (Microwave) | Classic Method (Stovetop) | The Result |
|---|---|---|---|
| Texture | Can become rubbery quickly | Consistently silky and aerated | Stovetop offers better control |
| Flavor | Flat and overly sweet | Deep, toasted, and complex | Browning butter adds "delightful" notes |
| Durability | Softens within 24 hours | Stays chewy for 3-4 days | Stovetop emulsion lasts longer |
There is something truly "transforming" about using the stovetop method. While the microwave is tempting for a quick fix, it often overheats the sugar, leading to a bar that shatters rather than bends. Taking those extra five minutes to melt everything gently in a single pot makes a world of difference in the final mouthfeel. If you enjoy that sticky, sweet cereal vibe, you should definitely check out my Froot Loops Treats recipe.
The Component Deep Dive
| Ingredient | Science Role | Pro Secret |
|---|---|---|
| Grass fed Butter | Provides the fat base for the marshmallow emulsion. | Brown the butter slightly until it smells nutty for extra depth. |
| Mini Marshmallows | Acts as the primary adhesive and structural "glue." | Use a fresh bag; older marshmallows lose their moisture and won't melt smoothly. |
| Creamy Almond Butter | Adds protein and healthy fats to stabilize the sugar bonds. | Stir it in right after the marshmallows melt to keep the texture velvety. |
| Flaky Sea Salt | Sharpens the flavor profile and cuts through the sugar. | Sprinkle half on top at the very end for a "shatter" of saltiness. |
Between the gooey marshmallows and the crispy cereal, the almond butter acts as a bridge. It provides a savory backbone that makes these bars incredibly addictive. Just like how I balance the savory notes in my Foolproof Japanese Curry recipe, these bars need salt and fat to really shine. Without it, you're just eating sugar on sugar.
Necessary Elements and Swaps
- Crisp Rice Cereal (4 cups / 120g): The airy foundation. Why this? Provides the signature "snap" and "crackle" without being heavy.
- Substitute: Puffed quinoa for a nuttier, gluten-free earthy vibe.
- Fresh Mini Marshmallows (10 oz / 285g): Our sweet binder. Why this? Minis melt faster and more evenly than large ones.
- Substitute: Vegan marshmallows (like Dandies), but watch the melt time closely.
- Unsalted Grass fed Butter (4 tbsp / 56g): The flavor carrier. Why this? Higher fat content than standard butter for a richer taste.
- Substitute: Refined coconut oil for a dairy-free option (adds a tropical hint).
- Salted Roasted Almonds (1/2 cup / 70g): The primary crunch. Why this? Roasting brings out the oils and creates a "shatter" texture.
- Substitute: Toasted pecans or walnuts if you prefer a softer nut.
- Dried Cranberries (1/2 cup / 60g): The chewy acid. Why this? Balances the sweetness with a tart, fruity punch.
- Substitute: Dried cherries or chopped apricots for a different tang.
- Raw Pumpkin Seeds (1/4 cup / 30g): The green "pop." Why this? Adds a subtle earthiness and great visual contrast.
- Substitute: Sunflower seeds work perfectly for a similar size.
- Semi sweet Chocolate Chips (1/2 cup / 90g): The indulgent finish. Why this? Semi sweet doesn't overpower the other trail mix components.
- Substitute: Dark chocolate chunks for a more mature, bitter edge.
- Pure Vanilla Extract (1 tsp): The aromatic lift. Why this? Bridges the gap between the butter and the sugar.
- Substitute: Almond extract (use only 1/4 tsp) for a marzipan like scent.
- Flaky Sea Salt (1/2 tsp): The flavor enhancer. Why this? Provides concentrated bursts of salt rather than a uniform saltiness.
- Substitute: Standard kosher salt, but reduce the amount by half.
- Almond or Peanut Butter (2 tbsp): The secret "chew" factor. Why this? Prevents the bars from becoming brittle as they cool.
- Substitute: Sunflower seed butter (SunButter) for a nut free alternative.
step-by-step Production Guide
- Prep the vessel. Grease an 8x8 inch square baking pan with butter or line it with parchment paper. Note: Leaving a "sling" of parchment makes it easy to lift the whole block out later.
- Melt the butter. Place the grass fed butter in a large, heavy bottomed pot over low heat until it begins to foam and sizzle.
- Liquefy the marshmallows. Dump in the 10 oz of mini marshmallows and stir constantly until they are completely smooth and glossy.
- Incorporate the "chew." Remove the pot from the heat and immediately whisk in the vanilla extract and the 2 tbsp of almond butter.
- Coat the cereal. Add the crisp rice cereal to the pot and fold gently with a silicone spatula until every grain is cloaked in white.
- Add the medley. Fold in the chopped almonds, dried cranberries, and pumpkin seeds until they are evenly distributed through the mixture.
- Temper the chocolate. Wait about 30 seconds for the heat to drop slightly, then quickly fold in the semi sweet chocolate chips. Note: Adding them too soon will cause them to melt and streak the bars.
- The gentle press. Transfer the mixture to your prepared pan and use a lightly greased spatula to flatten the top until the surface is level but not compressed.
- The final seasoning. Sprinkle the flaky sea salt evenly over the top of the bars while they are still warm and sticky.
- The patient wait. Let the bars sit at room temperature for at least 30 minutes until they are firm to the touch.
Perfecting the Outcome
Why Your Bars Are Rock Hard
The biggest culprit is heat. If you boil the butter and marshmallows or keep them on the stove too long, the sugar starts to turn into hard candy. Another mistake I once made was "packing" the mixture into the pan like I was building a sandcastle. You want to gently nudge the mixture into the corners.
If you press down with all your might, you crush the air pockets in the cereal, resulting in a dense, tooth breaking slab.
The Sticky Spatula Struggle
Dealing with marshmallow goo can be a nightmare. The trick is to keep your tools "slick." Rub a little bit of butter or a tiny drop of neutral oil onto your spatula before you start folding. If you find the mixture is sticking to your hands when you try to level it in the pan, lightly dampen your fingertips with water.
The water creates a temporary barrier that allows you to smooth the top without the "rice krispies trail mix bars" sticking to your skin.
| Problem | Root Cause | Solution |
|---|---|---|
| Bars fall apart | Not enough marshmallow binder | Ensure you use the full 10 oz bag; don't eye ball it. |
| Cereal is soggy | Added mix ins were wet | Always use dried fruits and toasted nuts; avoid "fresh" fruit. |
| Too sweet | Lacking salt or acid | Increase the cranberries or the sea salt topper to balance. |
Common Mistakes Checklist
- ✓ Freshness check: Use marshmallows that are soft in the bag; if they are stuck together, they are too old.
- ✓ Low and slow: Never turn the heat above low medium when melting the base.
- ✓ The cooldown: Don't put the bars in the fridge to speed up the setting; it makes the cereal go stale.
- ✓ Batch size: Stick to an 8x8 pan for thick, "delightful" bars; a 9x13 will result in thin, sad squares.
- ✓ Chocolate timing: Let the cereal cool for a minute before adding chips to keep the "dots" of chocolate intact.
Volume Adjustments
If you are making these for a big group, doubling the recipe is straightforward, but there are a few "techniques" to keep in mind.
Scaling Down (6 servings): Use a standard loaf pan (9x5 inch) instead of a square pan. Half the ingredients exactly. Since the volume is smaller, the marshmallows will melt even faster keep your eyes on the pot to prevent scorching.
For the half egg situations in other recipes, you'd be stuck, but here, it's just about cutting the measurements in half.
Scaling Up (24 servings): Double all ingredients and use a 9x13 inch pan. Note: When doubling, you might find the mixture gets "heavy" to stir. I recommend using your largest Dutch oven to ensure you have enough room to fold the cereal without it flying over the sides.
Keep the salt and vanilla at 1.5x the original recipe first, taste, and add more if needed; flavors can sometimes intensify when doubled.
Ingredient Shortcuts
| Goal | Shortcut | Trade off |
|---|---|---|
| Save Time | Use pre made trail mix | Might have uneven salt levels or ingredients you don't like. |
| Easy Clean up | Line pan with foil | Foil can sometimes stick to the marshmallows more than parchment. |
| No Nut Option | Use WowButter or SunButter | Adds a distinct "toasted seed" flavor instead of nutty notes. |
Ingredient Superstitions
There is a common belief that "marshmallows are just sugar, so they never go old." This is a total myth. Marshmallows are actually a delicate balance of gelatin and moisture. Over time, that moisture evaporates, leaving you with a gummy, tough cube that won't melt into a smooth sauce.
Always buy a fresh bag for this recipe.
Another myth is that you need to use a "cooking spray" for everything. While it works, buttering your pan and tools provides a much better flavor profile. The chemicals in some sprays can leave a metallic aftertaste that ruins the "delightful" vanilla notes of the trail mix bars. Trust the butter!
Preservation and Mindfulness
Storage: These "rice krispies trail mix bars" are best kept at room temperature in an airtight container. They will stay fresh and "velvety" for up to 5 days. If you find they are getting a bit firm toward the end of the week, a quick 5 second zap in the microwave will revive that gooey pull.
Freezing: You can actually freeze these! Wrap individual squares in plastic wrap and place them in a freezer bag. They stay good for up to 3 months. To eat, let them thaw on the counter for about 20 minutes. Do not thaw them in the oven, or you'll end up with a puddle.
Zero Waste: If you have a few crumbs or broken bits at the bottom of the pan, don't throw them away. They make an "amazing" topping for vanilla ice cream or can be stirred into your morning yogurt. Any leftover pumpkin seeds or almonds can be used to top a salad or added to your next batch of homemade granola. Learning how to season your pantry staples correctly means nothing ever goes to waste in a busy kitchen.

Recipe FAQs
Can I substitute brown butter for regular butter to enhance the flavor?
Yes, absolutely, but manage the heat. Browning the butter first adds a nutty, rich complexity that plain butter lacks, which perfectly complements the trail mix elements. Just be sure to cool the browned butter slightly before adding the marshmallows to avoid scorching the sugar.
How to prevent the bars from turning hard and brittle instead of chewy?
Melt marshmallows slowly over low heat and remove from the burner before incorporating mix-ins. High heat causes the sugar to crystallize into hard candy structures, destroying the chewy texture we want. If you master this slow melting principle, you'll have perfectly pliable treats, much like when working with dough for our Homemade Mochi Ice recipe.
Is it necessary to add nut butter if I am using other mix-ins?
No, it is not strictly necessary, but highly recommended. The nut butter acts as a secondary stabilizer, coating the cereal and adding healthy fats that prevent the final bar from drying out and crumbling over time.
How do I get perfectly square cuts without the bars sticking to my knife?
Use a large, sharp, non-serrated knife wiped with non-stick cooking spray or warm butter between each slice. For the cleanest cut, let the bars cool completely, about one hour, before attempting to slice them. A warm knife will drag the sticky marshmallow throughout the cross section.
What is the best way to store leftover bars to maintain their chewiness?
Store them tightly wrapped at cool room temperature in an airtight container. Refrigeration actually speeds up staling by drawing moisture out of the marshmallows, making the bars hard faster. They should easily last four to five days this way.
What can I use if I need a nut-free alternative for the almonds and peanut butter?
Substitute sunflower seeds for the nuts and use sunflower seed butter (SunButter) for the binder. This swap maintains a similar texture profile while completely eliminating the allergens. This approach is similar to adapting many recipes, such as using a dairy-free base in our Hodge Podge Soup recipe.
How should I adjust the recipe if I want to use a 9x13 inch pan instead of 8x8?
Double all ingredient quantities exactly and ensure you use a large enough pot to mix everything. Using a larger pan yields thinner bars, so the setting time will decrease slightly, likely needing only 20 minutes at room temperature to set.
Rice Krispies Trail Mix Bars
Ingredients:
Instructions:
Nutrition Facts:
| Calories | 264 kcal |
|---|---|
| Protein | 4.1 g |
| Fat | 11.7 g |
| Carbs | 38.6 g |
| Fiber | 1.8 g |
| Sugar | 25.2 g |
| Sodium | 179 mg |
