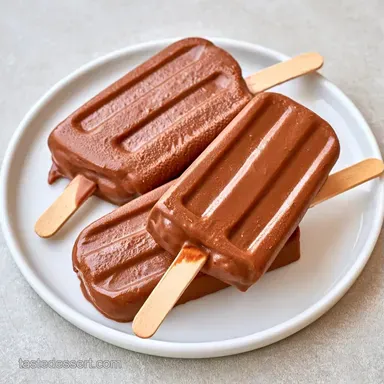
Guilt-Free Homemade Pudding Pops

- Time: 15 min active + 6 hours chilling
- Flavor & Texture: Chocolatey, light, and smooth
- Perfect for: Easy summer snacks
Pudding Pops
Most homemade frozen treats turn into hard, icy blocks that feel like frozen flavored water. They lack that decadent mouthfeel we want from a creamy dessert.
This version fixes that by aerating the dairy and using a specific stabilizer. It avoids the gritty texture found in many DIY popsicles.
These pudding pops bring back that nostalgic feel without the heavy sugar. They are light enough for a weekday treat but feel like a real dessert.
The Trick Behind the Texture
- Air Pockets: Whipping the milk and cream creates tiny bubbles. These bubbles break up the ice crystals so the treat doesn't feel like a rock.
- Pudding Base: The instant mix binds the water. This helps keep the water from separating and creating a grainy feel.
| Version | Main Fat | Texture | Best For |
|---|---|---|---|
| Classic | Heavy Cream | Dense & Heavy | Rich Dessert |
| This Version | Light Cream | Airier & Lighter | Daily Snack |
What You'll Need
| Ingredient | What It Does | Best Swap |
|---|---|---|
| Light whipping cream | Adds fat for a velvety feel | Full-fat coconut milk (thick) |
| Honey | Adds subtle sweetness | Maple syrup |
- 2 cups skim milk
- 3/4 cup light whipping cream Why this? Adds richness without being too heavy
- 1 package (3.4 oz) sugar-free instant chocolate pudding mix
- 1 tsp pure vanilla extract
- 1 tbsp honey
- 1/4 tsp fine sea salt
Recipe Specs
This recipe makes 8 servings. The total process takes 6 hours 15 mins, mostly spent in the freezer. It's a low-sugar option that keeps the creamy vibe of the original treats.
Bringing It Together
For a Fluffy Consistency
Combine the skim milk, light whipping cream, and vanilla extract in a large bowl. Use an electric mixer on medium-high speed for 2-3 minutes until the mixture is frothy and slightly thickened. This aeration is what keeps the pops from getting too icy.

For Maximum Flavor Integration
Sift in the sugar-free instant chocolate pudding mix and fine sea salt. Beat on low speed until the powder is fully incorporated and the mixture is glossy. Gently fold in the honey with a spatula. The base should look thick and smooth.

For a Perfect Freeze
Pour the mixture into popsicle molds. Leave about a quarter-inch of space at the top so the liquid can expand as it freezes. Tap the molds firmly on the counter to release any trapped air bubbles.
Insert the popsicle sticks and place them in the freezer for at least 6 hours until they feel firm to the touch.

How to Fix Common Problems
If your treats feel too "icy," you likely missed the whipping stage or used too much skim milk. The air bubbles from the mixer help limit large ice crystals, so the pops feel softer instead of icy.
When the sticks won't stay centered, you can freeze the molds for 30 minutes first, then insert the sticks. This lets them freeze in place before the rest of the liquid sets.
Fixing Icy Textures
Ensure you whip the cream and milk until frothy before adding the pudding powder.
Dealing with Mold Stick
Freeze the base partially for 30 mins before inserting sticks.
Preventing Overflow
Keep a 1/4 inch gap at the top of every mold.
| Problem | Root Cause | Solution |
|---|---|---|
| Icy feel | Not enough aeration | Whip dairy for full 3 mins |
| Stuck pops | Mold is too cold | Dip mold bottom in warm water |
| Dull flavor | Salt missing | Add a pinch of sea salt |
Freezing and Reheating Guide

Keep these in their molds or move them to a freezer-safe container lined with parchment paper. They stay fresh for up to 2 weeks.
Do not reheat these. Instead, let them sit at room temperature for 3-5 minutes before eating. This softens the outer layer and makes the texture more creamy.
Variations & Substitutions
To vary the flavor of your pudding pops, use vanilla or butterscotch instead of the chocolate mix. For a nutty addition, swirl in a tablespoon of melted peanut butter after the mixing is finished.
You can also drop a few fresh raspberries into the bottom of the mold for a bit of tartness. To create a marbled appearance, try layering two distinct flavors within the mold.
If you want a warm, rich dessert to contrast your frozen snacks, this sticky toffee pudding recipe is a perfect choice.
Your Questions, Answered
Can I use different pudding flavors?
Swap the chocolate mix for vanilla or butterscotch versions.
Tip: Swirl in melted peanut butter for a nutty twist.
How should I store these treats?
Keep them in the freezer until ready to serve.
Tip: Let them freeze for at least 6 hours or overnight to ensure they are firm.
Why is tapping the molds important?
Tapping removes trapped air bubbles to ensure a consistent texture.
Tip: Do this firmly on the counter before inserting the sticks.
Is it possible to include fruit?
You can add a few fresh raspberries to the bottom of each mold.
Tip: This provides a tart contrast to the sweetness of the chocolate.
How to make a marbled effect?
Layer two different flavors in the mold before freezing.
Tip: Use a thin skewer to gently swirl the layers together.
Creamy Chocolate Pudding Pops