The Ultimate Crunch Perfect Chocolatedipped Pretzel Rods for Any Occasion
- Why This Recipe Outshines Store-Bought Sweet & Salty Snacks
- Mastering the Perfect Chocolate Covered Pretzels: A Game Changer
- The Essential Components for Stellar Dipping
- Step-by-Step Guide to Flawless Coating and Setting
- Elevating Your Creation: Next-Level Customization Ideas
- Troubleshooting and Long-Term Stash Tips
- Recipe FAQs
- 📝 Recipe Card
Why This Recipe Outshines store-bought Sweet & Salty Snacks
There’s a certain magic that happens when the deeply satisfying crunch of a classic pretzel meets the velvety embrace of high-quality melted chocolate. While you can certainly grab a bag of pre-packaged sweet and salty snacks off the shelf, nothing, absolutely nothing, compares to the experience of crafting your own Chocolate Covered Pretzels .
This homemade approach allows you to control the quality of every component, moving beyond the waxy coatings and uneven coverage often found in mass produced versions. We are aiming for a superior snap, a perfect balance of salinity, and an aesthetic that makes these treats look worthy of any gourmet gift basket.
Forget the ordinary; we are elevating the humble pretzel rod into a truly memorable confection.
Mastering the Perfect Chocolate Covered Pretzels: A Game Changer
The journey to perfecting Pretzel With Chocolate is surprisingly straightforward, yet the resulting texture and flavour profile feel incredibly sophisticated. This process demystifies the art of dipping, ensuring that your final results are glossy, firm, and utterly irresistible.
The Irresistible Allure of Homemade Indulgence
The appeal of making Pretzels Chocolate Covered at home rests entirely in the ability to customize. You decide the chocolate percentage be it intensely dark or smooth milk and you select the supporting cast of toppings.
This recipe, yielding about 18 20 pretzel rods, focuses on simplicity paired with premium ingredients, meaning you get maximum flavour impact with minimal fuss.
Setting Expectations: Glossy vs. Dull Coating
One of the biggest visual differences between professional and amateur dipped treats is the gloss. A dull, streaky finish often occurs when chocolate is either overheated or contains traces of moisture.
To combat this, we rely on using quality melting chocolate, and for those chasing that true professional snap, we touch upon the importance of tempering (though we offer easy alternatives, too!). Achieving that mirror like sheen is key to that high end Chocolate Covered Pretzels Aesthetic .
Why Rods Offer the Best Dipping Experience
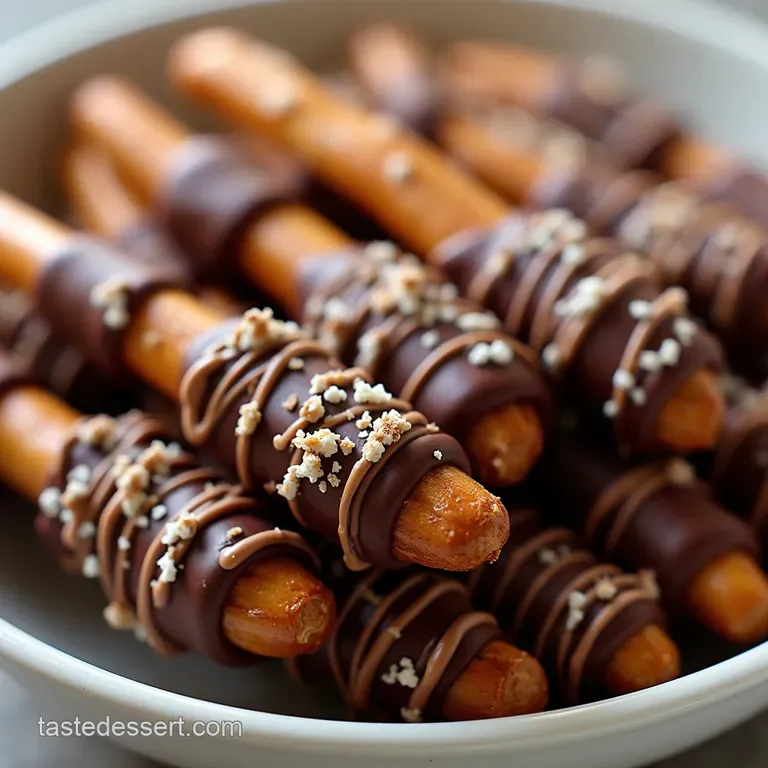
While twists or knots work well for small bites, for an elegant presentation and ease of handling, Chocolate Covered Pretzels sticks (rods) are the superior choice. They offer the perfect length for dipping about 80% of the rod, leaving a neat, uncoated handle area.
This makes the dipping process cleaner and provides a built-in, mess free way for guests to enjoy the finished product.
The Essential Components for Stellar Dipping

Creating superb Chocolate on Pretzels requires thoughtful selection of your primary ingredients. We aren't just throwing ingredients together; we are curating a flavour experience.
Selecting the Premier Chocolate for Superior Results
The quality of your chocolate dictates the final snap and flavour profile. For this recipe, start with 12 ounces (about 340 grams) of high-quality melting chocolate. If you opt for baking bars, chop them finely so they melt evenly. If using chips, look for higher quality brands.
If you want that ultra smooth, shiny coat that sets hard, consider adding one teaspoon of vegetable shortening or coconut oil; this slightly thins the chocolate, helping to reduce the final thickness and improve the sheen once set.
Tool Kit Essentials: What You Need Beyond the Pantry
Preparation extends beyond the ingredients. You’ll need a large baking sheet lined securely with parchment paper or silicone mats this is crucial for easy release once the coating sets. For the actual dipping, a tall, narrow glass or mug is ideal.
This container holds the melted chocolate vertically, allowing you to submerge the pretzel rod deeply without needing an overly large, shallow bowl which wastes chocolate and makes coating uneven. You will also want a wooden skewer or a chopstick to act as your temporary handle during the dipping stage.
Choosing Your Pretzel Foundation: Crunch Factor Matters
For the base, standard, hard pretzel rods are the winner. Ensure they are uniform in size for consistent results. Before beginning, check that your rods are completely dry and unbroken. You are aiming for a solid, salty crunch that can stand up to the richness of the coating.
Having a selection ready ensures you can move quickly once the chocolate is perfectly melted.
Optional Finishes: Sprinkles, Drizzles, and More Flair
The fun begins when you personalize your Chocolate Covered Pretzels Designs . Have your chosen toppings ready in small bowls near your dipping station. Simple rainbow sprinkles or elegant nonpareils add immediate visual appeal.
For an extra layer of sophistication, a sprinkle of flaky sea salt (Maldon is excellent) just after dipping brings out the chocolate’s depth beautifully.
Related Recipes Worth Trying
- The Classic Snap Perfect Salted Chocolate Covered Pretzels — Make irresistible homemade chocolate covered pretzels that taste better than storebought This easy recipe guarantees a thick velvety coating and perfect...
- Foolproof Classic Christmas Almond Toffee with Dark Chocolate — Get that perfect snap with our trusted recipe for Classic Christmas Toffee This buttery rich Homemade Toffee Recipe is easier than you think
- Foolproof Homemade English Toffee Recipe with Dark Chocolate — Learn how to make genuine shatteringly crisp Homemade Toffee Bars at home This classic toffee recipe guarantees a perfect snap every time Get the secrets now
Step-by-step Guide to Flawless Coating and Setting
With your materials prepped, the active cooking time is short about 20 minutes but precision in melting and dipping is everything for perfect Chocolate Covered Pretzels .
Prep Work: Creating the Ideal Dipping Surface
First things first: line that baking sheet with parchment paper. Have your bowls of optional toppings ready to go; speed is essential once the rod is dipped. Set up your dipping vessel (the tall glass) filled with your chocolate mixture.
Melting Magic: Tempering Chocolate for a Hard Shell
If you are aiming for a standard, easy coating, the microwave method is best. Place your finely chopped chocolate and the optional shortening into a microwave safe bowl. Heat in 30-second bursts, stirring vigorously after each interval.
It is vital not to overheat; stop stirring when a few small lumps remain, as the residual heat will melt them completely into a silky smooth consistency. If you skip tempering but use high-quality chocolate, you will still achieve excellent results for a home Chocolate Covered Pretzels recipe .
The Art of the Dip: Coating Each Rod Perfectly
Take one pretzel rod and hold it near the end. Dip it into the melted chocolate, swirling gently until about 80% is submerged. The goal is full coverage without making the coating too thick. Lift the rod straight up, allowing the excess chocolate to drip back into the container.
A gentle tap against the side of the glass helps encourage those final drips to fall away, ensuring a clean line where the chocolate meets the pretzel handle.
Setting Up Shop: Ensuring Your Chocolate Covered Pretzels Harden Beautifully
Immediately after dipping, while the chocolate is still wet, roll the coated section in your sprinkles or sprinkle with sea salt. Then, lay the rods horizontally onto your prepared parchment lined sheet. It’s vital they lie flat and not touch one another.
Pop the entire sheet into the refrigerator for 45 to 60 minutes. This chilling period ensures the coating sets firmly, delivering that satisfying crunch when you bite into your Pretzel Covered Chocolate creation.
Elevating Your Creation: Next Level Customization Ideas
Once you master the basic coating technique, the sky’s the limit for Chocolate Covered Pretzels Designs . These treats are endlessly adaptable for parties, holidays, or just because.
For a dazzling look, melt white chocolate separately. Dip the dark chocolate coated rods, and while the white chocolate is wet, use a fork to drizzle thin lines of contrasting colour across the entire surface creating a fantastic zebra effect that significantly boosts the overall Chocolate Covered Pretzels Aesthetic .
For a sophisticated twist on the salty theme, infuse your melted dark chocolate with a pinch of smoked paprika or a drop of high-quality orange extract before dipping. If you plan on making Chocolate Covered Pretzels bulk for an event, consider using coloured candy melts (like festive greens or reds) instead of pure chocolate, as they set very quickly without refrigeration.
Troubleshooting and Long Term Stash Tips
Even the best recipes occasionally throw a curveball. Knowing how to address minor hiccups ensures your Chocolate Covered Pretzels look as good as they taste.
Seasonal Variations: Turning Pretzels into Holiday Happenings
Holidays are prime time for these dipped delights. For Christmas, ditch the standard sprinkles for crushed peppermint candies or finely chopped candied pecans. For Easter, dip in pastel candy melts. For Halloween, use black or orange candy melts and decorate with mini candy eyeballs while the coating is still tacky.
Storage Secrets: Keeping That Sweet Crunch Intact
The key to storing your finished Pretzel With Chocolate is avoiding moisture and temperature fluctuations. Once completely firm, transfer the rods to an airtight container. They should be kept in a cool, dark pantry, not the refrigerator, unless your kitchen is extremely warm.
Refrigeration can sometimes cause condensation when brought back to room temperature, leading to a sticky exterior. They typically stay crisp and fresh for up to two weeks.
Addressing Common Pitfalls: Why Is My Chocolate Streaky?
If your chocolate sets dull, patchy, or streaky after cooling, it’s almost always due to moisture contamination during the melting stage (known as 'seizing') or the chocolate cooling too slowly or unevenly. To minimize this, ensure all utensils and your dipping glass are impeccably dry.
If you are not tempering, adding that small amount of coconut oil will significantly improve the sheen and prevent streaking, leading to a much better result for your Pretzels Chocolate Covered .
Nutritional Insights and Serving Suggestions
While certainly an indulgence, these treats are relatively light when portion controlled, yielding about 180 210 calories per rod depending on the chocolate used. They pair beautifully with strong black coffee or a dry sparkling wine, as the acidity cuts through the sweetness.
For presentation, pile them high on a platter; they look fantastic served alongside fresh fruit or small pots of salted caramel for dipping on the side.
Recipe FAQs
How do I stop my chocolate from seizing when making Chocolate Covered Pretzels?
The dreaded seize is usually down to moisture! Make absolutely certain that your bowl, spatula, and even the air around you are bone dry. If you are using a double boiler, ensure no steam or water droplets splash into your lovely melted chocolate, or it will turn grainy instantly.
Keep everything dry as a bone, and you'll be fine!
Can I make these ahead of time, or do Chocolate Covered Pretzels go soggy?
You are in luck; these keep brilliantly well! Once the chocolate is completely set (give them a good hour or so away from the fridge if you can), store them in an airtight container at cool room temperature.
If your kitchen is very warm, the fridge is fine, but let them sit out for 10 minutes before serving for the best texture.
My chocolate coating looks dull, not shiny like the ones in the shops what am I doing wrong?
That high gloss finish usually comes from properly tempered chocolate, which is a bit fiddly, bless it. For an easier cheat, add about a teaspoon of coconut oil or vegetable shortening to your chocolate when melting it; this helps improve the sheen and makes the chocolate thinner for easier dipping.
What's the best way to decorate my Chocolate Covered Pretzels if I'm in a rush?
Speed is key when decorating, as the chocolate sets fast! The absolute quickest method is a heavy sprinkle of high-quality flaky sea salt immediately after dipping it adds that sophisticated salty kick without any drying time needed. Otherwise, have your sprinkles ready to go in a shallow dish for a quick roll.
I want a healthier option can I use dark chocolate instead of milk chocolate?
Absolutely, go for it! Using good quality dark chocolate (70% cocoa or higher) will drastically cut down on the sugar content, offering a much more sophisticated, less sickly sweet treat. The slight bitterness of the dark chocolate pairs wonderfully with the saltiness of the pretzel, making them taste rather posh!
Perfect Chocolate Pretzels 2

