No Bake Chocolate Pudding Pie with Greek Yogurt
- Time: 15 min active + 4 hours chilling
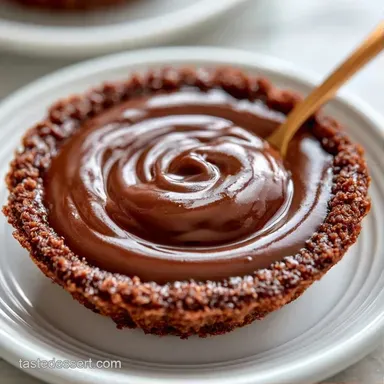
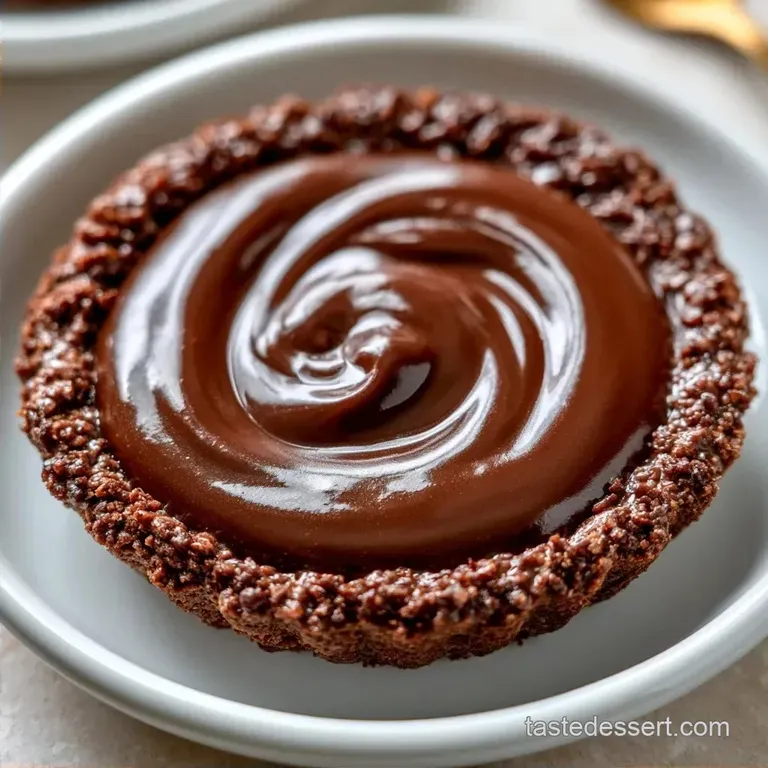
- Flavor/Texture Hook: Rich, mahogany dark chocolate with a crisp wafer base
- Perfect for: Last minute dinner parties or summer cravings
The smell of cocoa powder hitting the air always reminds me of my grandmother's kitchen, though she actually used a stove. I spent way too long trying to recreate that deep chocolate taste without spending an hour hovering over a pot of boiling milk.
It’s a lot of work for something that often ends up too runny or too stiff.
I eventually figured out that using chilled Greek yogurt gives you that same weight and richness without the hassle. This No Bake Chocolate Pudding Pie hits that sweet spot where it feels decadent but doesn't require a degree in pastry arts to get right.
You can basically throw this together in a few minutes and let the fridge do the heavy lifting. It's a reliable win when you want something that looks like you spent all afternoon on it, but you actually spent it on the couch.
No Bake Chocolate Pudding Pie Basics
Chilled Yogurt: The cold temperature keeps the filling stable while the thickness prevents it from leaking into the crust. Flash Setting: Putting the crust in the freezer for 10 minutes locks the butter in place so the base stays crisp.
| Method | Time | Texture | Best For |
|---|---|---|---|
| No Bake | 15 min active | Fudgy & Dense | Quick wins |
| Stovetop | 45 min active | Smooth & Soft | Classic comfort |
If you're into no bake treats, my peanut butter cream pie is another great option that uses a similar chilled logic.
What Each Ingredient Does
| Ingredient | What It Does | Best Swap |
|---|---|---|
| Greek Yogurt | Provides structure and tang | Labneh (for thicker set) |
| Cocoa Powder | Gives the deep chocolate flavor | Melted dark chocolate |
| Maple Syrup | Natural sweetener and binder | Honey (adds floral notes) |
| Chocolate Wafers | Creates a crunchy, dark base | Oreo crumbs |
Ingredients
- 1.5 cups (150g) crushed chocolate wafers Why this? High cocoa content matches the filling.
- 3 tbsp (42g) melted unsalted butter Why this? Binds the crumbs into a solid shell.
- 1 tbsp (12g) coconut sugar Why this? Adds a hint of caramel depth.
- 1 cup (240g) plain Greek yogurt, chilled Why this? Acts as the thickening agent.
- 0.5 cup (60g) unsweetened cocoa powder Why this? Provides the core chocolate intensity.
- 0.5 cup (120ml) pure maple syrup Why this? Liquid sweetener that blends smoothly.
- 1 tsp (5ml) pure vanilla extract Why this? Rounds out the bitterness of cocoa.
- 0.25 tsp (1.5g) sea salt Why this? Cuts through the richness.
- 2 oz (56g) dark chocolate (70% cocoa), shaved Why this? Adds a textural contrast on top.
Recipe Specs
This recipe makes 8 servings. You'll spend 15 minutes on the active prep and zero minutes cooking, though you have to wait 4 hours for the total set time.
The nutritional breakdown per slice is 263 kcal, with 6.1g of protein, 10.1g of fat, and 40.3g of carbohydrates. It also provides 4.2g of fiber, which is a nice bonus for a dessert.
Necessary Kitchen Tools
You don't need anything fancy here. A 9 inch pie plate is the standard. Use a large mixing bowl for the filling and a smaller one for the crust. A measuring cup is helpful for pressing the crust down firmly. A sifter is non negotiable for the cocoa powder, or you'll end up with bitter clumps in your filling.
Step by step Assembly

Phase 1: Constructing the Base
- Combine the crushed chocolate wafers, melted butter, and coconut sugar in a bowl until the mixture resembles wet sand.
- Press the mixture firmly into the bottom and up the sides of a 9 inch pie plate using the bottom of a measuring cup for a compact crust.
- Place the crust in the freezer for 10 minutes to flash set.
Phase 2: Whipping the Filling
- In a large bowl, beat the chilled Greek yogurt and maple syrup until smooth and aerated.
- Sift in the cocoa powder and sea salt to prevent clumps, then fold gently with a spatula until the color is a deep, uniform mahogany.
- Stir in the vanilla extract until fully incorporated and the mixture looks glossy.
Phase 3: Setting and Finishing
- Pour the chocolate filling into the chilled crust, smoothing the top with a spatula.
- Cover with parchment paper touching the surface and refrigerate for 4 hours to set. Note: This prevents a skin from forming on the chocolate.
- Garnish with shaved dark chocolate before serving.
Fixing Common Issues
The most common issue is a filling that doesn't quite hold its shape. Usually, this happens because the yogurt wasn't cold enough or the cocoa powder was skipped in favor of something else. If it's too soft, just pop it back in the fridge for another hour.
Another snag is the crust crumbling. This usually means the butter didn't fully coat the crumbs or it wasn't pressed hard enough. Use a flat object to really jam those crumbs into the corners of the plate.
Why Your Filling Is Runny
If the filling feels like a sauce instead of a pudding, it's likely a temperature issue. Ensure your yogurt is straight from the fridge.
| Problem | Root Cause | Solution |
|---|---|---|
| Filling too soft | Yogurt was warm | Chill for 2 extra hours |
| Clumpy texture | Cocoa not sifted | Whisk vigorously or strain |
| Soggy crust | Not flash frozen | Freeze base 10 mins first |
Adjusting the Yield
If you want a smaller treat, you can halve the recipe and use a 6 inch tart pan. Reduce the chilling time by about 20%, but still give it at least 3 hours. If you're beating a single egg for a different variation, beat it first then measure out half.
For larger crowds, you can double the filling and crust. Use two 9 inch plates rather than one deep dish to ensure it sets evenly. I only increase the salt and vanilla to 1.5x the original amount, as too much can overpower the chocolate.
| If you want... | Do this... |
|---|---|
| Less sweetness | Reduce maple syrup by 2 tbsp |
| Extra richness | Add 1 tbsp melted butter to filling |
| Nutty flavor | Use almond flour in the crust |
Debunking Pie Myths
Some people think you need gelatin to make a no bake pie set. That's not true here. The proteins in the Greek yogurt and the starch in the cocoa powder create enough structure on their own.
Another myth is that you have to use store-bought pudding mix for a "pudding pie." While that works, using real ingredients gives you a much cleaner taste and avoids that artificial aftertaste.
Storage Guidelines
Keep the pie in the refrigerator, covered with parchment or plastic wrap. It stays fresh for up to 4 days. After that, the crust starts to lose its snap.
You can freeze this for up to 2 months. Slice it first, then wrap each piece in foil and place them in a freezer bag. To eat, let a slice thaw in the fridge for 2 hours.
For zero waste, don't toss the leftover chocolate shavings. Stir them into your morning oatmeal or melt them over some sliced bananas for a quick snack.
Making the Pie Pretty
To get clean slices, dip your knife in hot water and wipe it dry between every single cut. This prevents the chocolate from sticking and smudging the crust.
The shaved chocolate on top is a must for the look, but you can add a few fresh raspberries for a pop of color. The tartness of the berries cuts through the richness of the No Bake Chocolate Pudding Pie perfectly.
For a different vibe, you could try a chocolate souffle if you're hosting a formal dinner, but for a casual get together, this pie is the way to go.
Mixing Up the Flavors
If you want to change the flavor profile, try adding a tablespoon of instant espresso powder to the filling. It doesn't make it taste like a latte, but it makes the chocolate taste "darker" and more intense.
You can also swap the chocolate wafers for Graham crackers. It changes the base to a lighter, honey like flavor that contrasts the dark filling.
For a Mocha Twist
Stir in 1 teaspoon of espresso powder during step 5. This enhances the cocoa.
For a Peanut Butter Swirl
Warm 2 tablespoons of peanut butter and drizzle it over the filling before chilling. Use a toothpick to swirl it in.
For a Vegan Version
Swap the butter for coconut oil and use a plant based Greek style yogurt (like almond or soy). Ensure the chocolate wafers are dairy-free.
Recipe FAQs
How long should I refrigerate the pie before serving?
Refrigerate for 4 hours. This gives the Greek yogurt and cocoa mixture enough time to set so you get clean, professional slices.
Can I freeze this dessert for long term storage?
Yes, for up to 2 months. Slice the pie first, then wrap individual pieces in foil and store them in a freezer bag for easy serving.
How to avoid lumps when adding cocoa powder?
Sift the cocoa powder and sea salt directly into the bowl. Fold the mixture gently with a spatula until the color is a deep, uniform mahogany.
Is it true that I must bake the crust for it to hold its shape?
No, this is a common misconception. Pressing the mixture firmly and flash setting it in the freezer for 10 minutes makes the crust perfectly stable.
How to ensure the top of the pie stays smooth?
Cover the filling with parchment paper. Make sure the paper touches the surface of the chocolate directly to prevent a skin from forming during refrigeration.
How long does the pie stay fresh in the fridge?
Up to 4 days. Keep the pie covered with parchment or plastic wrap to ensure the crust maintains its snap.
Can I use a different brand of chocolate wafers for the crust?
Yes, any chocolate wafer works. If you enjoyed the rich cocoa profile here, see how we use a similar flavor balance in our homemade Oreos.
No Bake Chocolate Pudding Pie